Pages

Showing posts with label Joyful Winter 6x6 Paper Pad. Show all posts

Sunday, 10 May 2026

Berry Sweet Birthday Wishes!

Hello Tea Timers!

Michelle from the Design Team here and today I am sharing the most deliciously cute birthday card featuring the sweetest little bunny perched right on top of a towering strawberry shortcake. This one is an absolute treat from top to bottom!

Supplies used: 

Fruitful Friends

Love Is In The Air

Birthday Cake

A5 Woodgrain Clear Stamp

Joyful Winter Paper Pad


I started with a pretty pink gingham background which gives the card such a fresh and summery feel straight away. It is the perfect backdrop to make all those gorgeous reds and greens really pop!

The star of the show is this magnificent stacked shortcake layered up with jam, cream and the most beautifully coloured sponge. Plump strawberries and little daisy flowers are tucked in all around it, and sitting right on top is our adorable bunny wearing the cutest strawberry hat. 

The whole scene sits on a woodgrain shelf at the bottom of the card which grounds everything nicely and gives it that lovely rustic, homely feel. Scattered strawberries around the base of the cake add even more fruity fun and fill the space beautifully.

To finish it all off, the "Birthday Wishes" sentiment is heat embossed in white onto a bold red banner, which ties in perfectly with all the strawberry tones and gives the card a really punchy, celebratory finish. The whole design is framed with a stitched scallop border for that soft, sweet finishing touch.


This card is so berry perfect for any birthday and guaranteed to make someone feel extra special on their big day!


Michelle

Friday, 16 May 2025

Sending Love


Happy Friday! DT Annalisa here and I'm excited to share a card I created using the Oops a Daisy stamp set from Time For Tea Designs. This adorable set features kitties and flowers, two of my absolute favourites!

I started by ink-blending Kitsch Flamingo onto white cardstock, which I then die-cut using the Sweet Scalloped Dies. To add some texture, I applied white splatters using Picket Fence Distress Spray Stain before attaching the panel to a card base with double-sided tape.


Next, I trimmed patterned paper from the Joyful Winter Paper Pad to fit within the stitched lines on the pink panel and secured it with double-sided tape.

For the heart design, I die-cut Ranger Distress Watercolour Cardstock with the Heart Nesting Dies. To add colour, I used Saltwater Taffy, Picked Raspberry, Tattered Rose, and Spun Sugar Distress Watercolour Pencils. I soaked the pencils in water, scribbled the colours onto acetate, and then spritzed the acetate with water. After that, I pressed the acetate onto the watercolour paper repeatedly, heat-setting and spritzing with water as needed. I also incorporated Mica Spray Stains in Cocktail Party and Sugary Gumdrop for extra shimmer.


Using liquid glue, I adhered the heart to the card base.

I then stamped images from three stamp sets: Oops a Daisy,  Fruitful Friends and Squeeze the Day. I colored these images with Copic markers and added accents with a white gel pen.


Finally, I used liquid glue to attach the stamped elements and sentiment, completing the card.

Thank you so much for visiting my blog! Don’t forget to use my discount code T4TANNALISA10 when you shop at Time For Tea Designs for 10% off your order.

Sunday, 15 December 2024

Merry Christmas

  Hi Friends!

I’m Patricia and today I share you a new Christmas card with  Sweet Christmas stamp set.


I've created this card with Scalloped Circle Dies, on of them I've used with Joyful Winter 6x6 Paper Pad and the other I've used Distress Oxide Ink (Spun Sugar) and liquid inks for splash on.


For the sentiment I've used the White Velvet Alpha Stickers


Thank you so much for reading my blog post. Remember to use my discount code T4TPATRICIA10 when you visit the Time For Tea Designs shop to get 10% off your order. Happy Crafting! 

Friday, 13 December 2024

Have A Sweet Christmas


Happy Friday, DT Annalisa here today
! I used the new Sweet Christmas stamp set from Time For Tea Designs to create a pastel pink Christmas card. I really enjoyed incorporating non-traditional Christmas colours into this project.

To begin, I die-cut Distress White Heavy cardstock by Ranger using the Wonky Window Cover Die. I then ran it through my Big Shot a second time with the Snow Flurry Cover Die, which creates a lovely stitched pattern that I love!

Next, I ink-blended the panel with Saltwater Taffy Distress Oxide and my Beautiful Blender Brushes. After that, I sprayed Sugary Gumdrop Distress Mica Stain onto the panel to add a beautiful shimmer.

I trimmed paper from the Joyful Winter Paper Pad to fit a card base measuring 5 3/4 inches by 4 1/8 inches and adhered it using double-sided tape.

For the pink panel, I applied 1 mm double-sided foam tape to the back before attaching it to the card base.

I stamped and coloured several images from the Sweet Christmas set using Copics and cut them out with the Brother Scan N Cut SDX125e. To add some detail, I used a white gel pen for accents with a Gelly Roll Pen.


I placed the stamped images in the openings of the card using 1 mm double-sided foam tape. I also added sparkles to some images using a Quickie Glue Pen and Lawn Fawn Prisma Glitter.

Finally, I stamped the sentiments, cut them out with the A6 Simple Nesting Dies, and adhered them to the card with liquid glue.


Thank you so much for reading my blog post. Remember to use my discount code T4TANNALISA10 when you visit the Time For Tea Designs shop to get 10% off your order.

Sunday, 8 December 2024

Sweet Christmas

 Hi Friends!
I’m Patricia and today I share you a new Christmas card with  Sweet Christmas stamp set


I've created a Slim Card with some characters of set, I've colored with Copic Markers.

For the background I've used Distress Oxide ink Spun Sugar color and liquid inks for splash on.


The sentiment in the center of the card, I've created with Joy Stitched Sentiment die and Joyful Winter 6x6 paper pad


Thank you so much for reading my blog post. Remember to use my discount code T4TPATRICIA10 when you visit the Time For Tea Designs shop to get 10% off your order. Happy Crafting! 

Sunday, 24 November 2024

Joy with Seasons Tweetings

 Hi Friends!
I’m Patricia and today I share you a new card with new Christmas Release Seasons Tweetings A6 Stamps


For this card I've combined different papers from Joyful Winter 6x6 Paper Pad. I use from the background and sentiment with de Joy Stitched Sentiment die.


Also, I use the Simple Stitched Circle dies for created a "window" in a middle of the card and place the pair of birds, they were going to be the protagonists of the card but then I decided to put them all 😁


For coloring I use the Copic Markers. 
And finished I decorated with some enamel dots 
Thank you so much for reading my blog post. Remember to use my discount code T4TPATRICIA10 when you visit the Time For Tea Designs shop to get 10% off your order. Happy Crafting! 

Sunday, 10 November 2024

Let's Party!

 Hi Friends!

I’m Patricia and today I share you a new card with Happy Hump Day Stamp set and coordinated dies and the Let’s Party Sentiment Die.


I’ve used directly a mini lawn fawn ink in yellow color (sunflower tone) by rubbing the pad on the card stock directly to make the background. I like the effect and with mini pad is more easy to go through it a few times.


For the principal sentiment I’ve used the Let’s Party Sentiment Die and one second sentiment from the stamp set. I’ve die cut several layers to create a false chipboard. For the first layer, I’ve used the Joyful Winter 6x6 paper pad, the rest is white card stock .


All stamps are coloring with Copic Markers.


Thank you so much for reading my blog post. Remember to use my discount code T4TPATRICIA10 when you visit the Time For Tea Designs shop to get 10% off your order. Happy Crafting! 

Tuesday, 17 May 2022

New Home A2 card


Hi Tea Timers!

How are you enjoying the new release? I had a blast making the samples and I can't wait to share all my projects with you! 

Today I'm taking you through how I made this New Home A2 card.


For my background I used the Sweet Summer and Joyful Winter paper pads. They are super versatile and work in many combinations. I went for the wood effect for the wall paper and a stripy one for the floor. I mounted the pattern paper on an A2 card base, leaving a thin white border all around.

Next, I stamped the couch, lamp and window from Home is where the heart is stamp set and coloured them in. I used the matching dies to cut them and added some white highlights. I added them to my card base using foam tape.

For the sentiment I used the New Home Sentiment Die and cut the shadow in white card stock. For the sentiment I used a yellow cardstock and die cut it 3 times. I glued them together and then used the negative from the sentiment die to help me glue them on the shadow in the right places. 

I glued the sentiment at the top of the card and used a white gel pen to add some extra details.

I hope you like today's card and I can't wait to see what you create with the new release. If you've not had a chance to get your hands on any of the new products yet there's still time and I also have a 10% discount code - T4TMIKI10.

Until next week!

Hugs,

Miki

Tuesday, 8 February 2022

Let's Spoon note cards

Hi friends! It's Miki here and today I have some super cute note cards to share with you. I used the Let's spoon stamp & die set to create these and I think they're so adorable!

I started by stamping my images - I picked the pizza, the spoons, the light bulb and the switch and die cut them using the matching dies. I then coloured them in using my Spectrum Noir Illustrator markers and added some white highlights. 

Next, I cut some 3.5" x 3.5" panels and used a stencil to ink blend an abstract background. The one that I used is no longer available, but the Boho Tiles stencil would work just as well. The distress oxides that I chose are:

  • Cracked Pistachio
  • Kitsch Flamingo
  • Tumbled Glass
Next, I stamped and embossed the matching sentiments in white on black cardstock and used the dies to cut them out.

To assemble the notecards I used some pattern paper from the Joyful Winter paper pad, glued it to 4"x4" card bases and added the ink blended background on top with foam tape. I then added my images on top and the sentiments, glued some heart gems and that was it.

These note cards were super quick and fun to make and I think they're perfect to give to your special someone for Valentine's day.

I'm up on the T4TD Instagram page with a reel showing you the process so make sure to check that out!

If you shop on the T4TD website, please remember to use my code T4TMIKI10 for 10% off your whole order!

Hugs,
Miki

Sunday, 23 January 2022

Cutie Pie

 Good afternoon Teatimers,

I hope you've enjoyed the new release? Jo certainly knocks it out of the park with each release doesn't she! This release is just perfect for Valentines Day or Anniversarys or even just show some love ❤ 

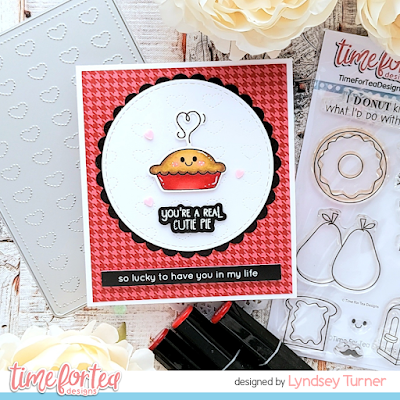
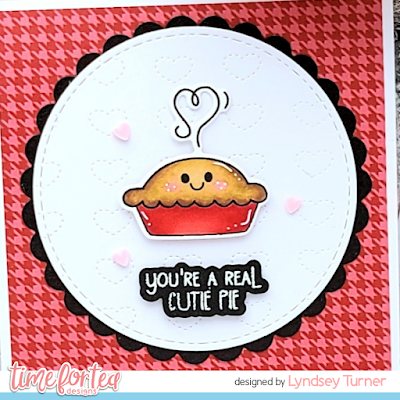
Today I'm sharing this sweet little cutie pie card with you. This adorable little image from the We go together stamp and die set is just the cutest!


To start as always I stamped and coloured my images using my Spectrum Noir markers (colours listed below in order of lightest to darkest)

Pie - EB2, GB8,  GB11, GB10 

Dish - CR7,  DR5,  DR6 


To card was simple to make I trimed a 6x6 card blank to 12cm wide and added a piece of paper from the Joyful Winter 6x6 Paper Pad to front making sure to trimed down to leave a small border. 

I die cut the Dotty Hearts Cover Plate from white card before cutting out using a Circle Nesting Die. This was matted onto to a piece of black card cut out using a Scalloped Circle Nesting Die. I stamped the sentiment on black card and embossed in white ink before using the matching die to cut out.

To finish I added a sentiment from the Brighter Days Sentiments and a few clay hearts around the image.

Thanks for joining me here on the blog today,  don't forget to use my code T4TLYNDSEY10 for 10% off your order in store. 

Enjoy the rest of your weekend 

Lyndsey x


Sunday, 16 January 2022

Love ya lots!!

 Good afternoon Teatimers,

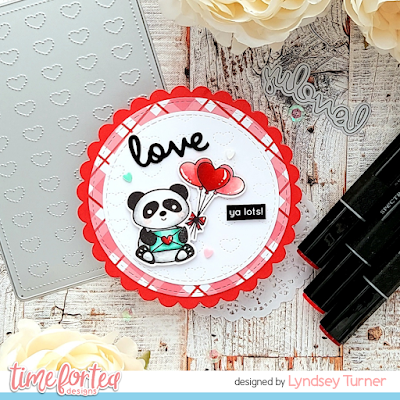
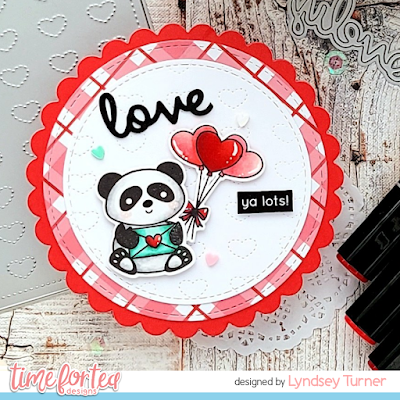
I'm sharing this cute little circle card with you today featuring one of the adorable pandas from the Pandamonium Party stamp set. I thought this sweet little fella with his love letter would be perfect for a Valentines Day make.

To start I coloured my images using my Spectrum Noir markers (colours listed below in order of lightest to darkest)

Panda - IG1, IG3, IG5 

Red - CR7,  DR5,  DR6

Pink - CR3, CR5, CR6 

Green - GT1, GT2, GT3 

To create the shaped card I cut a scalloped circle from a red card blank making sure to overlap the die over the fold. I then cut another circle to add to the front. 

I die cut the Dotty Hearts Cover Plate from white card before cutting out a circle using the Circle of love Nesting Dies. This was then added to a larger circle cut from a piece of paper from  the Joyful Winter 6x6 Paper Pad and finally added onto the card.

I added my cute panda to the front along with some balloons from the Smitten Kitten stamp set. I used the 'Lovely' from the Slimline Scalloped Nesting Dies cutting off the LY to leave the word LOVE this was die cut 3 times to give dimension. Finally I used one of the Brighter Days Sentiments to complete my message.

Thanks for joining me here on the blog today, don't forget to use my code T4TLYNDSEY10 for 10% off your order in store.

Enjoy the rest of your weekend 

Lyndsey x

Thursday, 23 December 2021

Jolly Coffee Christmas


Happy Christmas Eve everyone! I hope you all have a wonderful day and a happy Christmas tomorrow. Thank you so much for your support throughout the year.

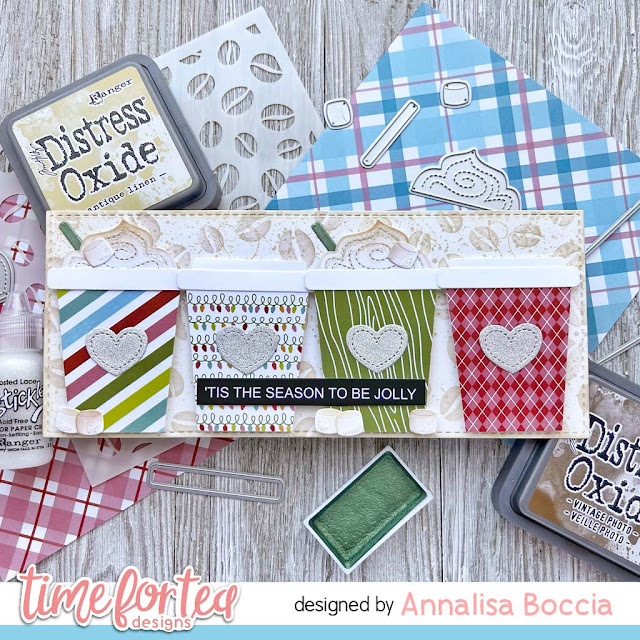
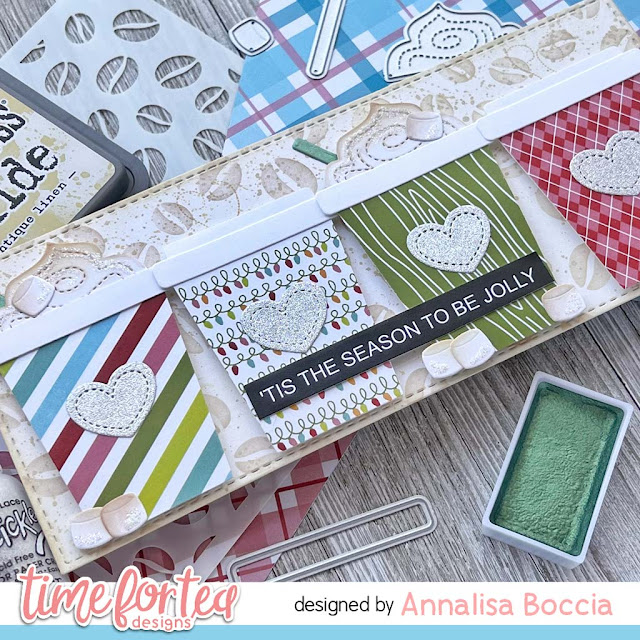
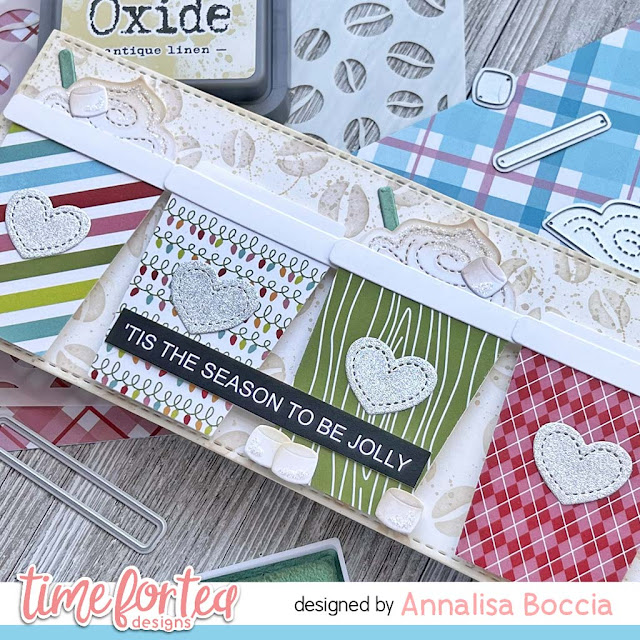
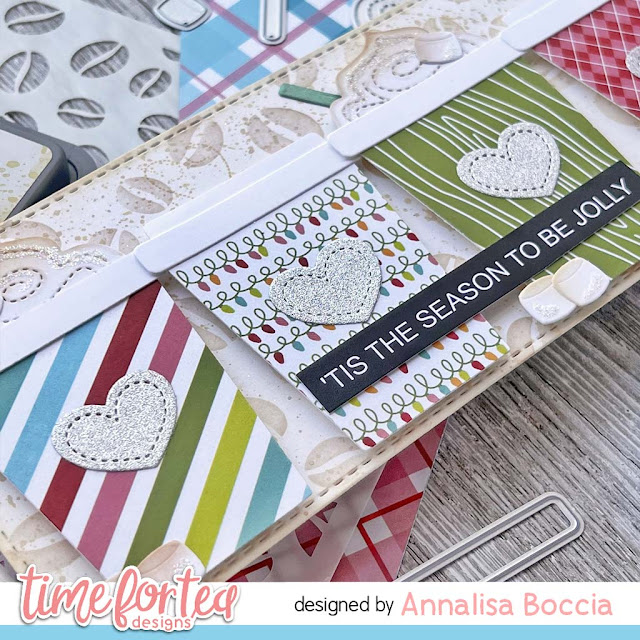
I am sharing a festive coffee card featuring the new Joyful Winter Paper Pad, when I saw these beautiful patterns I knew I needed to make them into coffee cups!

I started by creating the background, I die-cut a slimline base using the Slimline Scalloped Trio Circle Nesting Dies and then used the Coffee Beans 6 x6" Stencil to which I added Antique Linen, Vintage Photo and Ground Espresso Distress Oxides using my Beautiful Blender Brushes. I filled in the white areas by blending lightly with my blender brush and some of the leftover Antique Linen left on my blender brush. I added some splatter of Antique Linen Distress Oxide with a paintbrush. Once the panel was dry, I added it to an 8.5 x 3.5-inch card base.

I started creating the cups by cutting the patterned paper using the Takeout Coffee Cup Dies for the cup base. I then cut out the cup toppers. marshmallows and whip cream with white cardstock, I ink blended on a little Antique Linen onto the whipped cream and marshmallows to add some yummy colour! I die cut the hearts using the silver glitter card stock from my scraps.

I used some shimmery green watercolour to paint the straw once it had been die-cut. I glued the cup elements together using liquid glue and then added double-sided foam tape to the back of each of them.


I attached the cups side-by-side, to the coffee stencilled panel. I then used a combination of liquid glue and foam tape to adhere to the marshmallows and straws. To finish off the card, I added some Stickles to the marshmallows and whipped cream.  


Thank you so much for reading my blog post, you can use my discount code T4TANNALISA10 when you visit the Time For Tea Designs shop to get 10% off your order.

Monday, 20 December 2021

Using your patterned papers


Hello, Tea Timers!

It is Natalia with you today. How are the preparations for Christmas coming along?

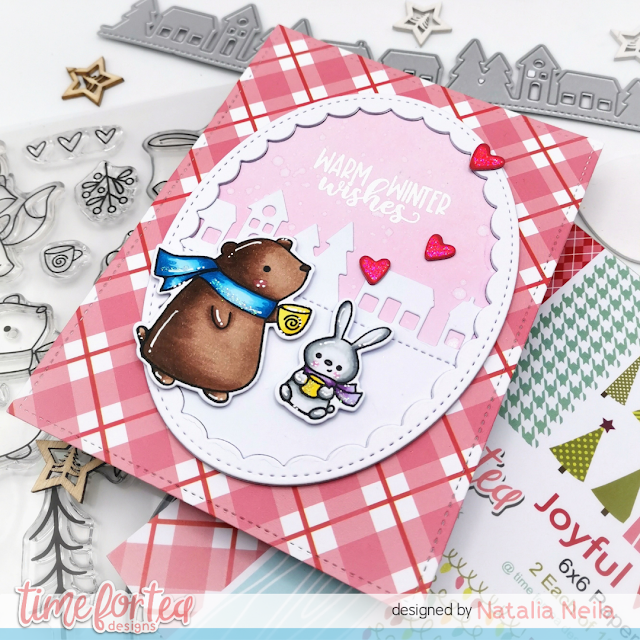
Today's card features these little cuties from the Cosy Winter stamp set. I used the Oval Scalloped Nesting die to create the focal point for my card. 

I created a pink sky - there is something about pink skies, don't you think? - with kitsch flamingo distress oxide and perfect pearls water to create shimmery splatters. I stamped the sentiment with my WOW! embossing pad and used white embossing powder.


I then cut the Slimline Mini Village die from white cardstock to create my background scene. 

The patterned paper is from the Joyful Winter 6x6' paper, which I think is SOOO pretty! and very versatile as there's designs in it that you can use all year around. 

I added some stickles to my die cut hearts, because you can never have too much sparkle! I am sure you agree.

I wish you a lovely Christmas, and I will see you next Monday with a new card!

Whether you are getting a Christmas present for a loved one, or yourself, remember to use the code T4TNEILA10 for a 10% off your shop!

Sending hugs,
Natalia

Tuesday, 14 December 2021

Merry Everything - A pattern paper card


Hi crafty friends! Happy Tuesday!


It's Miki here and today I'm back with my weekly inspiration for Time For Tea Designs - this time around I have a simple card for you using pattern paper - I'm sure we all have tons and rarely reach for it - I know I do.

To start with, I chose a design from the Joyful Winter 6x6 Paper Pad. I really love the striped paper so I wanted this to be the star of the show. I then used the Wide Stitched Frame Dies to build up my card - you can see all the added dimension in the picture below.


I took the frame dies and aligned them on the pattern paper as well as I could. Once I was happy with the alignment I taped each frame die to my paper and ran them through my die cutting machine. That left me with 3 frames which I used to build up my card. I started with the largest one and glued it straight to the card base. Then, I took the next smaller die and cut it twice from white card stock. I glued those together and then took the pattern paper frame and glued it on top. This now three layer frame went on my card base, somewhat aligned to the previous one - there are small imperfections, but shhh no one can tell! For the next size down I used the die and cut from white card stock 4 times to build up dimension - hopefully you can see where I'm going with this. Once those were glued together I aligned it to the frames on my card. Next up was the sentiment. I used the smallest die to cut a sentiment strip from the Winter Wonderland Sentiment Cards. I then used the die and cut it 6 more times from white card stock and glued them together behind my sentiment and popped it in the centre of my card. 

This was super easy to create and frankly quite therapeutic - I really hope you give it a go!

I hope you like today's card and if you shop on the T4TD website, please remember to use my code T4TMIKI10 for 10% off your whole order.

Crafty hugs,
Miki

Other Posts You Might Like