Pages

Showing posts with label Slimline Scalloped Trio Circle Nesting Dies. Show all posts

Friday, 14 February 2025

Sweet On You Shaker Slimline


Happy Valentine's Day! DT Annalisa here today and I’d like to share a slimline Valentine's Day shaker card I created using the Sweet On You and Warm Hugs stamp sets from Time For Tea Designs.

To create the background, I began with Ranger Distress Watercolor Cardstock and used Saltwater Taffy, Picked Raspberry, Tattered Rose, and Spun Sugar Distress Watercolor Pencils. I soaked the pencils in water, scribbled them onto acetate, and then spritzed the acetate with water. After that, I pressed the acetate onto the watercolour paper repeatedly, heat-setting and spritzing with water as needed. I also used Mica Spray Stains in Cocktail Party and Sugary Gumdrop.


Next, I followed the same process on another piece of watercolour paper using Salvaged Patina and Tumbled Glass Distress Watercolor Pencils. Additionally, I applied Peacock Feathers Distress Spritz, Wonderland Distress Mica Stain, and Salvaged Patina Distress Spray Stain.

I used the Slimline Scalloped Trio Circle Nesting Dies to cut out both the pink and blue panels. For the pink panel, I die-cut three hearts using one of the Heart Nesting Dies. I then glued the blue panel to a slimline card base.


To assemble the shaker element, I adhered acetate to the back of the pink hearts panel using double-sided tape. I placed 3mm double-sided tape on the back of the pink panel and attached it to the blue card panel. Before securing the pink panel, I sprinkled a mix of Candy Christmas and Mermaid Tail sequins from Pawsome Stamps in the appropriate areas.

Then, I stamped and coloured the images from the Sweet On You and Warm Hugs stamp sets using Copics. I die-cut them out with the coordinating dies and added white gel pen accents using a Gelly Roll Pen.


Finally, I used liquid glue to adhere the images and the "I'm Sweet On You" sentiment to the card. I finished by adding Glossy Accents to certain areas of the images for added dimension and shine.

Thank you so much for reading my blog post! Be sure to use my discount code T4TANNALISA10 when you visit the Time For Tea Designs shop to get 10% off your order.


Friday, 24 January 2025

From Our House to Yours


Happy Friday from DT Annalisa! I'm excited to share a water-coloured winter-themed Christmas card because it's never too early to start preparing for next year’s cards, right?

For the background, I die-cut water-coloured cardstock using the Slimline Scalloped Trio Circle Nesting Dies and applied Tim Holtz Distress Watercolor Pencils in Stormy Sky and Salvaged Patina.


To create the background effect, I soaked the pencils in water and then scribbled them onto acetate. After spritzing the acetate with water, I pressed it onto the watercolour paper repeatedly, heat-setting and spritzing with water as needed.

I added splatters of Broken China Distress Ink and Copic White using water and a brush. Afterwards, I adhered the background to a slimline card base using double-sided tape.


Next, I used the Slimline Mini Village Die on watercolour paper. I coloured the snow, trees, and houses with several Distress Watercolor Pencils in the following colours: Pumice Stone, Bundled Sage, Pine Needles, Iced Spruce, Weathered Wood, Hickory Smoke, Speckled Egg, Spun Sugar, Squeezed Lemonade, Milled Lavender, and Tumbled Glass.

I added Copic white splatter to get the effect of falling snow. I die-cut this scene with the Slimline Scalloped Trio Circle Nesting Dies and secured it to the card base using double-sided foam tape.

Finally, I attached a sentiment from the Sentiment Cards - Winter Wonderland | Black to the card with double-sided foam tape.

Thank you so much for reading my blog post! Be sure to use my discount code T4TANNALISA10 when you visit the Time For Tea Designs shop to get 10% off your order.


Friday, 7 June 2024

Seal of Approval


Happy Friday, everyone DT Annalisa here sharing an ocean-themed slimline card created with the Sealed With A Kiss stamp set and two stand-alone die sets from Time For Tea Designs It was my first time using the Best Fishes stencil and I love it!

I die-cut Distress Watercolor Cardstock by Ranger using the Slimline Scalloped Trio Circle Nesting Dies. I smushed peacock feathers Distress Ink onto my glass matt, sprayed it with water and pressed the die-cut panel into it several times to get the beautiful watercolour look.


I die-cut white heavy stock paper with the Slimline Postage Stamp Frame Dies and ink-blended salvaged patina and peacock feathers Distress Ink onto the center area of the panel. Next, I used a Beautiful Blender Brush to ink-blend peacock feathers Ink through the Best Fishes 6 x 6” Stencil.


I then used a palette knife to apply a layer of Wendy Vecchi translucent embossing paste over the stencil in the same area as the ink-blended fish.


Once the paste was dry, I used double-sided tape to stick the trio slimline panel down to the postage stamp frame. I created a slimline card base, used double-sided tape and stuck the panel to it.


I stamped and coloured (with Copics) several images from Sealed With A Kiss and cut them out with their coordinating dies. The shells were from Beach Buds. I added white gel pen accents with a Gelly Roll Pen.


I adhered the images to the card base using liquid glue or double-sided foam tape for dimension.


Thank you so much for reading my blog post. Remember to use my discount code T4TANNALISA10 when you visit the Time For Tea Designs shop to get 10% off your order.


Friday, 15 March 2024

Hoppy Easter Shaker


Happy Friday! DT Annalisa here to share an Easter shaker card I created using the Eggstra Special Birthday stamp set and their coordinating dies from Time For Tea Designs.  

I die-cut Distress Watercolor Cardstock by Ranger with the Slimline Scalloped Trio Circle Nesting Dies and the Eggstra Special Slimline Add-On Horizontal Die. I pressed peacock feathers, picked raspberry Distress Ink onto my glass matt, and sprayed water onto the inks. I pressed the die-cut watercolour panel into the ink several times and heat-set it.


I trimmed purple cardstock to go behind the watercoloured panel and glued it down to a slimline card base. I used liquid glue to adhere a trimmed piece of acetate over the egg panel holes.

Next, I added two layers of double-sided tape on the back of the egg panel and added pink, purple, blue and clear sequins. I then pressed the card base onto the double-sided tape to seal in the sequins.


I stamped and coloured (with Copics) several images from Eggstra Special Birthday and cut them out with their coordinating dies. I added white gel pen accents with a Gelly Roll Pen

I used liquid glue to adhere the stamped elements to the card. 


Thank you so much for reading my blog post. Remember to use my discount code T4TANNALISA10 when you visit the Time For Tea Designs shop to get 10% off your order.

Friday, 16 February 2024

Sending Warm Hugs in a Mug

Happy Friday! DT Annalisa here, sharing a coffee-themed slimline card featuring the new Warm Hugs stamp set. I absolutely love the kitty hugging the coffee cup and that spoon, talk about adorable!

I used the Slimline Scalloped Trio Circle Nesting Dies to trim down Neenah Metallic cardstock for the back panel. I used double-sided tape to adhere this to a slimline card base.

I used the same die to trim a panel of watercolour cardstock that I had ink blended with abandoned coral, saltwater taffy and scattered straw Distress Oxide using my Beautiful Rainbow Blender Brushes. I added white splatter with a paintbrush, water and Copic opaque white.

I ink-blended salvaged patina Distress Ink onto a card panel and splattered it with salvaged patina ink spray. I used liquid glue to stick this in behind the circle trio panel; next, I added foam tape and stuck it down to the card base. 


I stamped and coloured (with Copics) several images from the Warm Hugs stamp set and cut them out with their coordinating dies. I added white gel pen accents with a Gelly Roll Pen. The green leaves are from Sweet Cart Critters. I used liquid glue to stick the stamped elements to the card base. 

I added blue Designer Enamel Dots from the Sweet Summer collection to complete the card. 


Thank you so much for reading my blog post. Remember to use my discount code T4TANNALISA10 when you visit the Time For Tea Designs shop to get 10% off your order.

Friday, 12 August 2022

Porthole Sea Shaker


Hello and happy Friday! DT Annalisa here today sharing a porthole sea shaker card that I created using supplies from the latest Time For Tea Designs release. The sea creatures work perfectly with the Slimline Porthole Dies; I love how they peek through the openings.

To start, I die-cut some wood grain card stock using the largest rectangle die in the Slimline Scalloped Trio Circle Nesting Dies. I ink-blended this with Simon Says Stamp Khaki ink and Walnut Stain Distress Ink. Once the ink was dry, I die-cut the panel with the Slimline Porthole Dies.

I used the same die on some silver metallic card stock to create shiny portholes. I then used the circle frame in this set to cut some white card stock which I then coloured black with my copics. I used liquid glue to adhere these to the backs of the silver portholes so the black would show through.

I created an 8.5 by 3.5-inch slimline card base and ink blended it with Peacock Feathers and Salvaged Patina Distress Ink with my Beautiful Blender Brushes. I then added some white splatter of acrylic paint with a paintbrush.


Next, I stamped the critters from Fintastic Friends and die-cut them out with the coordinating die set. I coloured them with my Copics and added white gelly roll white pen accents. 

For the sentiment, I heat embossed some white embossing powder onto some black cardstock and then die-cut it out.

I used tape on the back of the woodgrain cardstock to connect the port holes to the front panel. I stuck down the critters to the card base in the areas behind the port holes and then added some Glitz Recollections Chunky Glitter down on top of them.


I used double-sided foam tape (which I doubled up) on the woodgrain panel to adhere this down onto the card base.

I added the sentiment using liquid glue to complete the card.

Thank you so much for reading my blog post,. Don't forget to use my discount code T4TANNALISA10 when you visit the Time For Tea Designs shop to get 10% off your order.


Friday, 1 April 2022

Slothy Hugs


Happy Friday! DT Annalisa here today, I have a slimline sloth card to share with you. It features the Be Slothy stamp set and the Slimline Scalloped Trio Circle Nesting Dies from Time For Tea Designs.

 I started by using an older T4T stencil (Tropic Like It’s Hot) and ink blending on Distress Oxides in the colours Twisted Citron and Mowed Lawn using my Beautiful Rainbow Blender Brushes. I added some water and white paint splatters for interest.

Next, I die-cut out the panel using the middle rectangle die and the three scalloped circles die. I added foam tape to the back of this panel and set it aside.

I then stamped, Copic coloured and die cut the Sloths using the Be Slothy coordinating die set. I glued parts of the branches to the back of the green stencilled panel and added foam tape to the rest.

On an 8 1/8 by 3 1/8 inch card panel, I ink blended Tumbled Glass Distress Oxide to the clouds section of the Slimline Scene Builder Stencil and then added some white splatter. I then added the popped-up slimline panel and sloths to the card.

I stamped the small flower in blue and pink ink, die-cut them and glued them to the branches. I then stamped, copic coloured and die cut three butterflies and glued them to the card.

To complete the card, I added the hugs sentiment from Paper Plane Pals and then added some glossy accents to the flowers and butterflies.

Thank you so much for reading my blog post, you can use my discount code T4TANNALISA10 when you visit the Time For Tea Designs shop to get 10% off your order.


Friday, 4 March 2022

Thank you Skunks


DT Annalisa here, wishing you a happy March! Spring is a few weeks away, so I am sharing this bright and cheerful tulip card. I can't wait until my garden starts blooming. As I write this, the snow is falling outside, so I know that we are a long way off from that!


For the middle panel, I used the medium scalloped die to cut white card stock onto which I ink blended Spiced Marmalade, Wild Honey and Squeezed Lemonade Distress Oxide, using my
Beautiful Rainbow Blender Brushes. I added some splatter in Fired Brick Distress Oxide.

For the back panel, I die-cut some white card stock using the largest stitched die from the Slimline Trio Circle Die Set and ink blended on Salvaged Patina Distress Oxide with a blender brush.

The front panel was created by die-cutting white card stock with the tulip add-on die and the smallest stitched die from the Slimline Trio Circle Die set. I added splatters of Salvaged Patina Distress Oxide with a paintbrush. 

I adhered the teal and scalloped panels to a slimline card base with liquid glue. For the top panel, I used foam tape for added dimension.

I used the following stamp sets: Stinkin' Cute, You’ve Got Mail, Mum & Dad, Be Slothy and Up, Up & Away. I stamped, coloured and die-cut the images and the 'thanks' sentiment and then used liquid glue to adhere them to the slimline card. To complete the card, I added some clear gems.


Thank you so much for reading my blog post, you can use my discount code T4TANNALISA10 when you visit the Time For Tea Designs shop to get 10% off your order.


Sunday, 9 January 2022

Kitchen Helpers

  Good afternoon Teatimers, 

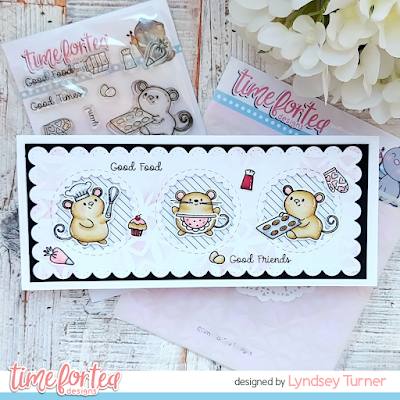
My daughter has recently taken a big interest in cooking and has been helping out in the kitchen a lot (or even kicking me out of the kitchen completely!) So this has inspired my card I'm sharing with you today. Perfectly I'm using the adorabley cute little baking mice from Baked with more Love stamp set. 


To start I coloured my images using my Spectrum Noir Markers (colours listed below in order of lightest to darkest)

Mice - EB1, EB2,  GB8- CR3, CR2 

Red - CR11, DR5, DR7 

Pink - CR3, CR2 CR6 

Grey - IG1, IG3, IG5
 

 I cut out the panel using the 2nd largest die from the Slimline Scalloped Nesting Dies and took the the inside die from the Trio Circle Die to create the apertures. To add some interest to the background I used the Boho Tiles Stencil with Picked Raspberry distress ink and randomly added sections of colour to the panel. I added pieces of the striped paper from the 6x6 Sweet Summer paper pad to back of each aperture before adhering the whole panel to a piece of black card, leaving a small border before creating a slimline card to fit.

All the images were cut out using the matching dies and I added the cute little mice and their accessories around the apertures looking as pleased as punch with their baking! 

Thank you for joining me here on the blog today,  don't forget to use my code T4TLYNDSEY10 for 10% off your order in store.

Enjoy the rest of your weekend 

Lyndsey x

Sunday, 2 January 2022

Stinkin Cute

 Good afternoon Teatimers,

Happy New Year to you all, I hope 2022 brings you health and happiness.

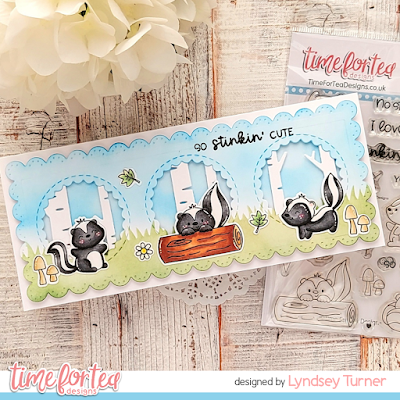
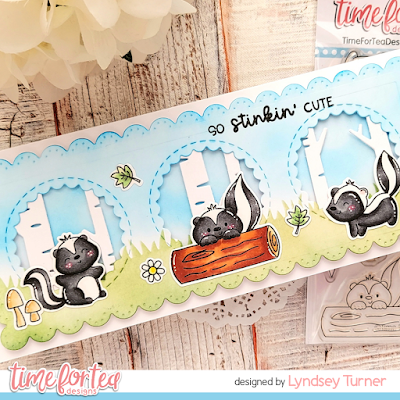
I'm here today kicking off my card making with this sweet slimline card using the most super adorable little Skunks from the Stinkin Cute stamp and die set.

I absolutely fell in love with these little characters as soon as they were released and have been dying to get a card made using them however work, illness, christmas and all the jazz got in the way!🙄 so I was so pleased to finally find a few hours to myself yesterday to get creative.


To start as always I stamped and coloured my images using my Spectrum Noir markers (colours listed below in order of lightest to darkest)

Skunks - IG5, IG7, IG9 
Log - TN5, TN7, TN9 
Mushrooms - EB1, EB2,GB8 
Leaves - LG2, LG3, DG3 

To create my card I took 2 pieces of white card trimed roughly to the size of DL card blank and used distress inks in Mowed Lawn and Salty Ocean to create a background on each.  Using the Slimline Scene Builder Stencil to add the grass outline.

From 1 piece I used the smallest sizedie from the Scalloped Frame Dies and the inside die from the Trio Circle Nesting Die  to create my front piece.

I cut the trees from the Winter Trees Dies from white card and added them to the back of the apertures, before adding foam tape to the back of the panel. The 2nd panel was trimed to size to fit behind the Scalloped panel before being added to a DL card blank trimed to size.

I added the critters to the card and finally stamped the sentiment I  the top RH correct.

Thank you for joining me here on the blog today, don't forget to use my code T4TLYNDSEY10 for 10% off your order in store.

Enjoy the rest of your Bank Holiday weekend 

Lyndsey xx

Thursday, 23 December 2021

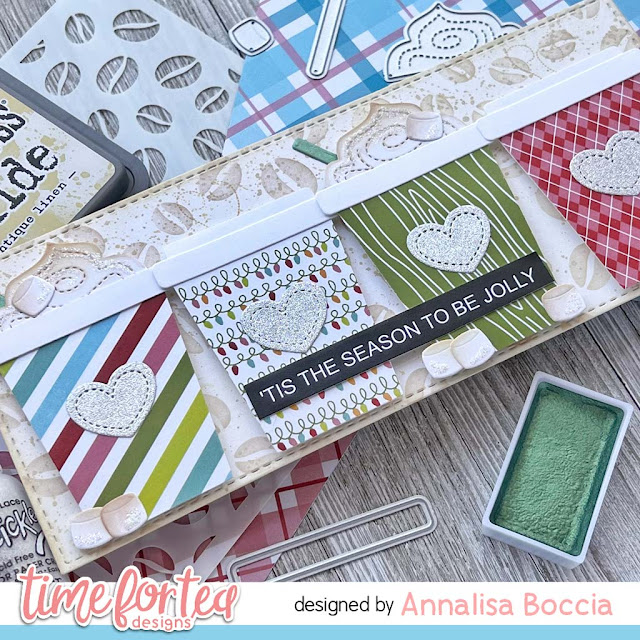
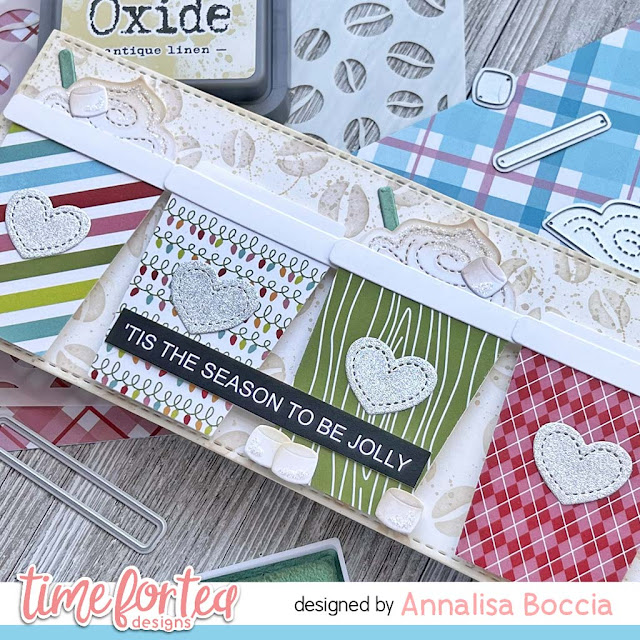
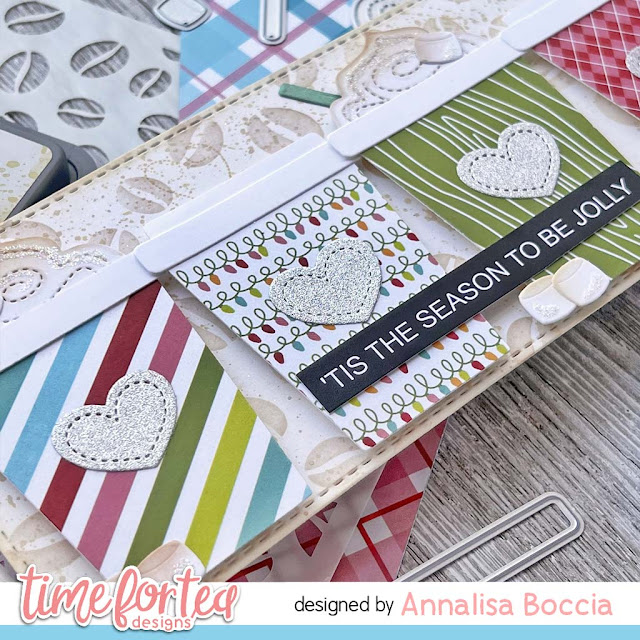
Jolly Coffee Christmas


Happy Christmas Eve everyone! I hope you all have a wonderful day and a happy Christmas tomorrow. Thank you so much for your support throughout the year.

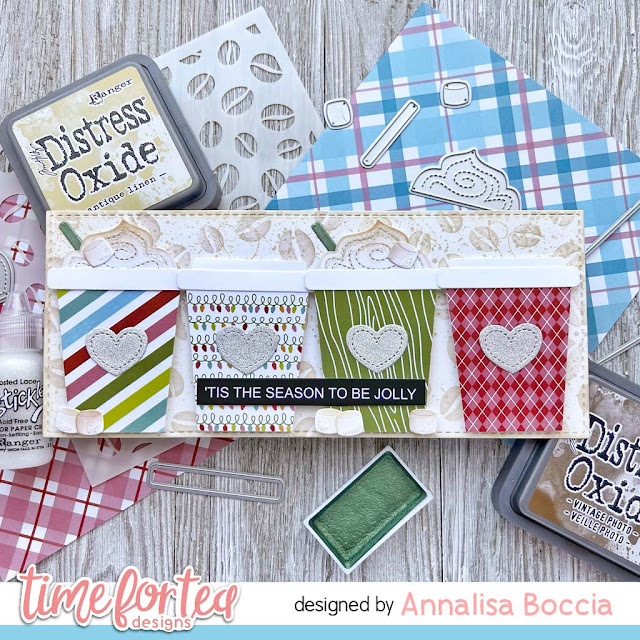
I am sharing a festive coffee card featuring the new Joyful Winter Paper Pad, when I saw these beautiful patterns I knew I needed to make them into coffee cups!

I started by creating the background, I die-cut a slimline base using the Slimline Scalloped Trio Circle Nesting Dies and then used the Coffee Beans 6 x6" Stencil to which I added Antique Linen, Vintage Photo and Ground Espresso Distress Oxides using my Beautiful Blender Brushes. I filled in the white areas by blending lightly with my blender brush and some of the leftover Antique Linen left on my blender brush. I added some splatter of Antique Linen Distress Oxide with a paintbrush. Once the panel was dry, I added it to an 8.5 x 3.5-inch card base.

I started creating the cups by cutting the patterned paper using the Takeout Coffee Cup Dies for the cup base. I then cut out the cup toppers. marshmallows and whip cream with white cardstock, I ink blended on a little Antique Linen onto the whipped cream and marshmallows to add some yummy colour! I die cut the hearts using the silver glitter card stock from my scraps.

I used some shimmery green watercolour to paint the straw once it had been die-cut. I glued the cup elements together using liquid glue and then added double-sided foam tape to the back of each of them.


I attached the cups side-by-side, to the coffee stencilled panel. I then used a combination of liquid glue and foam tape to adhere to the marshmallows and straws. To finish off the card, I added some Stickles to the marshmallows and whipped cream.  


Thank you so much for reading my blog post, you can use my discount code T4TANNALISA10 when you visit the Time For Tea Designs shop to get 10% off your order.

Other Posts You Might Like