Pages

Showing posts with label let's chat stamp set. Show all posts

Monday, 6 October 2025

Hello

Hi. Design team member Koren Wiskman here. I hope that I can inspire you to create something fun with all of these awesome T4TD supplies. Today I am using the Let's Chat Stamp Set and Speech Bubble Dies to create this project. 

The card size is A2 (4.25in x5.5in.) The front panel is cut to 3.25in x 4.75in. This is my favorite size card to create. I have tried so many others but this size is the one that keeps my heart happy. My card bases are typically made using a neutral gray cardstock. These two details about my cards rarely change. 


Background

I stamped the phone base image from the Time for Tea Designs Let's Chat Stamp Set with black ink directly onto the card panel. I then stamped the hand set and cord onto another piece of heavy weight white cardstock and used the coordinating dies to cut them out. The hand set and the cord are popped up using foam squares. 

Sentiment

I heat embossed the sentiments from the T4TD Let's Chat Stamp Set onto blue cardstock and used the coordinating dies to cut them out. To give the card a fun text message vibe, I used the Speech Bubble Dies also cut from blue cardstock. All of these elements are popped up using foam squares. 


Embellishments

I used a small enamel heart to act like an emoji to keep the text messages vibe. 

I like the mix of vintage phone and new age elements. 

I hope that I've inspired you to create something today. Check out the Let's Chat Stamp Set and Speech Bubble Dies in the T4TD shop

KOREN

Monday, 15 September 2025

Not Another Vintage Phone Card

Hi. Design team member Koren Wiskman here. I hope that I can inspire you to create something fun with all of these awesome T4TD supplies. I had to make more phone cards, I love it and I have more planned. Today I am using the Hey, Hello, Hi Dies as well as the Let's Chat Stamp Set and Coordinating Dies to create this project. 

The card size is A2 (4.25in x5.5in.) The front panel is cut to 3.25in x 4.75in. This is my favorite size card to create. I have tried so many others but this size is the one that keeps my heart happy. My card bases are typically made using a neutral gray cardstock. These two details about my cards rarely change. 

Background

Today's background is actually just a piece of patterned paper cut down to about 3 x 4 3/4 inches and then a added some fringe to make the panel 3 1/2 x 4 3/4 with the 1/2 inch fringe added. This panel was put onto the card base using craft foam and tear tape adhesive. 

Focal Image

The only image on the card that isn't patterned paper is from the Time for Tea Designs Let's Chat Stamp Set. I love this phone. I used coordinating dark green cardstock. I heat embossed it using clear sticky ink and white embossing powder. Once heated and completely cooled I used the Let's Chat Coordinating Dies to cut out the phone image. 

Sentiment

I used the T4TD Hey, Hello, Hi Dies to cut out the "hello" using both the hello die from the set and it's shadow. The "hello" was cut out of patterned paper that I thought coordinated well with the background. The shadow was cut from a coordinating piece of mustard cardstock. The sub-sentiment "i'm only a phone call away" is also from the Let's Chat Stamp Set. I also heat embossed this onto coordinating dark blue cardstock. The coordinating dies for this set are so fun because it comes with sentiment dies. 

Embellishments

To add to the fun, I added a pink and white speech bubble from my scrapbooking stash. The phone cord was made using dark green twine and liquid adhesive. I coated the twine in adhesive and wrapped it around a thin plastic micro-brush. Once dry, it was curled like the phone cords of old. I used large glue dots to adhere the phone cord. Everything else was popped up using foam squares. 

I hope that I've inspired you to create something today. Check out the Hey, Hello, Hi Dies as well as the Let's Chat Stamp Set and Coordinating Dies in the T4TD shop


KOREN

Monday, 8 September 2025

Thanks for Listening

Hi. Design team member Koren Wiskman here. I hope that I can inspire you to create something fun with all of these awesome T4TD supplies. Today I am using the Let's Chat Stamp Set and Coordinating Dies as well as the Speech Bubble Dies to create this project. 

The card size is A2 (4.25in x5.5in.) The front panel is cut to 3.25in x 4.75in. This is my favorite size card to create. I have tried so many others but this size is the one that keeps my heart happy. My card bases are typically made using a neutral gray cardstock. These two details about my cards rarely change. 

Background

This scene was easy to create. I grabbed an old cloud edge stencil from my stash and several shades of ink to mimic a gorgeous sunset. I used these to create a card panel with ink blended clouds. I really wanted to work with pink. Not just any pink, hot pink. So, I grabbed some hot pink cardstock from my stash and cut a scalloped circle. On top of the scalloped circle is a circle of ink blended clouds. On top of that is some grass, cut using very bright green. 

Focal Images

My two critters are from the Time for Tea Designs Let's Chat Stamp Set. I stamped them on alcohol marker friendly paper using alcohol marker friendly ink, so that I could color them with my alcohol markers. I cut them out using the coordinating dies. 

Sentiment

I used the T4TD Speech Bubble Dies to create a little bit of a conversation between my two critters. I heat embossed "thanks for listening" from the Let's Chat Stamp Set using white embossing powder onto that same hot pink cardstock and cut it out using the coordinating dies. The "heart emoji" is a small glossy enamel heart from my stash. 

Everything is popped up using foam squares. 

I hope that I've inspired you to create something today. Check out the Let's Chat Stamp Set and Coordinating Dies as well as the Speech Bubble Dies in the T4TD shop. 

KOREN

Monday, 5 May 2025

Hello Stars


Hi. Design team member 
Koren Wiskman here. I hope that I can inspire you to create something fun with all of these awesome T4T supplies. Today I am using the Time for Tea Designs Let's Chat Stamp Set along with the Stars Stitched Cover Die to create this project. 


The card size is A2 (4.25in x5.5in.) The front panel is cut to 3.25in x 4.75in. This is my favorite size card to create. I have tried so many others but this size is the one that keeps my heart happy. My card bases are typically made using a neutral gray cardstock. These two details about my cards rarely change. 


Background

For this card I grabbed some interesting patterned paper that coordinates colorfully. I took my 3 1/4 by 4 3/4 card panel and placed it onto the T4TD Stars Stitched Cover Die before running it through the die cutting machine. I know my panel is smaller than the die. I love how it cuts off. I find imperfect things incredibly interesting. later, I adhered the different papers behind each star to allow it to be set back from the panel using foam squares. 


Sentiment

Before popping up the patterned paper, I used the T4TD Let's Chat Stamp set to add "hello" and "thank you" to my card panel. I stamped them using waterproof black ink. 


I hope that I've inspired you to create something today. Check out the Let's Chat Stamp Set or the Stars Stitched Cover Die in the T4TD shop


Koren

Monday, 14 April 2025

Vintage Let's Chat


Hi. My name is Koren Wiskman and I am a member of the Time for Tea Designs Design Team. I hope that I can inspire you to create something cool with all of these awesome T4T supplies. Check out the Let's Chat stamp set and coordinating dies that I am using on this project in the T4TD shop. 


This card project is an A2 size card (4.25in x5.5in.) The front panel is cut to 3.25in x 4.75in. This is my favorite size card to create. I have tried so many others but this size is the one that keeps my heart happy. My card bases are typically made using a neutral gray cardstock. I should warn you, I enjoy my "white-space". My card designs can be all over the place, much like my personality. I hope you enjoy. 


Background

I used a little low tack tape to mark off a line towards the center of my card panel. I'm using watercolor paper for this card. You will see some light beige ink blending in the background of each card. 


Focal Image

This vintage phone image is from the Time for Tea Designs Let's Chat stamp set. I used waterproof ink on watercolor paper. To color this image I used black ink from a dye ink pad and a blender pen. I concentrated the majority of the ink towards the outside edges of the image and blended it out towards the center. This was my attempt to add a little dimension to the image. There is no light direction. I repeat, there is no light direction. I don't usually think that way when I'm coloring unless one image is in front of another image. Then, I might add a little shadow. I just like to color. 


I used the T4TD Let's Chat coordinating dies to cut out the images and pop them up along with a piece of string for the phone cord. Yes, we use to be attached to a place when we spoke to someone on the telephone. We also got to hang up on people. That was sometimes therapeutic. I was going for a vintage color scheme for these cards. The olive green and black remind me of times gone by. Also, it's a rotary phone! My kids have no idea what that is. 


Sentiment

The sentiment, also from the Let's Chat stamp set, was stamped in waterproof black ink. I did have to use my stamp positioner and stamp it several times to get it to look ok on the bumpy watercolor paper texture. 


I hope that I've inspired you to create something today. Check out the T4TD shop to find these products and more.


Koren

Friday, 21 February 2025

Hello Kitties


Happy Friday, DT Annalisa here! Today, I'm excited to share a beautiful card featuring a watercolored background that I created using the Wonky Shapes Masking Stencil and Distress Watercolor Pencils.

To start, I soaked the Evergreen Bough and Chipped Sapphire Distress Watercolor Pencils in water. I then scribbled the colours onto the Wonky Shapes Masking Stencil and spritzed it with water. After that, I flipped the stencil over and pressed it onto Ranger Distress Watercolor Cardstock, holding it in place for several minutes.


While the stencil was pressed down, I traced the outline on one side of the stencil openings with a Victorian Velvet Distress Watercolor Pencil. I used a small paintbrush and very little water and brushed over the pigment, activating it, and spreading it out.

I lifted the stencil and heat set the panel with my Ranger Heat It craft tool. I trimmed the panel and used liquid glue to adhere it to an A2 card base.


I love the way the background turned out and will be trying this technique again!

Next, I stamped and coloured several images using Copics from the Kitty Capers, Purrfect Day (books, plants, and a cat lying down), Let's Chat (sentiment), and Home Is Where The Heart Is (telephone) stamp sets. I cut them out with their coordinating dies and added white gel pen accents with a Gelly Roll Pen.


Finally, I adhered the images to the card base using liquid glue or double-sided foam tape for added dimension.

Thank you so much for reading my blog post! Be sure to use my discount code T4TANNALISA10 when you visit the Time For Tea Designs shop to get 10% off your order.


Friday, 26 April 2024

Warm Hugs in a Mug


Happy Friday, DT Annalisa here! I tried no line colouring in today's card, I love the look of it, but it is a technique that I find quite tricky, since you have no dark outlines, you must create contrast in the right places to get the right look. 

I ink blended Simon Says Stamp Khaki Ink for the background over the Coffee Beans 6 x6" Stencil using my Beautiful Blender Brush onto white cardstock. I removed the stencil and used a lighter hand and what was left on my brush to fill the white areas. I added brown splatter with a paintbrush, water and Khaki Ink.


I die-cut the ink-blended panel with a stitched rectangle die and then used double-sided tape to stick it to an 80 lb Neenah Desert Storm card base ink-blended with vintage photo Distress Oxide. 

I used salvaged patina Distress Spray Stain on the smooth side of Distress Watercolor Cardstock by Ranger. Once it was almost dry I sprayed water using a Distress Sprayer that filled in the white spaces with a pale teal colour. 


I die-cut the teal panel with the Warm Hugs Large Sentiment Die. I ink-blended another piece of Neenah Desert Storm with vintage photo Distress Oxide and die-cut it with the same die. I glued the two die-cuts together slightly offset to create a shadow.

I stamped elements from Let's ChatPumpkin SpiceWarm Hugs and Get Whale Soon with Ink on 3 fadout No Line Coloring ink. I coloured them with Copics, cut them out with their coordinating dies and added white gel pen accents with a Gelly Roll Pen


I adhered the images and the sentiment to the card base using double-sided foam tape for dimension.

I added teal and pink sequins from the Candy Christmas Squin Mix from Pawsome Stamps using liquid glue to complete the card.


Thank you so much for visiting my blog post, be sure to use my discount code T4TANNALISA10 when you visit the Time For Tea Designs shop to get 10% off your order.

Wednesday, 22 February 2023

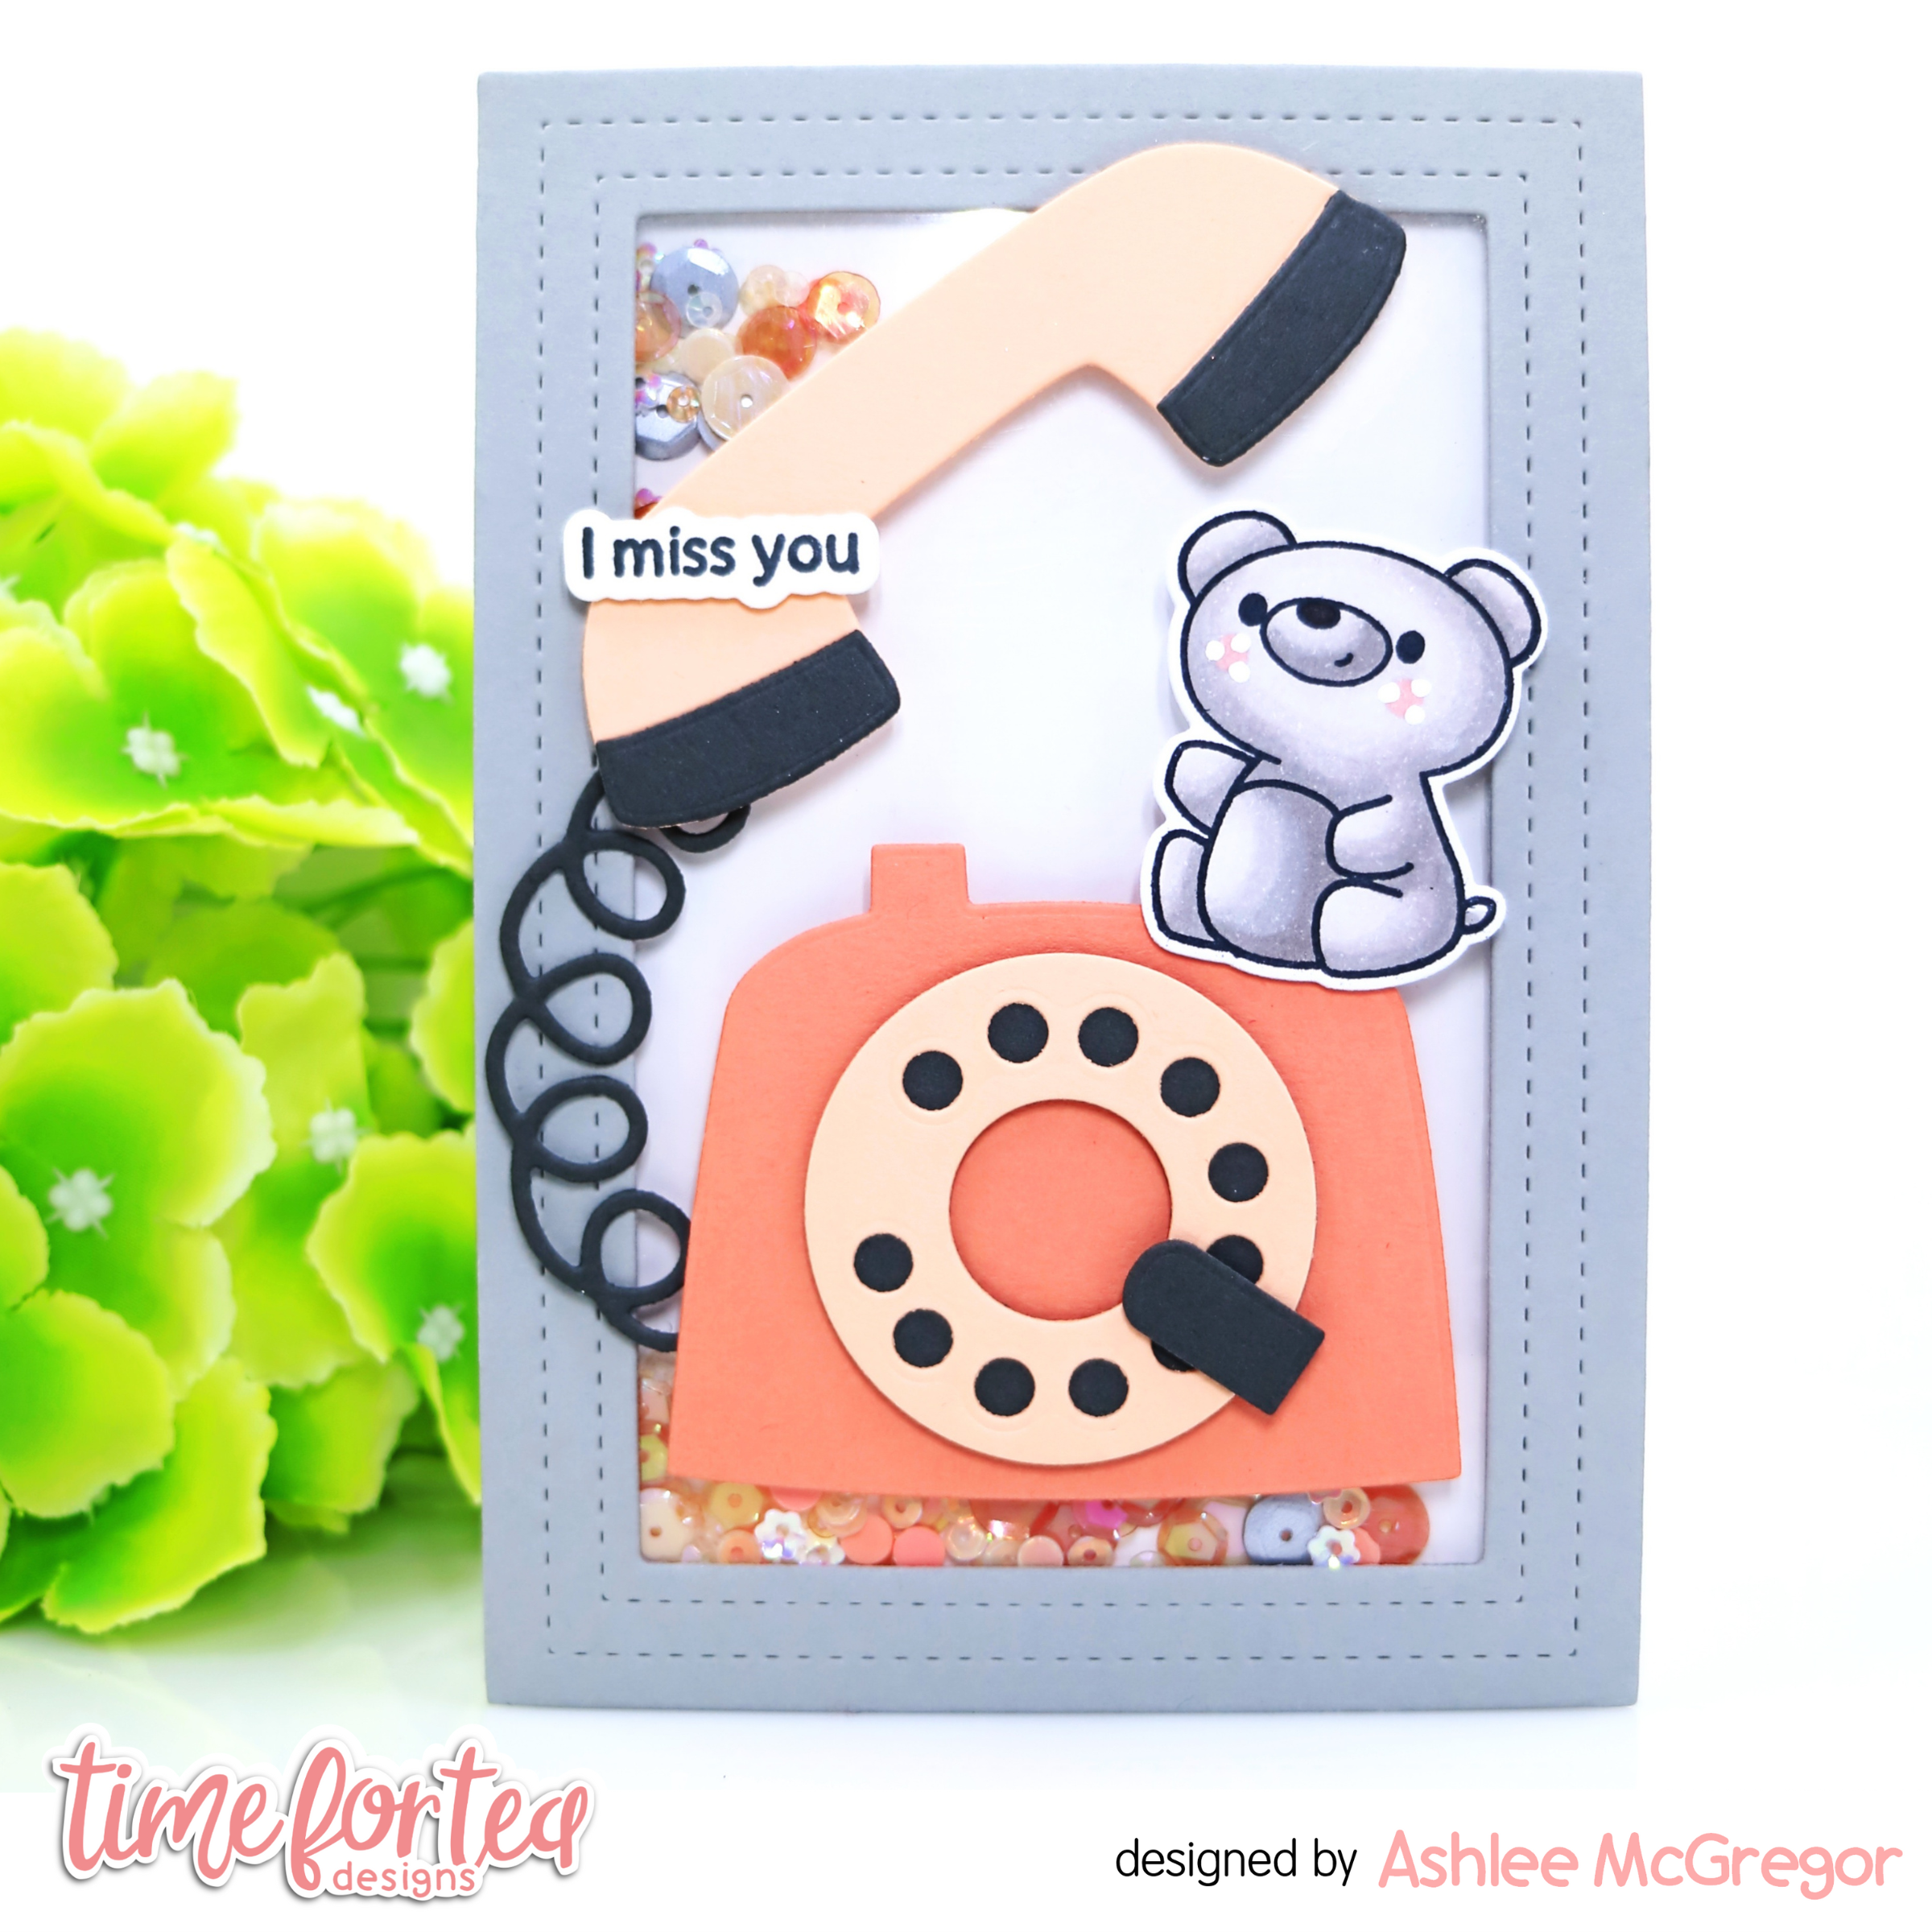
Retro shaker

Hey there Tea-timers...

It's DT Ashlee here and I'm sharing a Retro shaker card featuring the awesome Retro phone builder die!!


To create this card I started by making a shaker card base. I used the wide stitched frame dies to create the frame, adhered acetate to the open space and then added foam tape around the edges. I filled the shaker portion with a bunch of pretty sequins and then backed it with a piece of cardstock. 


I then went on to create the retro phone by die cutting all my pieces from cardstock and adhering together with foam tape and liquid glue....

I adhered it to the card base and then added a super cute little teddy from the Let's chat stamp set  (Coloured using Spectrum noir tri-blend markers and die cut using the co-ordinating dies)

To complete the card a little sentimen and now it's time to shake, shake, shake!!


That's all from me for today, I hope you enjoyed this shaker card inspiration...
Happy crafting, hugs Ashlee.

Friday, 17 February 2023

Big Bunny Hello


Happy Friday! DT Annalisa here today sharing a no-line coloured card featuring several Time For Tea Designs products. I don't often use this technique with my Copics as it is out of my comfort zone, but I am glad I did.

For the background, I added Saltwater Taffy, Abandoned Coral and Picked Raspberry Distress Oxide ink to watercolour paper with a paintbrush. I added some splatter and spots with a paintbrush for added interest.

Once the panel was dry, I used the Dotty Hearts Panel Die to add the pretty stitched hearts. I adhered this to an A2 card base (8.5 by 4 1/4 inches) with double-sided tape. I die-cut the frame from the Zig Zag Frame & Tag Dies and glued it to the panel.


I stamped the bunny and phone from Let's Chat with pale Fadeout ink from Ink on 3, which works well for no-line colouring. I used my Copics, adding darker tones near the edges of the images; this helped to ensure that the lines were no longer visible once the image was coloured in. I added white gel pen accents before using double-sided foam tape to adhere the images to the card base.

I stamped the sentiments from Let's Chat with Versafine Onyx Black and cut them out with the coordinating die set.


I used the large heart die from the Slimline Postage Stamp Frame Dies to die-cut three hearts. I ink-blended them with Salvaged Patina, Stormy Sky and Faded Jeans Distress Ink using my Beautiful Blender Brushes. I added white splatter using a paintbrush and Copic opaque white.

I used liquid glue to adhere the three coloured hearts to the card. I then used double-sided foam tape to stick the sentiments to the card. I add three blue Festive Fun Designer Enamel Dots for the final touch.


Thank you so much for reading my blog post, you can use my discount code T4TANNALISA10 when you visit the Time For Tea Designs shop to get 10% off your order.

Friday, 3 February 2023

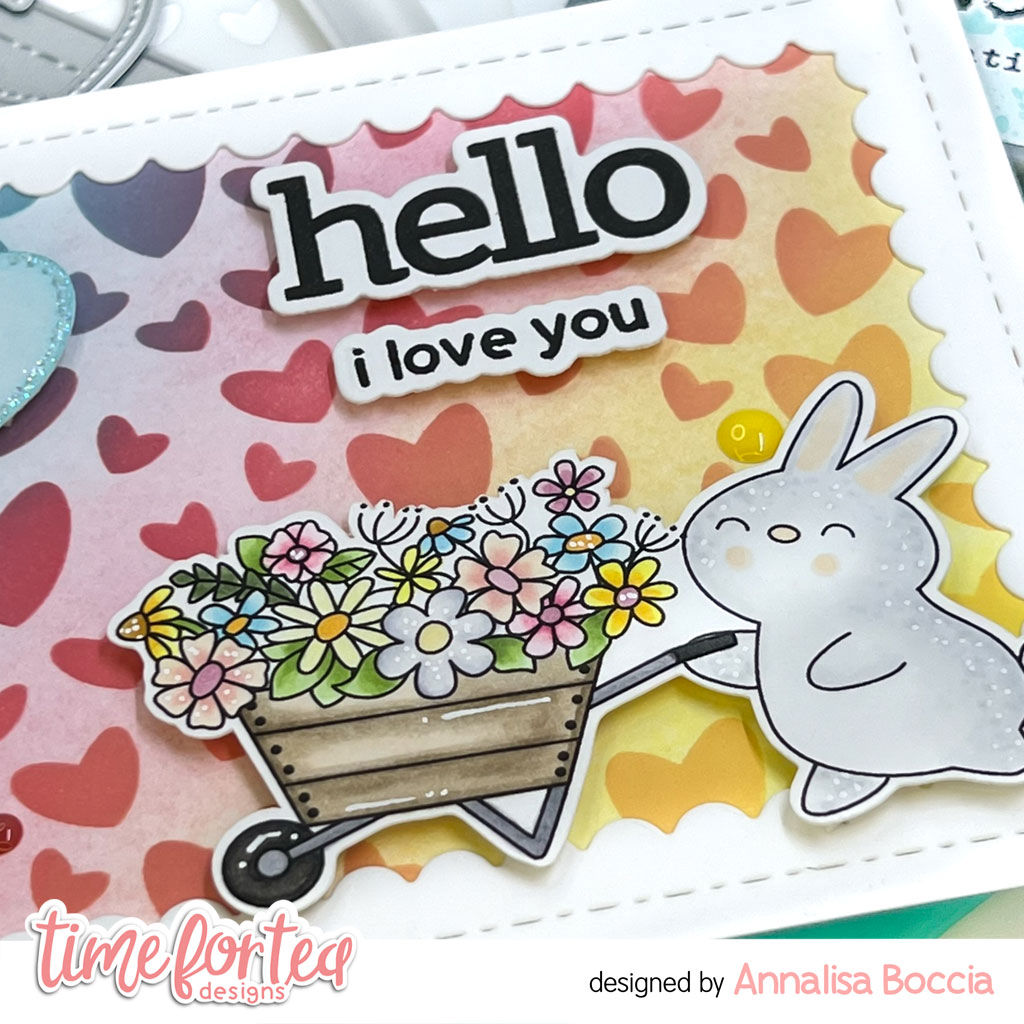
Bunny Valentine


DT Annalisa here wishing everyone a happy Friday! It is bitterly cold (-35 Celcius with windchill) where I am in Canada, so I wanted to share a bright spring Valentine's day card. It features the adorable Blooming Bunnies stamp set and the Scattered Hearts Stencil, perfect for Valentine's Day cards.  


For the background, I ink-blended Salvaged Patina, Worn Lipstick, Dried Marigold and Mustard Seed Distress Oxide onto the Scattered Hearts Stencil with my Beautiful Rainbow Blender Brushes onto some white cardstock. After removing the stencil, I ink-blended lightly with only the ink on my brushes. I die-cut white cardstock with the large frame in the Smile Inverted Scallop Frame Dies and used liquid glue to adhere it to the ink-blended panel. I used double-sided tape to stick this panel to an A2 card base. 

I stamped the bunch of flowers, masked them out and stamped down the wheelbarrow, and finished by stamping the bunny. I used my Brother Scan N Cut SDX125e to cut around the bunny and the cart. I then used my Copics to colour them in and added accents with a white Gelly Roll Pen.

I stamped the sentiments from Let's Chat and cut them out with the coordinating die set. I used the heart from the Slimline Postage Stamp Frame Dies to die-cut white cardstock. I ink-blended this with Salvaged Patina Distress Oxide ink and added sparkles to the edge with a Quickie Glue Pen and Lawn Fawn Prisma Glitter.

I used double-sided foam tape to stick all of the elements to the card. To complete the card, I added Sweet Summer Designer Enamel Dots.


Thank you so much for reading my blog post, you can use my discount code T4TANNALISA10 when you visit the Time For Tea Designs shop to get 10% off your order.


Thursday, 10 November 2022

A Cute Cafe Scene


Happy Thursday, Tea Timers!  It's Amanda here!  Today I'm sharing how I used my yellow cardstock cutouts from my last blog post.

I have created my layers for my card base using a white A2 card base, an ink blended layer (using Maker Forte's Blue Moon and Lady Liberty Inks) and then my yellow cutouts.  On my yellow cutouts, I ink blended the Tiled Wall Stencil with Yellowstone ink.  I also splattered some white and black paints on my background.

Next, I die cut some clouds using the Cloud Dies.
I stamped some images from the Cafe Critters Stamp Set and then colored them with OLO Markers.
My sentiment came from the Let's Chat Stamp Set.  I stamped it on black cardstock with clear glue ink, then applied white embossing powder.  I melted the embossing powder with my heat tool and then die cut it out with the coordinating die.
I assembled my card using liquid glue and 3D foam squares.


That's it for me today, friends! Thanks for stopping by the Time for Tea Blog today!  See you here next week! Xx, Amanda


Thursday, 27 October 2022

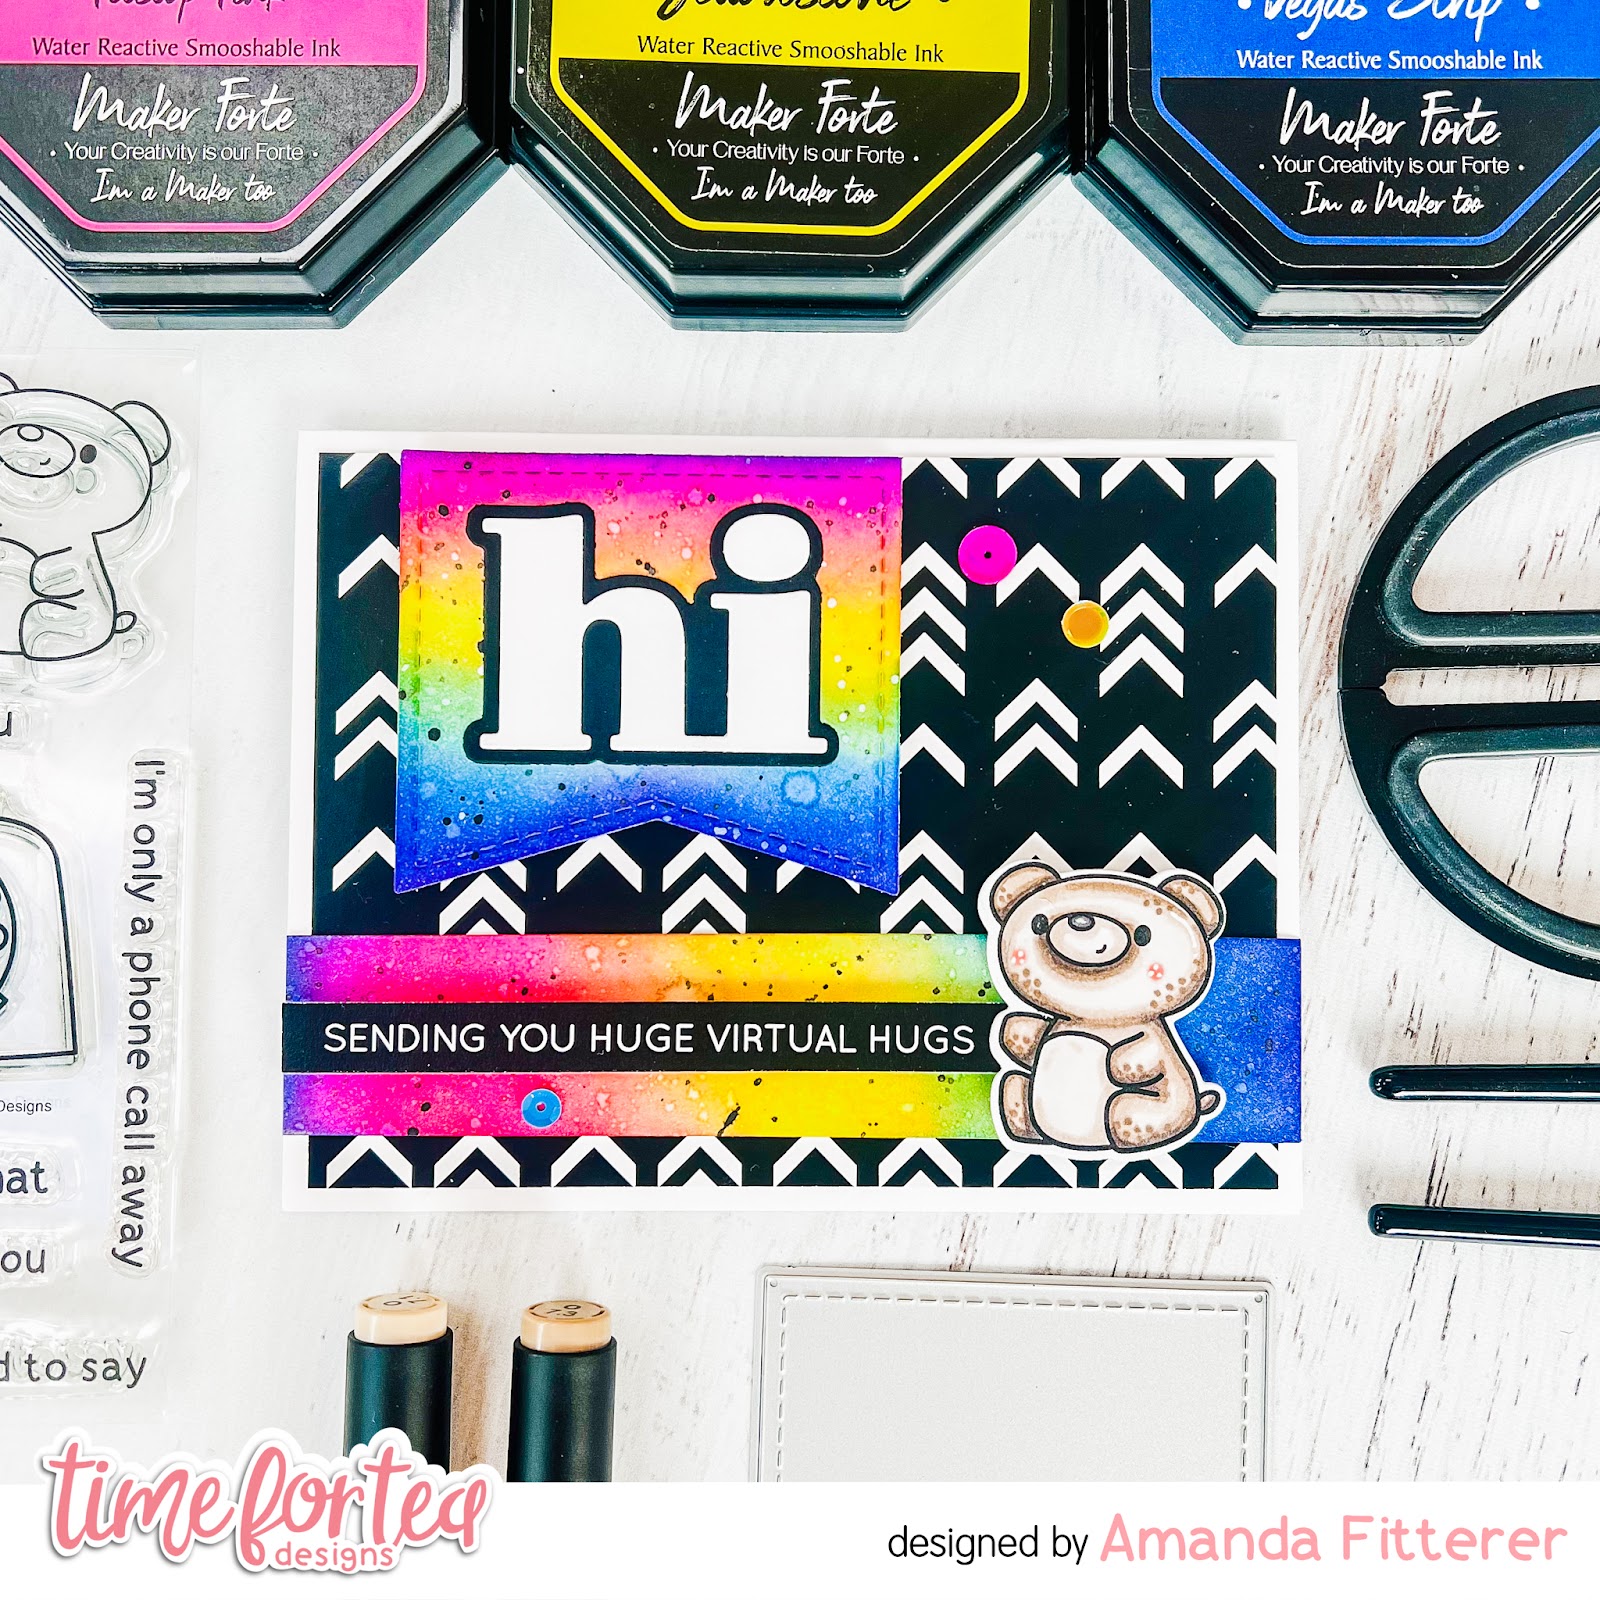
Sending You Virtual Hugs!

Happy Thursday, Tea Timers!  It's Amanda here!  I'm sharing this very happy card today!  I love creating cards that have bright contrast and bright colors - especially when they're rainbow!


To create this card, I stamped my cutie from the Let's Chat Stamp Set and then colored him with OLO markers.
 For my "hi", I used the Hey, Hello, Hi Dies.  The rainbow flag behind it is from the It's Your Day Sentiment Dies.  The other sentiment strip if from the Brighter Days Sentiment Cards.

One of my favorite rainbow ink blends is the one I created on this card!  It's a blend of Pitstop Pink, Yellowstone, and Vegas Strip Color Hive Inks.  I also spritzed my ink blend with water and created some black splatters with black paint.

Thank you so much for stopping by the blog today!  I hope you're feeling inspired by this post!  Come back next week for another happy card!
Xx, Amanda


Friday, 10 June 2022

Just Called to Say Meow


Hello and happy Friday tea-timers! DT Annalisa here sharing a cute kitty card featuring the Retro Phone Builder Dies and the You Had Me At Meow Sentiment Dies. You could colour this giant retro phone in different Distress Oxide or Ink colours or even use patterned paper for a variety of cards.

For the background, I used my Aqua Beautiful Blender Brush to apply some Speckled Egg Distress Oxide to the Tiger Stripes 6 x6" Stencil to a 5 1/2 inch by 4 1/4 panel of Distress White Heavy cardstock by Ranger. I then sprayed Shimmer Spray in Silver Sparkle onto this panel and set it aside to dry. I also ink blended Hickory Smoke Distress Oxide onto a 1 1/4 inch by 5 1/2 inch piece of white card stock and then added some water splatter.

Once everything was dry, I glued the grey portion to the stencilled panel and then onto an A2 card base.

I stamped and coloured the kitty and mouse from the Hey There Critters Clear Stamp Set with Copic markers. I then die-cut them out with the coordinating die set.

I die-cut the phone elements and ink blended on Abandoned Coral and Saltwater Taffy for the phone receiver and dial area. I used Salvaged Patina and Peacock Feathers on the phone base. I used the same colours to ink-blend the 'meow' sentiment from the You Had Me At Meow Sentiment Dies. For the phone cord and behind the dial circle, I used Squeezed Lemonade. 

For the table, I used Weathered Wood for the table top and Saltwater Taffy for the table legs that I cut from the Purrfect Day Scene Builder Dies.

I added white gel pen accents to the die-cut elements and critters and added them to the card using a mixture of liquid glue and foam tape. 

I stamped and die-cut the sentiment from the Let's Chat Clear Stamp Set and its' coordinating die set and added this to the card with foam tape.

Thank you so much for reading my blog post, you can use my discount code T4TANNALISA10 when you visit the Time For Tea Designs shop to get 10% off your order.


Other Posts You Might Like