Pages

Showing posts with label You Had Me At Meow. Show all posts

Wednesday, 10 April 2024

Meeoooowww!!

Hey there Tea-timers...

DT Ashlee here with some new T4T inspiration for you!

MEOOOOWWW...

To create this card I decided to choose a colour of card that I don't usually gravitate towards and that was orange. I then used the Pawsome prints stencil along with brown distress oxide ink to create a paw pattern/inked card base....


Using the You had me at MEOW sentiment die I die cut that from two different brown cardstocks before adhering together with liquid glue and adding to the card base using foam tape....

I added a couple cute little kitty faces by stamping, colouring and die cutting them from the Sweet cart critters set! These were adhered using foam tape also so that my card has lots of nice dimension!!

To complete the card in my usual style I finished it all off with a touch of pretty sequins. That's all for my card today, I hope you enjoyed this kitty themed card....


Until next post happy crafting, hugs Ashlee. 

Wednesday, 13 December 2023

MEOW....!!

 Hello lovely Tea-timer friends...

DT Ashlee here with a kitty cat themed card for today....

"YOU HAD ME AT MEOW"!


Time for tea designs products used for this card are :

- You had me at meow sentiment dies

- Pawsome prints stencil

- Home is where the heart is stamp set

- Home is where the heart is co-ordinating dies


To create this card I started with a mustard yellow card stock that I added partial paw print stencilling too with Catherine Pooler ink. I went on to die cut the sentiment, base from black card and then white for the wording that I added ink blending too for a fade of colour. This was adhered to the card base using foam tape to start adding dimension. 

Using a couple of images from the home is where the heart is set I stamped, coloured and die cut them before adhering to the card. These were coloured using Spectrum noir tri-blend markers. 

To complete the card a touch of pretty sequins adhered using micro glue dots (I love these things for adhering sequins, they are the best!)


That's all for my card today, what do you think?!

Happy crafting, hugs Ashlee. 

Friday, 24 November 2023

You Had Me At Coffee

Happy Friday, DT Annalisa here with another coffee-themed card - I have been on a roll for the last few weeks! I created this card using the large You Had Me At Meow Sentiment Dies that I adjusted to read 'You had me at coffee' by adding the Coffee Sentiment Die. It is always fun to get more use out of dies like this!

I used the Large Scallop Celebrate Frame Dies to cut out watercolour paper on which I ink blended ground espresso Distress ink through the Coffee Beans 6 x 6" Stencil. Next, I applied tea-dye Distress Oxide Spray and heat set the panel. I then added ground espresso Distress Ink splatter using water and a paintbrush. 


I die-cut teal cardstock with the 'You had me at meow' and 'coffee' sentiment dies and then ink blended peacock feathers Distress Ink for a deeper colour. I ink smooshed ground espresso Distress Ink onto the coffee text for added texture. I die-cut vellum with the coffee shadow die and used liquid glue to adhere it to the 'coffee' text. 

For the images on this card, I used Snappy Before Coffee (coordinating die set) and It's Penguin-ing to Look A Lot Like Christmas (coordinating dies) that I coloured with Copics and added white gel pen accents. 


I die-cut the letters/text three times for dimension and glued them all together with liquid glue. I then used liquid glue to adhere all the elements to the card.

I added stickles for sparkle on the bottom of all the letters and some of the images.

Thank you so much for reading my blog post. Remember to use my discount code T4TANNALISA10 when you visit the Time For Tea Designs shop to get 10% off your order.

Wednesday, 2 August 2023

Meow....!!

 Hey there Tea-timers...

It's DT Ashlee here and today I'm sharing a new card I made using some fun Time for Tea designs goodies to create a kitty cat themed card! 


I used these T4T products :

To create this card I started with a light grey card stock base that I inked the Pawsome prints on to with a grey ink from Catherine Pooler. I then die cut the large focal sentiment from two shades of pink cardstock and glued them together with Bearly arts liquid glue. That was then adhered to the card base using foam tape to pop it up.


 I stamped, coloured and die cut a bunch of images from the Kitty capers set and adhered those in place also with layers of foam tape to add even more dimension. The images were all coloured using Ohuhu brush markers. To finish the card off a touch of pretty pink sequins!


That's all for my card today, I hope you enjoyed this kitty themed card. Till next post happy crafting, hugs Ashlee. 

Wednesday, 1 February 2023

Pawsome....!!

Hey there Tea-timers...

How awesome was Valentine's inspiration week?! It was so nice seeing all the teams lovely creations so I thought I would continue it on a little more this week with a pink pawsome design!!


I used these Time for Tea designs products :


To create this card I started with a light pink cardstock base that I added the pawsome prints too using the stencil and Catherine Pooler ink. I then added a bit of blending to the top portion and gave it a splatter of black paint...

Using the You had me at Meow sentiment I die cut both layers and adhered them together with liquid glue before adhering to the card base with foam tape so it popped up off the base!


I coloured up two plants and a cat from the Purrfect set using Spectrum noir tri-blend markers, die cut using the co-ordinating dies and adhered those also using foam tape before completing the card with a touch of sequins....

I hope you enjoyed this meow card, happy crafting. Hugs Ashlee.

Friday, 16 September 2022

You Had Me At Meow


Happy Friday, DT Annalisa here! My card today features the awesomely large You Had Me At Meow Sentiment Dies. I love how this die takes up a whole A2 card!


I found some adhesive sheets with wood print at my local dollar store and decided to try them in my cardmaking. I used a stitched rectangle die (4 by 5 1/4 inches) to cut out one of the wood patterns. I also ran this through my die-cutting machine with the You Had Me At Meow die. It helped me with the placement of the letters and provided me with wood-looking letters that I could use in another project. I removed the backer sheet of the die-cut wood panel and placed it on a white A2 card base. 


I ink blended Walnut Stain Distress Ink using my Beautiful Blender Brush onto some white card stock through the Pawsome Prints 6 x6" Stencil. I used the You Had Me At Meow sentiment again to cut the stencilled paper. I used the same die to cut out the letters two more times (it got a workout on this card!). I glued all the letters together and then onto the card.  


I used the 
Purrfect DayKitty Capers and Café Critters stamp sets and their coordinating dies. I coloured the images with Copic markers and added white Gelly Roll pen accents. I used liquid glue to adhere the elements to the card.


Thank you so much for reading my blog post, you can use my discount code
T4TANNALISA10 when you visit the Time For Tea Designs shop to get 10% off your order.


Thursday, 7 July 2022

How to make your rainbow ink blend POP!


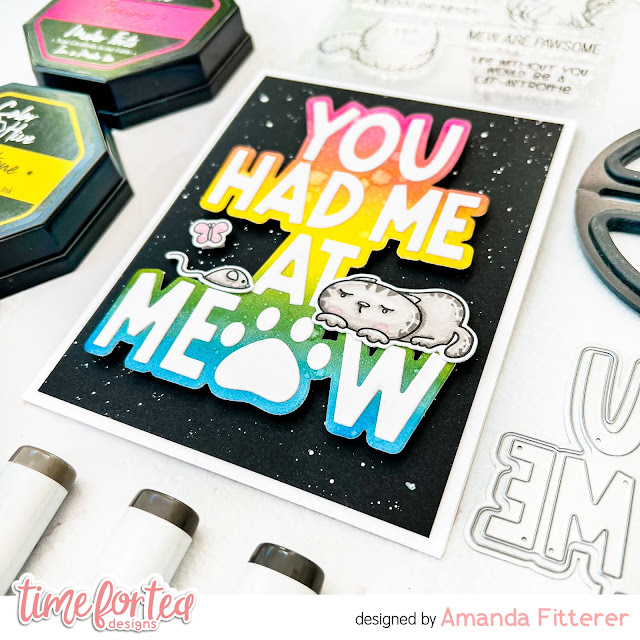
Hello friends!  It's Amanda back to share a rainbowy happy card!  Adding rainbow on any card just catches the eye, doesn't it?  
Want to make your rainbow blends pop even more?!  Add a black background!  Yep, it's as simple as that!  If you don't like the solid black background, you can always add white paint splatters to help ease the contrast!

To create this card, I've cut my white card base down to 5.5"x8.5" and my black cardstock to 4" x 5.25".  I've added the white paint splatters onto my black panel.

I've also die cut the You Had Me at Meow Sentiment Die and used only 3 colors to create a rainbow!  I've used Maker Forte's Flamingo, Yellowstone, and Vegas Strip Color Hive inks.  I've also stamped some images from the Kitty Capers stamp set, colored them with Copic markers, and then cut them out using the coordinating die set.


That's it for me today!  I hope you enjoyed my tips and tricks!
Don't forget, you can use code T4TAMANDA10 to get 10% off your purchase!
Until next week.... Xx, Amanda 


Tuesday, 5 July 2022

You had me at meow!


Hi friends!


Welcome back to the T4TD blog! It's Miki here and today I have another card to share with you.

To start with, I used the Pawsome Print Stencil and ink blended it in white on a purple cardstock. I let it dry for a bit and used the You had me at meow sentiment dies set to cut the words out. I then cut it twice more from the same purple cardstock and glued the letters together for extra dimension. I then cut the shadow from white cardstock and used one of the negatives from cutting the sentiment to glue the letters down straight. 

For the background I picked Shaded Lilac and lightly ink blended it in the centre of a white panel. I tried to follow the shape of the word shadow. I added some splatters in Shaded Lilac and white and let it dry. I then cut the panel to 4" x 5.25". I glued it on a black A2 card base and glued my large sentiment on top. I added a white panel inside my card base to be able to write a greeting.

I then stamped a kitty from the Purrfect Day Stamp Set on white card stock and coloured it in. I used the matching dies to cut it out and added some white highlights. I glued it on my card using foam tape and added some black gems around.

Today's card is super simple, but I love it and I hope you do too. Remember the code T4TMIKI10 gives you 10% off store-wide.


See you next week!

Miki

Wednesday, 15 June 2022

Video: Sentiment Die Shaker Card

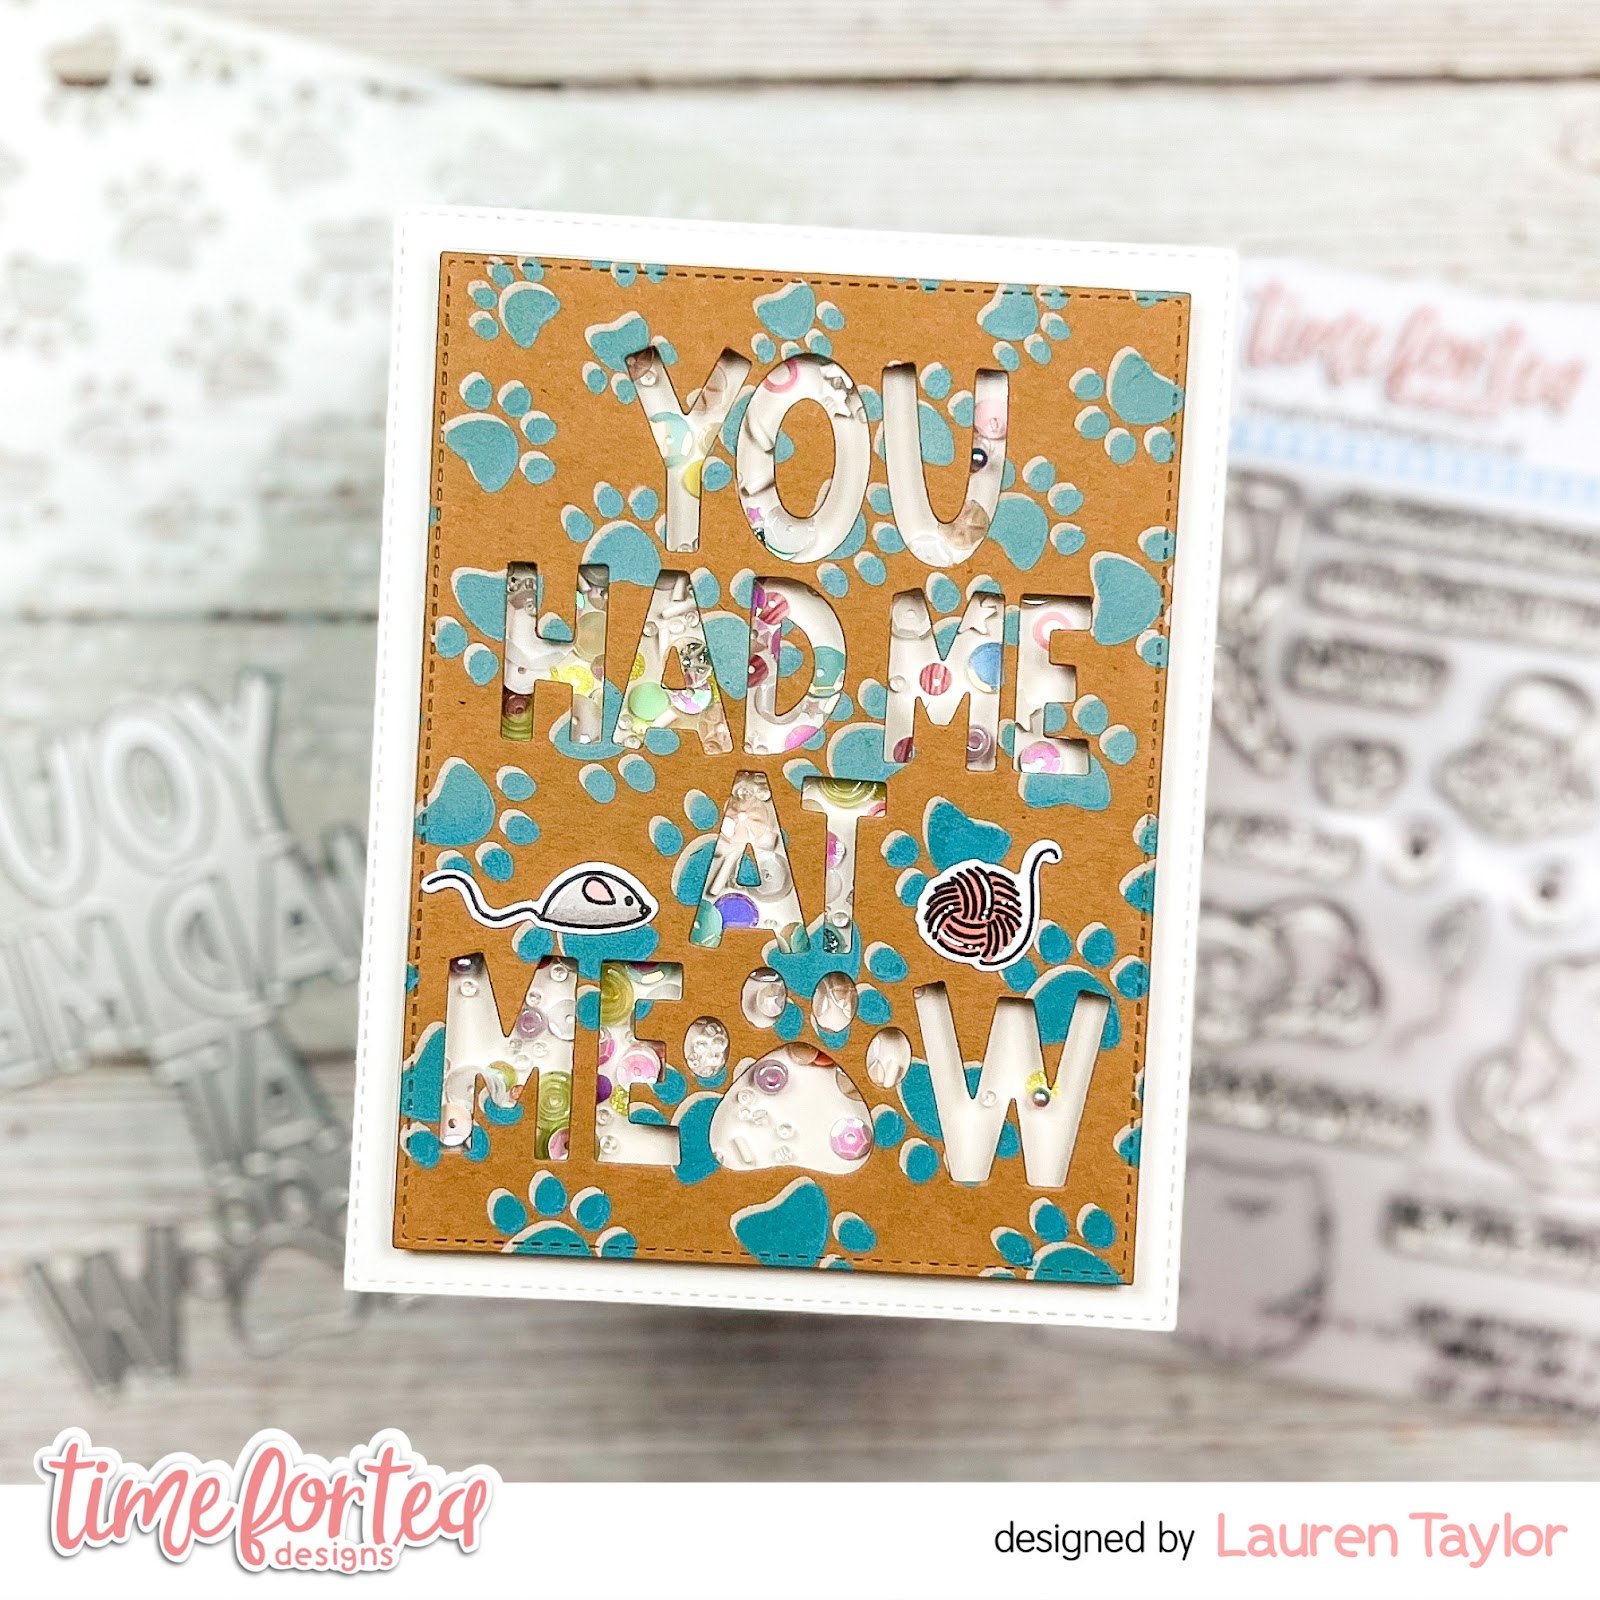
Hi, Friends! Lauren here and I'm back with a new video tutorial on YouTube! One of my favorite ways to use the new large sentiment dies is as a shaker window. In today's video, we're going to create a fun, stenciled background, die cut it with a sentiment die and then turn that panel into a large shaker. Of course we'll have some cute stamped images to bring some fun to the card - especially the inside!

If shaker cards are not your favorite, or maybe you don't have all of the supplies, this can be easily made into a regular panel card. Just glue the die cut panel to your card base instead of popping it up to be a shaker!

Click the image below to start the video and make sure to leave a comment if you have any questions!


Here is a quick list of the Time For Tea Designs supplies I used and make sure to enter my code T4TLAUREN10 at checkout for 10% off your order!

Thanks for joining me today and see you next month!

XO. Lauren

Find me on my social media here!

Friday, 10 June 2022

Just Called to Say Meow


Hello and happy Friday tea-timers! DT Annalisa here sharing a cute kitty card featuring the Retro Phone Builder Dies and the You Had Me At Meow Sentiment Dies. You could colour this giant retro phone in different Distress Oxide or Ink colours or even use patterned paper for a variety of cards.

For the background, I used my Aqua Beautiful Blender Brush to apply some Speckled Egg Distress Oxide to the Tiger Stripes 6 x6" Stencil to a 5 1/2 inch by 4 1/4 panel of Distress White Heavy cardstock by Ranger. I then sprayed Shimmer Spray in Silver Sparkle onto this panel and set it aside to dry. I also ink blended Hickory Smoke Distress Oxide onto a 1 1/4 inch by 5 1/2 inch piece of white card stock and then added some water splatter.

Once everything was dry, I glued the grey portion to the stencilled panel and then onto an A2 card base.

I stamped and coloured the kitty and mouse from the Hey There Critters Clear Stamp Set with Copic markers. I then die-cut them out with the coordinating die set.

I die-cut the phone elements and ink blended on Abandoned Coral and Saltwater Taffy for the phone receiver and dial area. I used Salvaged Patina and Peacock Feathers on the phone base. I used the same colours to ink-blend the 'meow' sentiment from the You Had Me At Meow Sentiment Dies. For the phone cord and behind the dial circle, I used Squeezed Lemonade. 

For the table, I used Weathered Wood for the table top and Saltwater Taffy for the table legs that I cut from the Purrfect Day Scene Builder Dies.

I added white gel pen accents to the die-cut elements and critters and added them to the card using a mixture of liquid glue and foam tape. 

I stamped and die-cut the sentiment from the Let's Chat Clear Stamp Set and its' coordinating die set and added this to the card with foam tape.

Thank you so much for reading my blog post, you can use my discount code T4TANNALISA10 when you visit the Time For Tea Designs shop to get 10% off your order.


Other Posts You Might Like