Pages

Showing posts with label Let's Spoon. Show all posts

Sunday, 17 November 2024

Let's Spoon

 Hi Friends!
I’m Patricia and today I share you not one but two cards with Let’s Spoon Stamp Set and coordinating dies.


For the two card I’ve use Houndstooth Stencil, each one of them with different colors of Distress Oxide inks. One with pink tones Spun Sugar and Picked Raspberry. And the other in green tones Peeled Paint and Twisted Citron.

For one of them I used this pair of avocados as the protagonist, which I think are really cute (well, the whole set 🤗❤️)


And I made the background round with the Simple Stitched Circle Dies and Scalloped Circle Dies sets that combine very well with each other.


For the second one, the prettiest pair of spoons and also use a small circle to make it stand out from the background.


Thank you so much for reading my blog post. Remember to use my discount code T4TPATRICIA10 when you visit the Time For Tea Designs shop to get 10% off your order. Happy Crafting! 

Wednesday, 28 June 2023

A pizza my heart

 Hey there Tea-timer friends...

It's DT Ashlee here. Do you like pizza?! If you answered yes then you are in for a pizza treat with this card!


I used these Time for Tea designs products :


To create this card I started with a teal blue card stock base that I added scattered hearts stencilling to using Catherine Pooler ink in the colour Cummerbund. 

Using black paint mixed with water I gave the base a splatter of paint! 

Using the wide stitched frame dies I die cut a frame from light grey card and backed it with a darker grey. I then adhered that angled onto the card base using foam tape to start adding in some dimension. 


I stamped, coloured and die cut three of the pizzas from the lets spoon set then adhered them onto the frame. 

Now it was time for a sentiment so I stamped and die cut the 'you stole a pizza my' and adhered it below the pizzas. Using the Anthonys alpha set I die cut the word HEART to finish the sentiment. I die cut it from grey cardstock and also from pink card so that I could offset it creating a shadow. Once that was all done I adhered it in place and finished it all off with a touch of sequins and 
embellishments!


Thanks for checking out my card today, I hope you enjoyed it. Happy crafting, Hugs Ashlee.

Wednesday, 8 March 2023

AVO nice day shaker

 Hey there Tea-timer friends...

It's DT Ashlee here with you today and I have an avocado inspired card to share featuring the "Let's spoon stamp and die collection".

I recently got these stamps and the let's avocuddle shaker embellishments so I couldn't wait to make a shaking avocado card with them!! 


I created the card base using the A2 stitched hearts cover die by die cutting it from a green cardstock and then adding some shading to the bottom half portion using green ink....

I then adhered acetate to the cut out and added foam tape to make the shaker portion, filled it with avocado babies/sequins and backed it closed with another green piece of cardstock!!


I wanted a fun sentiment so I die cut the AVO NICE DAY using the Anthony's alphas die from white and green cardstock so that I could adhere the white cuts behind the green offset creating a letter shadow...

These were adhered to the card base using foam tape giving a nice bit of dimension to the lettering!!


I coloured up a couple of the super cute avo's using OLO markers and stamped the centres using CPD ink. Using a white gel pen I added some white highlights them adhered them to the base also using foam tape to pop them up...

To complete the card a small touch of sequins!!


Thanks for checking out my inspiration for today, I hope YOU avo nice day hehe....
Happy crafting, hugs Ashlee. 

Wednesday, 11 May 2022

Easy (E-Z!) light up cards

Happy May, Tea-timers! I have been meaning to try a light-up card forever, so when I got the Let's Spoon stamp set a couple of weeks ago in the Treat Yourself Tuesday sale, the little light bulb images just called out to be lit up, and I finally broke out my E-Z Lights from Pear Blossom Press.


To make your own, you'll need:

- Let's Spoon stamp set

- White and grey cardstock

- Vellum

- Copic markers (I used Y19, Y08, Y15, Y02 for the yellows and C5, C3, C0 for the greys)

- A tiny die (I used the heart from the Paper Plane Pals set)

- E-Z Lights

- Foam tape

- Clear tape


Instructions 

1. Stamp two of the light bulb images onto white cardstock, cut to 3.75" x 5". Stamp the sentiment below, and the light switch toward the bottom right.

2. Colour the light bulbs and light switch using Copics.

3. Use a tiny die to cut a small hole in the centre of each light bulb.

4. Separate one of the lights sets from the pack of three, and insert the battery. The three tiny lights on the end of the wires should light up when you press the small button. 

5. Place the stamped panel over the card base to work out where the light switch and bulbs will go. Mark their position with a pencil on the card base.

6. Attach the battery pack to the card base with double sided tape, underneath where the light switch will go. Place the lights over your pencil marks for the light bulbs and secure with tape. Tape down the rest of the wires so they won't poke out the side of the card front. Place your card front over the light set and press the light switch image to ensure everything is in the right place.

7. Colour a scrap of vellum with a yellow Copic marker and glue it in place behind the light bulb images.

8. Attach the card front to the card using double height foam tape, to ensure there is enough room for the battery pack. 

And here's the finished product:


Thanks again for tuning in and don't forget to use discount code T4TJAYNE10 to get 10% off your next purchase. Until next time, happy crafting!!

Tuesday, 15 March 2022

I love you to Pizzas


Hello Tea Timers! Happy Tuesday! Who here loves pizza? I totally do so you can imagine my excitement when I saw this cute stamp in the Let's Spoon set! For today's card I also have a reel over on IG showcasing the process so please make sure to check it out here.

For today's card I started off by using the A2 Stitched Hearts Dies to create my background. I then ink blended it using the following Distress Oxide colours:

  • Tumbled Glass
  • Broken China
  • Peacock Feathers
I then added some splatters in the same colours to add some interest to my background. Next, I used the stitched die from the same set and cut it 4 times from white cardstock. I glued them together and added the stack to the middle of my ink blended panel.

Next up, I stamped the pizza from the Let's Spoon set twice on white cardstock. I used my Spectrum Noir Illustrator markers to colour them in and cut them using the matching dies. I embossed the matching sentiment in WOW Opaque Bright White embossing powder on black cardstock and cut it using the matching die. 

I added the images on top of the white panel and used some heart gems to add some interest. Once my panel was done, I glued it to a top folding A2 card panel.

As always, you can use my discount code T4TMIKI10 for 10% off your order site wide!

I hope you have a lovely rest of the week!

Hugs,
Miki

Tuesday, 8 February 2022

Let's Spoon note cards

Hi friends! It's Miki here and today I have some super cute note cards to share with you. I used the Let's spoon stamp & die set to create these and I think they're so adorable!

I started by stamping my images - I picked the pizza, the spoons, the light bulb and the switch and die cut them using the matching dies. I then coloured them in using my Spectrum Noir Illustrator markers and added some white highlights. 

Next, I cut some 3.5" x 3.5" panels and used a stencil to ink blend an abstract background. The one that I used is no longer available, but the Boho Tiles stencil would work just as well. The distress oxides that I chose are:

  • Cracked Pistachio
  • Kitsch Flamingo
  • Tumbled Glass
Next, I stamped and embossed the matching sentiments in white on black cardstock and used the dies to cut them out.

To assemble the notecards I used some pattern paper from the Joyful Winter paper pad, glued it to 4"x4" card bases and added the ink blended background on top with foam tape. I then added my images on top and the sentiments, glued some heart gems and that was it.

These note cards were super quick and fun to make and I think they're perfect to give to your special someone for Valentine's day.

I'm up on the T4TD Instagram page with a reel showing you the process so make sure to check that out!

If you shop on the T4TD website, please remember to use my code T4TMIKI10 for 10% off your whole order!

Hugs,
Miki

Wednesday, 2 February 2022

Let's Spoon

 Hello!

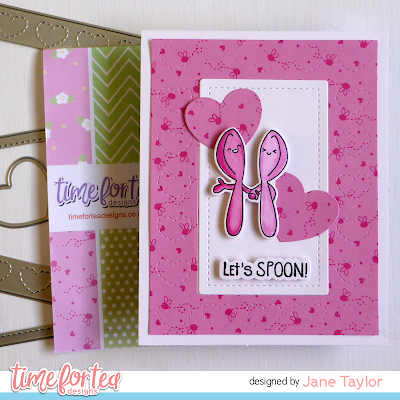
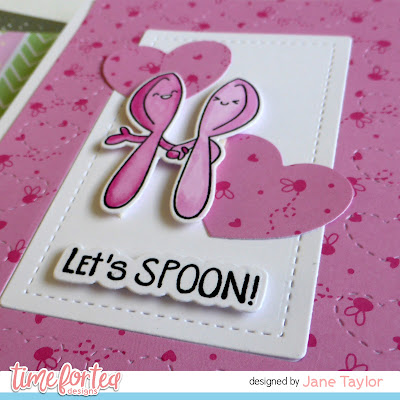
Today I'm sharing a card I made using the fabulously cheeky Let's Spoon stamps and dies combined with the A2 Stitched Hearts Cover Dies and Brighter Days Paper Pad.


I used the A2 Stitched Hearts Cover Dies to cut the background and hearts from the Brighter Days paper and a white panel to use as a base for the spoons.


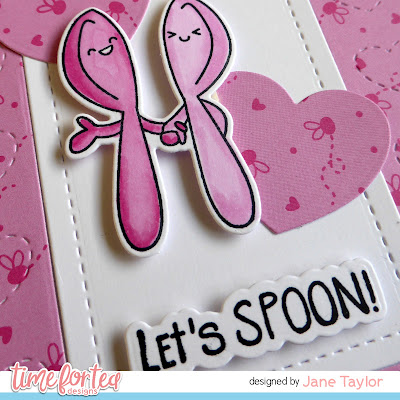
I then stamped coloured and die cut the spoon images and sentiment from Let's Spoon. I chose shades of pink to echo the paper and popped everything up using foam pads.


I hope you like my card using the awesome products from T4TD. If you'd like to purchase any items you can get 10% off by using my code - T4TJANE10.


Thanks for looking today. 
Stay safe and keep crafting!

Jane
x


Tuesday, 1 February 2022

you GUAC my world!


Hello Tea Timers! 

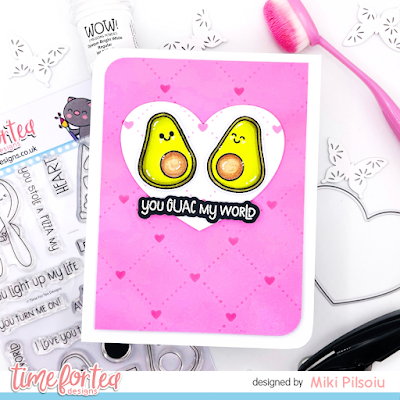
It's Miki here and today I'm back with new inspiration using the new release. I am in love with the Let's spoon stamp & die collection, partially because I love avocados, partially for the sassy sentiments hehe!

For today's card I also have a reel so please make sure to head over to the T4TD Instagram page to see each step. 

To start with, I ink blended an 3.75" x 5" panel in Kitsch Flamingo and used a stencil with the Picked Raspberry oxide for a tone on tone effect. I then used the nesting hearts dies and cut one of the hearts 5 times from white cardstock. I ink blended the same stencil design on one of the hearts in Kitsch Flamingo and glued them together for added dimension.

Next I stamped the avocados, coloured them in and used the matching dies to cut them. I also embossed the you GUAC my world sentiment in white embossing powder and cut it out using the sentiment die. I so appreciate that the matching dies also cut out the sentiments, makes such a huge difference! I added the images and the sentiment to my heart using foam tape and glued them to the panel. 

I used a corner rounder on the bottom right and top left corners of both my panel and the card base for added detail. I then added the panel to my card base using foam tape and lastly I added some white highlights to my avocados.

This card was super easy to make and so much fun, I hope you give it a go too!

Thanks for stopping by and I hope to see you next week. If you shop on the T4TD website, please remember to use the code T4TMIKI10 for 10% off your order!

Hugs,

Miki

Other Posts You Might Like