Pages

Showing posts with label Puffy Alpha Stickers. Show all posts

Monday, 29 September 2025

Happy Birthday Cailin!

Hi. Design team member Koren Wiskman here. I hope that I can inspire you to create something fun with all of these awesome T4TD supplies. Today I am using the Thinking of You Sentiment Dies and the Puffy Alpha Stickers to create this project. This card was personalized for my daughter Cailin. She is turning 24 on the day of this post. It was inspired by her. 

The card size is A2 (4.25in x5.5in.) The front panel is cut to 3.25in x 4.75in. This is my favorite size card to create. I have tried so many others but this size is the one that keeps my heart happy. My card bases are typically made using a neutral gray cardstock. These two details about my cards rarely change. 

Background

I used a stencil from my stash to ink blend my daughter's favorite color into a watercolor like background. I used several shades of the same teal color to try for a gradient effect. 

Sentiment

I used the Time for Tea Designs Thinking of You Sentiment Dies to cut "thinking of you" out of the center of the ink blended panel. To create the shiny effect on the sentiment I covered it with two coats of glossy accents. My glossy accents is rather old and it dried with a very yellow tinge to it. I might need to think about buying a new one. Anywho, I then used the T4TD Puffy Alpha Stickers to personalize the card with her name at the bottom of the sentiment. The card panel with the background and the sentiment itself is popped up using foam adhesive it give it dimension. I let the gray of the card base come through behind the letters. 

Embellishments

I then embellished the card with some hearts from my stash in a beautiful pink color. The "24" is also from my stash of number and alpha stickers. 

I hope that I've inspired you to create something today. Check out the Thinking of you Sentiment Dies and the Puffy Alpha Stickers in the T4TD shop. 


KOREN

Friday, 13 June 2025

Make a Splash


Happy Friday! DT Annalisa here, and I’m excited to share another card featuring products from the new release. I created this vibrant card using the Rain Or Shine Mice and the coordinating dies!

To make the background panel, I used a raindrop stencil from my stash, watercolour paper, and Distress watercolour pencils. I began by adding water to the tip of my Stormy Sky Distress watercolour pencil, then I scribbled it onto the back of the stencil. After spritzing the stencil with water, I pressed it firmly onto the watercolour paper. Next, I colored inside the raindrop areas with the Salvaged Patina Distress watercolour pencil. To finish the background, I added splatters using the Stormy Sky watercolour pencil over the entire panel.


I adhered the completed background to a card base with double-sided tape and added a frame using the Smile Inverted Scallop Frame Dies, attaching it with liquid glue.

Next, I stamped several images from the Rain Or Shine Mice stamp set, colored them with Copics, and cut them out using the coordinating dies. I also added accents with a white gel pen using a Gelly Roll Pen. For additional elements, I stamped clouds from the Adventure Awaits and cut them out with the coordinating dies.


Finally, I used liquid glue to adhere the stamped images to the card and spelled out the word "splash" with Pineapple Daiquiri Puffy Alpha Stickers to complete the design.

Thank you so much for reading my blog post! Don’t forget to use my discount code T4TANNALISA10 when you shop at Time For Tea Designs to receive 10% off your order.


Friday, 9 May 2025

Welcome Baby


Happy Friday, DT Annalisa here. I am sharing a mixed-media baby card I created using the Loads of Love stamp set, the Five Windows Cover Die, and the Tiled Wall 6 x 6" Stencil from Time For Tea Designs.

For the mixed-media background, I applied Ranger Distress Crackle Paste with a palette knife through the Tiled Wall 6 x 6" Stencil onto Distress Watercolour Cardstock by Ranger. Once the paste dried, I used Distress Watercolour Pencils in the colours Speckled Egg, Broken China, Weathered Wood, and Stormy Sky. I dipped the pencils in water to soften the pigment and then used them to apply colour to the paper.


After the panel dried, I adhered it to a card base using liquid glue. I die-cut white cardstock with the Five Windows Cover Die and attached it to the card as well.

For the floor area, I ink-blended Lost Shadow and Weathered Wood onto woodgrain cardstock. I trimmed this paper to fit inside the largest opening and secured it with liquid glue.


Next, I stamped multiple images from the Loads of Love stamp set and cut them out using the coordinating dies. I colored the images with Copics and added accents with a white gel pen.

To finish the card, I used liquid glue and various thicknesses of double-sided foam tape to adhere the images to the card base. I added the 'baby' sentiment using Watermelon Margarita Puffy Alpha Stickers.


I hope you like it!

Thank you so much for reading my blog post! Be sure to use my discount code T4TANNALISA10 when you visit the Time For Tea Designs shop to get 10% off your order.


Sunday, 22 December 2024

Holly Jolly Christmas

 Hi Friends!
I’m Patricia and today I share you a new Christmas card with new release Santa's Nice list stamp set
For the background I've used Distress Oxide ink (Wilted Violet & Worn Lipstick colors)

I've cutting two circles from Stitched Circle dies for use under the two santas and highlight them from the background
And I've given both of them a few touches with Distress ink so that they were not completely white.

For the sentiment I used one of sentiment of the set and White Velvet Alpha Stickers. To finish I used a few Festive Fun & Clear enamel dots.
Thank you so much for reading my blog post. Remember to use my discount code T4TPATRICIA10 when you visit the Time For Tea Designs shop to get 10% off your order. Happy Crafting!  

Sunday, 15 December 2024

Merry Christmas

  Hi Friends!

I’m Patricia and today I share you a new Christmas card with  Sweet Christmas stamp set.


I've created this card with Scalloped Circle Dies, on of them I've used with Joyful Winter 6x6 Paper Pad and the other I've used Distress Oxide Ink (Spun Sugar) and liquid inks for splash on.


For the sentiment I've used the White Velvet Alpha Stickers


Thank you so much for reading my blog post. Remember to use my discount code T4TPATRICIA10 when you visit the Time For Tea Designs shop to get 10% off your order. Happy Crafting! 

Friday, 30 August 2024

Lime All Yours Bunnies


Happy Friday, DT Annalisa here today I share a lime-coloured punny card. Who doesn't love a good pun? I combined new and older Time For Tea Designs stamp sets to create this scene.

I started by adding several drops of twisted citron Distress Paint onto my glass matt and spraying it with water. I pressed water-coloured cardstock into the paint several times to create a bright green background.


Once the background was dry, I used the Simple Square Nesting Dies to die-cut it out. I then glued it to a 4 1/2 inch by 4 1/2 inch card base.

I used the same die set to cut some patterned paper to a 4-by-4-inch square. I then used the Heart Nesting Dies to cut into this patterned paper. I also cut a 4-inch by 1/2-inch piece of green patterned paper and glued it to the bottom area.


I stuck down vellum paper on the card base in the area where the heart opening was. I then used liquid glue to adhere the green patterned paper to the card base.

I stamped and coloured (with Copics) two bunny images from Blooming Bunnies, the lime from Squeeze the Day and the butterfly and bee from I Really Dig You. I cut the images out with their coordinating dies. I added white gel pen accents with a Gelly Roll Pen.


I used double-sided foam tape to stick the bunnies, lime and sentiment to the card base. I used liquid glue to stick the butterfly and bee.

I used the letters in 'lime' from the Appletini Puffy Alpha Stickers and stuck them above 'all yours' in the center of the heart opening in the card.


Thank you so much for reading my blog post, be sure to use my discount code T4TANNALISA10 when you visit the Time For Tea Designs shop to get 10% off your order.

Friday, 10 December 2021

Home For Christmas


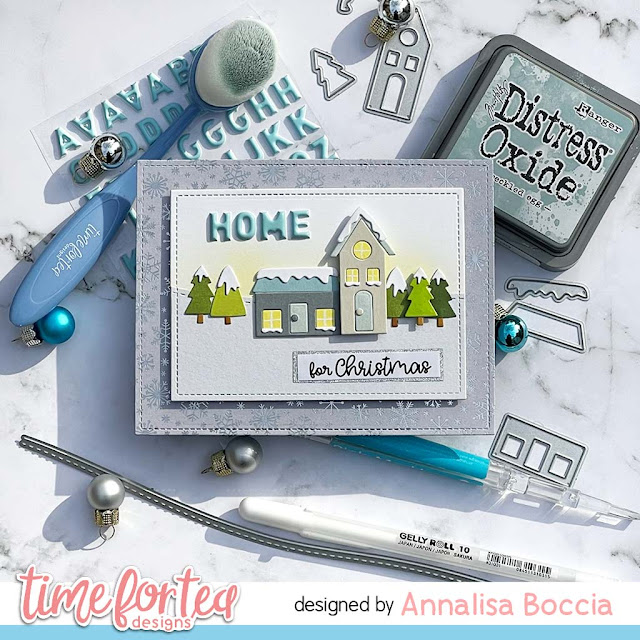
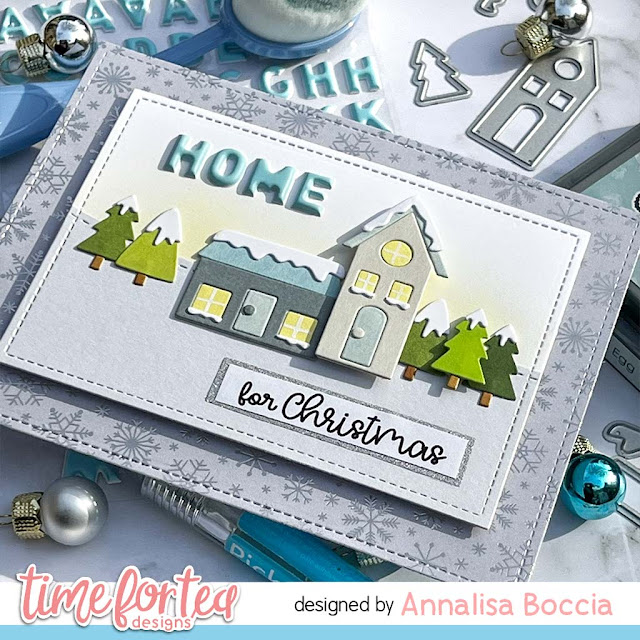
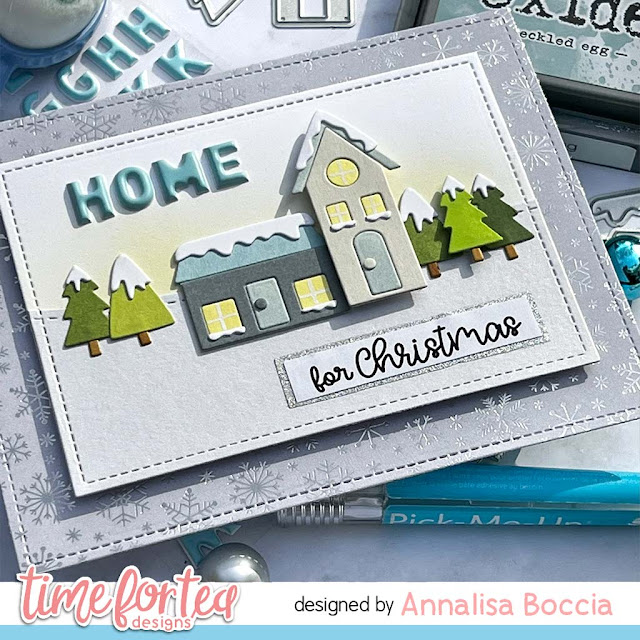
Happy Friday and thanks for visiting. DT Annalisa here sharing a card featuring the new Home For Christmas Die set from Time For Tea Designs. It has so many little pieces that can create a beautiful winter scene, however, if you don't use the snow pieces, you could use this in any season. 

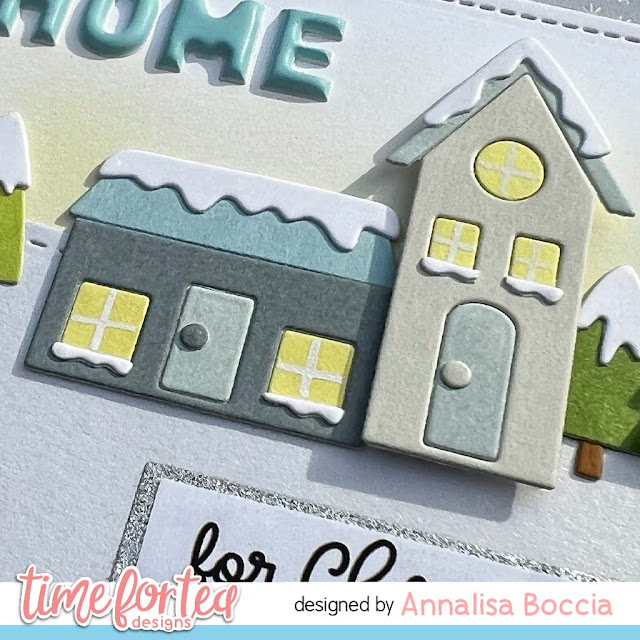
For the trees, I used smooth cardstock in different shades of green. For the houses, I coloured white cardstock with my Distress Oxide inks (Weathered Wood, Speckled Egg, Squeezed Lemonade) and die cut the pieces out. 

For the snowy hill, I used the Slimline Hillside Scene Dies to cut Holiday Shimmer cardstock (from Recollections) using the wavy stitched die in the set. For the sky, I ink blended with Squeezed Lemonade Distress Oxide and my Beautiful Rainbow Blender Brushes for a pale yellow sky.

I cut out cardstock in the shape of the houses and roofs so that I could adhere the windows, doors and roofs to the same layer. I used liquid glue to stick down the tresses and houses, except for one tree and the tall house - those I popped up using foam tape.

For the home sentiment, I used the Blue Lady Puffy Alpha Stickers. The 'for Christmas' sentiment is from two stamp sets - the new Baked With More Love stamp set and the Christmas Surprise Clear Stamp Set. I stamped the sentiment (after masking out the word you) and cut it out with my paper trimmer. I stuck it down onto some shimmer cardstock which I cut out a bit larger so that there would be a small border around the words.

To finish the card, I added foam tape to the back of the scene and placed it on top of a 5 1/2 by 4 1/2 piece of shimmery patterned paper that I had die cut using a stitched die.

Thank you so much for reading my blog post, you can use my discount code T4TANNALISA10 when you visit the Time For Tea Designs shop to get 10% off your order.


Other Posts You Might Like