Pages

Sunday, 6 March 2022

Happy Bee-Day

 Good evening Teatimers, 

I'm here (a bit late due to technical issues) on the blog today sharing this sweet birthday card using the adorable Bee Happy Stamp Set. This card absolutely gives me spring vibes, with the lighter nights and colour coming back into the garden.


To start as always I stamped and coloured my images using my Spectrum Noir Markers (colours listed below in order of lightest to darkest)

Bees - CT1, CT2, CT4, GB5 

Wings - IB1,BT2

Hive - GB2, GB3, GB5, TN4 

Branch - TN4, TN5, TN7 

To create the background I die cut a rectangle out using the 2nd largest die from the Slimline Scalloped Trio Circle Nesting Dies. Using the Sweet Honeycomb 6x6 Stencil and distress inks in Squeezed Lemonade and Spiced Marmalade I created an honeycomb pattern across the panel. 

I then took 3 small hexagon Dies and cut out from the panel. The panel was added to a slimline card base cut to size from white card and the hexagons were then pieced back into place using foam pads to give dimension. I added my cute little images to the card to create scene.

I die cut the 'Happy' from the Happy Mail Gift Card Holder Add On Set twice from white card and once from black to give a thick sturdy sentiment . Stamping the rest of the sentiment by masking off the 'Bee'  from the Bee Happy sentiment  and the 'Day' from the birthday from the Bold Sentiments set.

I finished the card off with some clear sequins randomly placed around the images.

Thank you for joining me here on the blog today, don't forget you can use my code T4TLYNDSEY10 to get 10% off your order in store.

Enjoy the rest of your Sunday evening

Lyndsey x 

Saturday, 5 March 2022

Stop Beavering Away!

 Happy Saturday Teatimer's its Natalie here with a sweet Beaver card for you today. I finally got a chance to use the new Stitched Slimline Slopes Dies it's a great die for creating scenes with.  

I started out by cutting out the die and inking up the inside panels. Adding clouds in the top one with the slimline scene builder stencil some green distress oxides for the grass and a combo of blues for the water. Finishing off with some texture by adding splatters using the same colours I used to blend. 

The beavers and accessories and trees are from the Beavering Away Stamp Set which I coloured up using copic markers. Then I added the bulrushes from the Lucky Duck Stamp Set alongside the dragon fly and fly. 

After everything was cut and coloured I layered it all together on to my card base and finished it up with my sentiment which I stamped out and heat embossed onto black card. That was my card finished off it was a really quick and easy card to make but looks super fun. I hope you like my card for today you can find all the products in the Time for Tea shop and get 10% off your orders using code T4TNATALIE10. 
Have a great weekend and Happy Crafting!

Cute Sloth Video Tutorial

 Hi DT Vic here today and I have a fun Resist Embossing video. 


I absolutely adore the Be Slothy Stamp set and I just had to use them for my video today. I also made the background using the smaller images in the stamp set. In the video you will see how I created this background.


I used some Distress Ink ( Scattered Straw, Worn Lipstick and Tumbled Glass) along with my Beautiful Blending Brushes for the colours on my background. I started by using Versamark ink and sprinkling WOW Bright White Embossing Powder over the top. I heat set this and added the inks.


I then stamped and coloured my images using the following Copics: E23, E25, E27, E53, E55, E74, E79, YG91, YG93. I added these onto my card and die cut the sentiment using the Big Birthday Wishes Sentiment Die.


I loved how this turned out in the end. I hope you enjoy the Video and don't forget you can save 10% off your orders using the code: T4TVICKI10 at the checkout to receive 10% off your orders. 

Have a lovely weekend!

Vic x

Friday, 4 March 2022

WINNER ANNOUNCED: Time for Tea and Heffy Doodle Collaboration Blog Hop

Hi Tea Timers!!

We have a winner!!! Thank you all so much for participating in the Time for and Heffy Doodle Collaboration Blog Hop! We hope you enjoyed all the inspiration!

Now it’s time to see if you’re the lucky winner! Woot woot!

(Drumroll, please!)

Congratulations, Karen Gerek!

Please email admin@timeforteadesigns.co.uk to claim your prize!

Don’t forget to check the Heffy Doodle Blog to see if you’re a winner over there!

Happy crafting!

Thank you Skunks


DT Annalisa here, wishing you a happy March! Spring is a few weeks away, so I am sharing this bright and cheerful tulip card. I can't wait until my garden starts blooming. As I write this, the snow is falling outside, so I know that we are a long way off from that!


For the middle panel, I used the medium scalloped die to cut white card stock onto which I ink blended Spiced Marmalade, Wild Honey and Squeezed Lemonade Distress Oxide, using my
Beautiful Rainbow Blender Brushes. I added some splatter in Fired Brick Distress Oxide.

For the back panel, I die-cut some white card stock using the largest stitched die from the Slimline Trio Circle Die Set and ink blended on Salvaged Patina Distress Oxide with a blender brush.

The front panel was created by die-cutting white card stock with the tulip add-on die and the smallest stitched die from the Slimline Trio Circle Die set. I added splatters of Salvaged Patina Distress Oxide with a paintbrush. 

I adhered the teal and scalloped panels to a slimline card base with liquid glue. For the top panel, I used foam tape for added dimension.

I used the following stamp sets: Stinkin' Cute, You’ve Got Mail, Mum & Dad, Be Slothy and Up, Up & Away. I stamped, coloured and die-cut the images and the 'thanks' sentiment and then used liquid glue to adhere them to the slimline card. To complete the card, I added some clear gems.


Thank you so much for reading my blog post, you can use my discount code T4TANNALISA10 when you visit the Time For Tea Designs shop to get 10% off your order.


Thursday, 3 March 2022

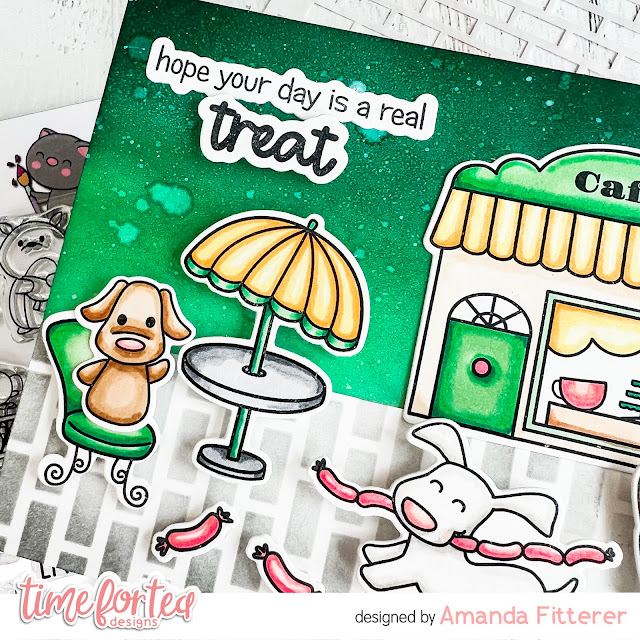
Hope your day is a real treat!


Hey friends!
It's Amanda here sharing my very first post as a proud Time for Tea Designs design team member!  I am so excited to share my creations with you!  I hope you get some inspiration from my cards and learn something new with every blog post!

Are these Enjoy the Little Things and Cafe Critters stamp sets just the CUTEST!?  Eek!  They look so good mix and matched, too!

For this card, I blended a background using Catherine Pooler's Minted, In the Park, and Deck the Halls inks.  I spritzed it with water and also flicked a bit of white paint on it.


While waiting for that to dry, I cut a panel of white cardstock for the ground.  I used the Tiled Wall Stencil and Twilight ink to create little pavestones.

Next, I stamped my images from the Enjoy the Little Things and Cafe Critters stamp sets, colored them with Copic markers, and then cut them out using the coordinating dies.


Finally, I assembled my card using liquid glue and 3D foam squares.


That's it for me today, crafty buddies!  Thank you so much for stopping by the Time for Tea blog today!  

Use code T4TAMANDA10 to get 10% off your purchase! 
See you next week!
Xx, Amanda

Tuesday, 1 March 2022

Let's catch up - Cafe Critters Scene


Hello tea timers! 

It's Miki here and today I have an extra cute scene card to share with you. I am obsessed with the Cafe Critters stamp and die collection and of course I had to make a little scene with them.

As you know by now, I start my projects by working on the background. For the sky I used the Fluffy Clouds stencil with Shaded Lilac and Spun Sugar distress oxides. I ink blended it on a card panel slightly smaller than A2 - 4"x5.25". Next up I used the Landscape Edge dies to cut two hills and some grass. I ink blended those in Twisted Citron and Mowed Lawn and added some splatters in both colours. I glued my grassy hills directly on the sky panel and left the grass one aside. 

Next, I used the Windmill add-on die to cut the fence. I ink blended it using Memento Toffee Crunch and stamped the Woodgrain A5 Stamp on top for added detail. I glued my fence on top of the grassy hill on the card panel.

I stamped the cafe and some of the images from the Cafe Critters set and coloured them in with my Spectrum Noir Illustrator markers. I used the matching dies to cut them out and added some details with a white gel pen.


I arranged my images on the card panel and glued them down. I only used foam tape for the critters, while for the other images I used liquid glue. I then took my grassy panel I created at the start and added it with foam tape at the bottom of my scene to give the illusion of them sitting in the grass. 

For the sentiment I picked the Let's catch up phrase form the Cafe set and embossed it in white on black cardstock. I used the matching die to cut it out and added it to the top of my card panel using foam tape. I then made an A2 card base and glued my panel on top.

I had so much fun creating this scene and I hope you try it out, I love all the little details and the critters are just too cute! Please remember if you shop in the T4TD store, you can use the code T4TMIKI10 for 10% off your order.

I wish you all a wonderful 1st of March and I'll see you back here next week with a new post!

Hugs,
Miki 

Other Posts You Might Like