Pages

Showing posts with label Be Slothy. Show all posts

Tuesday, 4 August 2026

Sending Smiles Your Way!

Hello Tea Timers!

Michelle from the Design Team here and today’s inspiration is the most purr-fectly delightful card featuring three little cats who have decided that flower pots make the cosiest of homes!

Supplies used:
Love Is In The Air
Light Green Spiky Plant - Beach Buds (palm tree)
Pink Flowers - Be Slothy
Dark Green Leafy Plant - Purrfect Day
Sunflowers - Hey There Critters
Garden Tools - I Really Dig You

I started with a soft and fresh white background with the lightest hint of green blended in to give it that gentle garden feel. The whole panel is then mounted onto the most cheerful pastel diamond check border which frames everything beautifully and adds a lovely pop of colour around the edges without taking anything away from the main scene.

Taking centre stage are three chunky terracotta pots, each one housing the most adorable little cat you ever did see! On the left, a sweet white cat peeks out from a pot bursting with lush green leaves and pretty pink flowers. In the middle, a cheeky little calico cat sits surrounded by big bold heart shaped leaves spilling out everywhere. And on the right, a fluffy grey tabby cat has made itself very comfortable amongst a gorgeous bunch of bright yellow sunflowers. Each pot is so full of personality and the trio together is just completely irresistible!


Tucked in on either side are a little green garden fork and a trowel, because even the most adorable plant pots need a little tending to now and then!


To finish everything off, the "Sending Smiles Your Way" sentiment is stamped in clean bold lettering on a simple white banner along the bottom, which keeps the focus on those wonderful cats and rounds off the card in the sweetest way.


This card is perfect for a cat lover, a gardening enthusiast or anyone who simply deserves a little smile in the post today!
Michelle

Friday, 3 July 2026

Thinking Of You Sloths


Happy Friday! DT Annalisa here, and today I'm sharing a thinking-of-you card for someone going through a hard time. It features a sweet sloth stamp set, a frame die set, and a stencil from T4T.

To begin, I ink-blended Salvaged Patina Distress Oxide Ink through the Scene Builder 6x6 Stencil using a blending brush. I then added splatters with the same Distress Oxide Ink to create extra dimension and interest in the background. Once it was dry, I adhered the sky panel to an A2 card base with liquid glue.


Next, I used the Smile Inverted Scallop Frame Dies to die-cut a frame from white cardstock. I adhered the frame to the card base with liquid glue, leaving a small section free of adhesive where the focal images would be placed so I could tuck them underneath the frame.

I stamped the images from the Be Slothy Clear Stamp Set and die-cut them using the coordinating die set. After colouring them with Copic markers, I added highlights with a white gel pen before adhering them to the card with liquid glue.


To finish the card, I stamped a "thinking of you" sentiment and added three red die-cut hearts for a simple pop of colour.

Thank you so much for reading my blog post! Don’t forget to use my discount code T4TANNALISA10 when you shop at Time For Tea Designs to receive 10% off your order.

Sunday, 15 February 2026

Let's Hang Out!

Hello!

Michelle from the Design Team here and today’s card all about slowing down and soaking up the good vibes with these sleepy little sloths hanging out in their leafy jungle.

Supplies used:

Be Slothy

Leafy Plants - Beach Buds (Palm Tree)


I started with a bright green leafy background that was made using a tropical leaf stencil and gently ink blending with Twisted Citron and Lucky Clover Distress Oxides on light green cardstock, giving it that lush jungle feel. I also added gold watercolour splatters to give it a subtle sparkle.

I then layered in a wooden-style arch frame cut from Kraft cardstock with some Vintage Photo and Ground Espresso Oxides ink blending around the edges to create a cosy window into the scene. The branches stretch across the card so the sloths have the perfect place to lounge, and I tucked in lots of tropical leaves and pink flowers to keep everything feeling fresh and vibrant.

The “let’s hang out” sentiment which was heat embossed onto bright pink cardstock fits these chilled little cuties perfectly. This would be such a sweet card for a friend, a catch-up hello, or just a little reminder to take things slow.

Hope this card brought a little calm and a lot of smiles to your day!

Michelle

Friday, 11 August 2023

Welcome Home


Happy Friday DT Annalisa here with a bright welcome home card which would be great for someone who has just moved or has been away from home for a while.

I used the following supplies to create the card:

Wonky Window Cover Die
Purrfect Day Scene Builder Dies
Love Is In the Air
Love Is In The Air coordinating dies
I Really Dig You
I Really Dig You coordinating dies
Oops a Daisy
Oops a Daisy coordinating die set
Purrfect Day Clear Stamp Set
Purrfect Day Coordinating Die set
Home Is Where The Heart Is Clear Stamp Set
Home Is Where The Heart Is coordinating die set
Baked With More Love Clear Stamp Set
Baked With More Love coordinating die set
Be Slothy Clear Stamp Set
Be Slothy coordinating die set


The Wonky Window Cover Die and window frame from Purrfect Day Scene Builder Dies were die-cut into yellow cardstock. Then I stuck the window frame to the back of one of the wonky window frames. I added double-sided foam tape to the back of this panel and added it to an A2 card base to which I had added light blue watercolour patterned paper.

I stamped and coloured (with Copics) all the images and cut them out with their coordinating dies. I added white gel pen accents with a Gelly Roll Pen


I stamped the sentiment onto the same yellow cardstock and heat embossed it with  Icicle ultra fine embossing powder by Brutus Monroe (clear). I die-cut it with the coordinating die and glued it to the card. 

The curtains and small carpet were die-cut from patterned paper and glued to the card. I die-cut several layers of white cardstock for the curtains and glued them behind the patterned paper for added dimension. 


Thank you so much for visiting my blog. Remember to use my discount code T4TANNALISA10 when you visit the Time For Tea Designs shop to get 10% off your order.

Friday, 10 February 2023

I Love Brew Kitty


Happy Friday, since February 14th is only a few days away, I am sharing a clean and simple Valentine's Day card that would be purr-fect for a tea lover. 

I used the following Time For Tea Designs products to create this card:


I started with an A2 card base, the Large Square masking stencil and the Scattered Hearts Stencil. I placed the Square masking stencil down and then put the Scattered Hearts Stencil on top of this. I used the strong magnets of the Wendy Vecchi 7-inch Make Art Station to ensure the stencils didn't move while I was inking up my card. I used Peacock Feathers, Picked Rasberry and Squeezed Lemonade Distress Inks and my Beautiful Rainbow Blender Brushes to apply ink. 

I stamped the kitty in the tea mug (Tearrific Pals) and the butterfly (Be Slothy), coloured them with my Copics and cut them out with their coordinating dies. I added some white gel pen accents.

I used liquid glue to adhere the butterfly and double-sided tape for the kitty in a cup. I stamped the 'i love BREW' sentiment from The Perfect Blend onto the card base. 


When you die-cut the Flirty Flowers cover die, a lot of tiny hearts remain that could be considered waste but I keep them in a small container for projects just like this! I coloured three of the tiny hearts Copics and used liquid glue to adhere them to the card.

Thank you so much for reading my blog post, you can use my discount code T4TANNALISA10 when you visit the Time For Tea Designs shop to get 10% off your order.

Friday, 29 April 2022

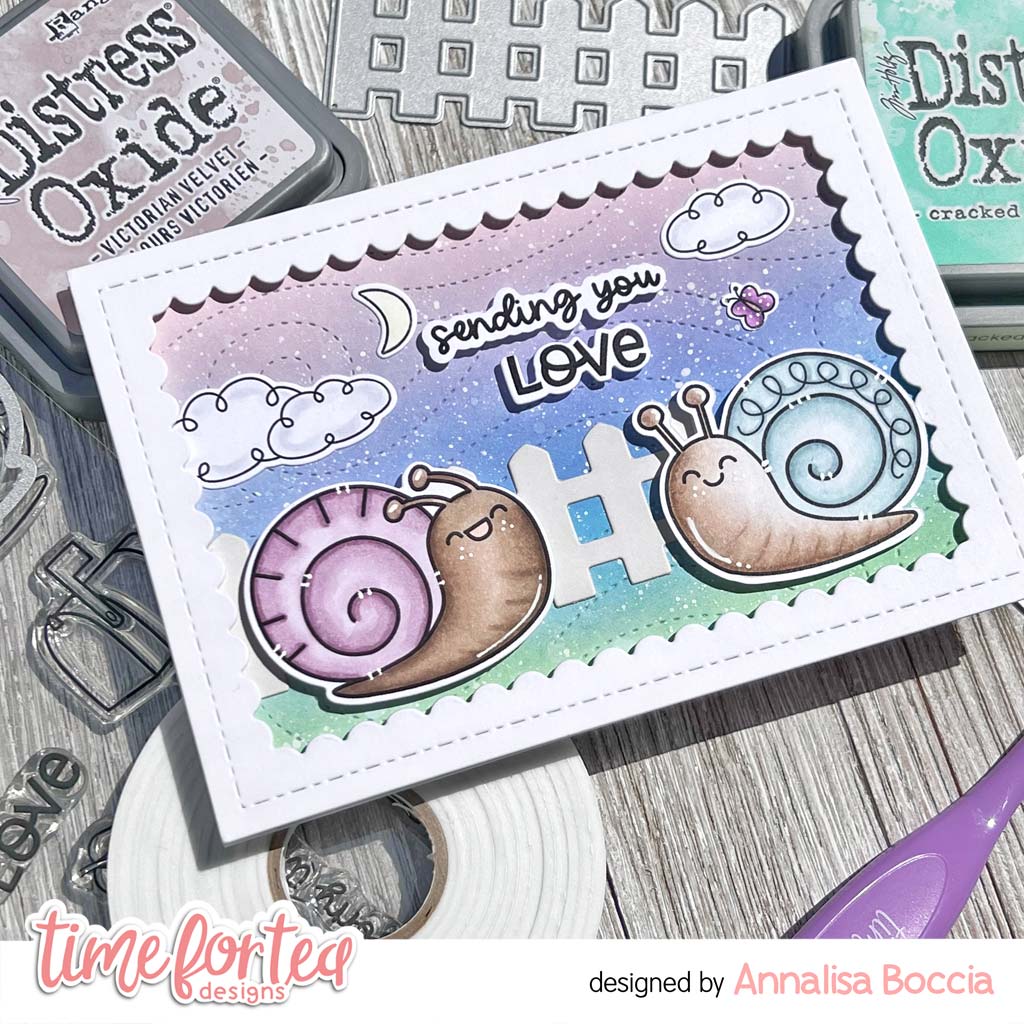
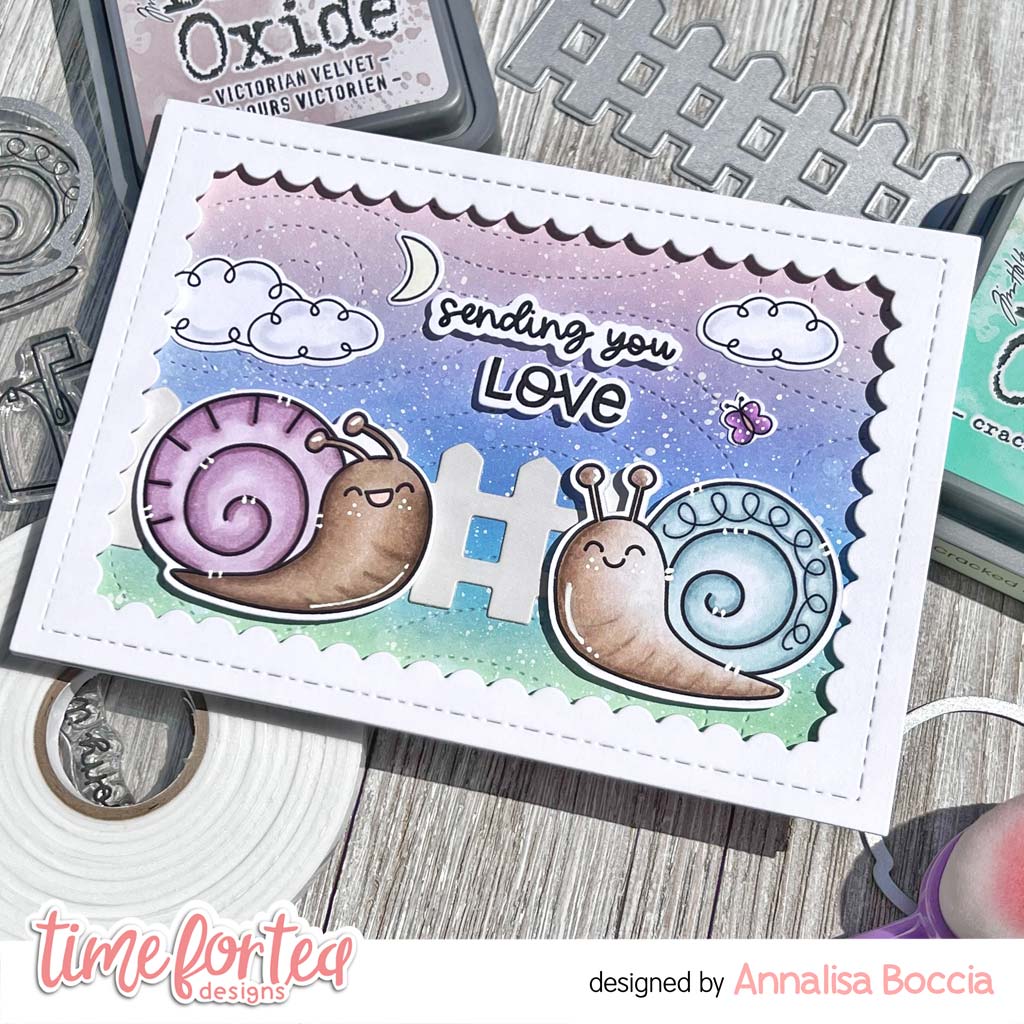
Sending You Love Snails


Happy Friday! DT Annalisa here sharing a card featuring the You’ve Got Mail clear stamp set and the coordinating dies. These snails are so fun to colour!

To start, I ink blended Distress Oxides (Victorian Velvet, Shaded Lilac, Salty Ocean and Cracked Pistachio) onto Distress White Heavy cardstock by Ranger with the Beautiful Rainbow Blender Brushes. I die-cut this panel with the Snow Flurry Cover Die and added white splatter to add inter


I die cut the fence from the Windmill Add On and lightly ink blended on some Weathered Wood Distress Oxide. I used liquid glue to stick this down to the ink-blended panel. I placed this onto a card base using liquid glue.

I stamped, coloured and die cut the snails from 'You've Got Mail.' I did the same with the clouds (Paper Plane Pals), butterfly (Be Slothy) and moon (Hillside Village). I used liquid glue to adhere the moon, clouds and butterfly to the panel. 


I used the larger frame in the Smile Inverted Scallop Frame Dies to die-cut some heavy white cardstock added foam tape to the back and stuck it to the panel. 

To complete the card, I added foam tape to the back of the snails and the sentiments and stuck them down.


Thank you so much for reading my blog post, you can use my discount code T4TANNALISA10 when you visit the Time For Tea Designs shop to get 10% off your order.

I hope you get some time to get inky and creative this weekend and that it makes you as happy as it does me!


Friday, 1 April 2022

Slothy Hugs


Happy Friday! DT Annalisa here today, I have a slimline sloth card to share with you. It features the Be Slothy stamp set and the Slimline Scalloped Trio Circle Nesting Dies from Time For Tea Designs.

 I started by using an older T4T stencil (Tropic Like It’s Hot) and ink blending on Distress Oxides in the colours Twisted Citron and Mowed Lawn using my Beautiful Rainbow Blender Brushes. I added some water and white paint splatters for interest.

Next, I die-cut out the panel using the middle rectangle die and the three scalloped circles die. I added foam tape to the back of this panel and set it aside.

I then stamped, Copic coloured and die cut the Sloths using the Be Slothy coordinating die set. I glued parts of the branches to the back of the green stencilled panel and added foam tape to the rest.

On an 8 1/8 by 3 1/8 inch card panel, I ink blended Tumbled Glass Distress Oxide to the clouds section of the Slimline Scene Builder Stencil and then added some white splatter. I then added the popped-up slimline panel and sloths to the card.

I stamped the small flower in blue and pink ink, die-cut them and glued them to the branches. I then stamped, copic coloured and die cut three butterflies and glued them to the card.

To complete the card, I added the hugs sentiment from Paper Plane Pals and then added some glossy accents to the flowers and butterflies.

Thank you so much for reading my blog post, you can use my discount code T4TANNALISA10 when you visit the Time For Tea Designs shop to get 10% off your order.


Saturday, 5 March 2022

Cute Sloth Video Tutorial

 Hi DT Vic here today and I have a fun Resist Embossing video. 


I absolutely adore the Be Slothy Stamp set and I just had to use them for my video today. I also made the background using the smaller images in the stamp set. In the video you will see how I created this background.


I used some Distress Ink ( Scattered Straw, Worn Lipstick and Tumbled Glass) along with my Beautiful Blending Brushes for the colours on my background. I started by using Versamark ink and sprinkling WOW Bright White Embossing Powder over the top. I heat set this and added the inks.


I then stamped and coloured my images using the following Copics: E23, E25, E27, E53, E55, E74, E79, YG91, YG93. I added these onto my card and die cut the sentiment using the Big Birthday Wishes Sentiment Die.


I loved how this turned out in the end. I hope you enjoy the Video and don't forget you can save 10% off your orders using the code: T4TVICKI10 at the checkout to receive 10% off your orders. 

Have a lovely weekend!

Vic x

Friday, 4 March 2022

Thank you Skunks


DT Annalisa here, wishing you a happy March! Spring is a few weeks away, so I am sharing this bright and cheerful tulip card. I can't wait until my garden starts blooming. As I write this, the snow is falling outside, so I know that we are a long way off from that!


For the middle panel, I used the medium scalloped die to cut white card stock onto which I ink blended Spiced Marmalade, Wild Honey and Squeezed Lemonade Distress Oxide, using my
Beautiful Rainbow Blender Brushes. I added some splatter in Fired Brick Distress Oxide.

For the back panel, I die-cut some white card stock using the largest stitched die from the Slimline Trio Circle Die Set and ink blended on Salvaged Patina Distress Oxide with a blender brush.

The front panel was created by die-cutting white card stock with the tulip add-on die and the smallest stitched die from the Slimline Trio Circle Die set. I added splatters of Salvaged Patina Distress Oxide with a paintbrush. 

I adhered the teal and scalloped panels to a slimline card base with liquid glue. For the top panel, I used foam tape for added dimension.

I used the following stamp sets: Stinkin' Cute, You’ve Got Mail, Mum & Dad, Be Slothy and Up, Up & Away. I stamped, coloured and die-cut the images and the 'thanks' sentiment and then used liquid glue to adhere them to the slimline card. To complete the card, I added some clear gems.


Thank you so much for reading my blog post, you can use my discount code T4TANNALISA10 when you visit the Time For Tea Designs shop to get 10% off your order.


Friday, 27 August 2021

Sending Paper Hugs


Hello everyone, Annalisa here sharing the INSIDE of a card rather than the outside, (shocking I know!) because the inside is the show stopper on this card. I love how this pop-up card turned out using the Happy Mail Critters from Time For Tea Designs.

I used my Brother Scan N Cut SDX125e to cut a card base and inside the pop-up area for the card base. I purchased the design from Lori Whitlock's SVG Shop (Mailbox Pop-Up Card) and adapted it to create my card. The sky was ink blended using Salty Ocean Distress Oxide Ink and the grass was from some green patterned paper I had. I coloured the tree and leaves with Copic markers.


The mailbox, bird and heart envelope are from the Happy Mail Critters, the planters, bush and small leaves and flowers are from the Windmill Add On die, the mouse is from Treat Yourself, the cat is from the Smitten Kitten and the flower and butterfly are from Be Slothy.

I stamped, coloured (with Copics) all of the elements and die cut them out. The Windmill Add On die elements were coloured using Distress Oxides (Mowed Lawn, Lucky Clover, Picked Raspberry, Vintage Photo, Peacock Feathers, Squeezed Lemonade, Faded Jeans.) I added a green splatter to the greenery and some white gel pen highlights to some of the elements.

I used liquid glue to adhere the critters and other items to the inside of the card. I finished up the inside by stamping the sentiment 'hello, sending paper hugs."

Thank you so much for visiting the T4T blog, you can use code T4TANNALISA10 when you visit the shop to get a 10% discount on your entire order.


Friday, 9 July 2021

Mini Slimline Blue Birds


Happy Friday! DT Annalisa here with a cheerful mini slimline card using the awesome Mini Slimline Scallop Dies. It is my first time using this stand-alone die and I love it! It is perfect for a smaller card that doesn't require a long time to create. These bright colours just make me happy and I loved making this card.

To start, I created the background using the Diamond Burst 6 x6 " Stencil and my Beautiful Rainbow Blender Brushes. I used distress oxides in the colours: Picked Raspberry, Squeezed Lemonade, Spiced Marmalade and Salty Ocean. I added a light colour over the white areas using the same oxides, added splatter, and then trimmed the cardstock to fit behind the scalloped frame.


For the stamps, I used Blooming Bunnies (flower bouquet, yellow sunflowers), Brighter Days (birds), and Be Slothy (small flower) which I stamped, cut out and coloured with my Copics.

I die cut the scalloped frame twice from some white card stock and the outer simple frame (both from the Mini Slimline Scallop Dies) from some pink paper. I adhered the two scalloped frames together with some liquid glue to add a bit of dimension. I adhered the stencilled patterned paper to the pink paper and then glued the scalloped frames on top.


I used foam tape and liquid glue to adhere the elements to the card, including a small heart I die cut and coloured with my Copics to match the background. I used the 'love ya lots!' from the Brighter Days Sentiment Cards | White on Black, which I popped up on some foam tape to finish the card.

You can save 10% off your Time For Tea Designs order using the T4TANNALISA10 at the checkout.


Thursday, 1 July 2021

Be Slothy

Hello crafty friends, it's Kitty here with my usual Thursday afternoon post. Today I am sharing a fun Slimline card featuring some cute sloths...


For this card I used the Be Slothy Stamp Set to create all the images. I stamped them in black ink, coloured them with copics and cut them out. To create the background I die cut kraft card using the medium Slimline Scallop Nesting Dies. I then die cut the panel using Tulip Aperture Slimline Die to create the shaker windows. I used the Chic Chevron Stencil with a little brown ink to add a bit of patterned to the panel. I added acetate onto the back of the panel, sequins and fixed it onto some blue card. I mounted the panel onto card and onto a slim card base. I added each of the images onto the panel with glue and foam pads along with some stamped sentiments from the same stamp set.


Thank you for stopping by today, I will be back next Thursday with another T4T DT creation. Don't forget you can use the code T4TKITTY10 for 10% off your order at Time For Tea Designs. See you all soon!

Kitty xx

Thursday, 13 May 2021

Hang in there

Hello Time for Tea Designs friends! Silvia's here today with a new card featuring some goodies from the Brighter Days collection.

First of all I ink blended a white panel with dried marigold, worn lipstick, seedless preserves and chipped sapphire Distress Oxide inks and I splattered with clean water and some gold and white inks.

I then die cut the "Tree of  Love Cover Plate" die from white carstock and I glued on my inked panel.

I also die cut the largest die from the "Smile inverted Scallop Frame" die set three times, I glued them first one above the other and then I on my card base.

I stamped one of the cute sloth from the "Be Slothy" stamp set, I colored it with alcohol markers and  I cut it out with coordinating dies and I attached on my card with some foam squares.

To finished  my card I added one of the adorable sentiments from  the "Brighter Days Sentiment Cards" white on grey.

That's all for today. Thank you so much for passing by and I hope you like this card as much as I do.

And don't forget that you can get a 10% off your Time for Tea order using my code, T4TSILVIA10 .

Hugs, Silvia.

Thursday, 22 April 2021

Hang In There Sloths

Hello, Kitty here and welcome to my usual weekly post for Time For Tea Designs. This week I got to play with one of my favourite stamp sets - Sloths!!! I love creating with these cuties, I just love their little sleepy faces...


I kept the design on this one very simple as I wanted the images to be the focal point. I used the Be Slothy Stamp Set. I coloured in each of them with Copics and cut them out. I created an tunnel style panel using two circle dies, kraft and white card. I and added some patterned paper behind it. I added the sloths so they were peeking out from behind the circle. I added the stamped sentiment which is from the Up, Up & Away Stamp Set and some Clear Drops to finish.

Don't forget you can use my discount code T4TKITTY10 to receive 10% off anything on the Time For Tea Website. There is also a new release coming so do check out all the sneak peaks over the next couple of days.


Kitty xx

Other Posts You Might Like