Pages

Showing posts with label slimline scene builder stencil. Show all posts

Friday, 1 April 2022

Slothy Hugs


Happy Friday! DT Annalisa here today, I have a slimline sloth card to share with you. It features the Be Slothy stamp set and the Slimline Scalloped Trio Circle Nesting Dies from Time For Tea Designs.

 I started by using an older T4T stencil (Tropic Like It’s Hot) and ink blending on Distress Oxides in the colours Twisted Citron and Mowed Lawn using my Beautiful Rainbow Blender Brushes. I added some water and white paint splatters for interest.

Next, I die-cut out the panel using the middle rectangle die and the three scalloped circles die. I added foam tape to the back of this panel and set it aside.

I then stamped, Copic coloured and die cut the Sloths using the Be Slothy coordinating die set. I glued parts of the branches to the back of the green stencilled panel and added foam tape to the rest.

On an 8 1/8 by 3 1/8 inch card panel, I ink blended Tumbled Glass Distress Oxide to the clouds section of the Slimline Scene Builder Stencil and then added some white splatter. I then added the popped-up slimline panel and sloths to the card.

I stamped the small flower in blue and pink ink, die-cut them and glued them to the branches. I then stamped, copic coloured and die cut three butterflies and glued them to the card.

To complete the card, I added the hugs sentiment from Paper Plane Pals and then added some glossy accents to the flowers and butterflies.

Thank you so much for reading my blog post, you can use my discount code T4TANNALISA10 when you visit the Time For Tea Designs shop to get 10% off your order.


Saturday, 5 March 2022

Stop Beavering Away!

 Happy Saturday Teatimer's its Natalie here with a sweet Beaver card for you today. I finally got a chance to use the new Stitched Slimline Slopes Dies it's a great die for creating scenes with.  

I started out by cutting out the die and inking up the inside panels. Adding clouds in the top one with the slimline scene builder stencil some green distress oxides for the grass and a combo of blues for the water. Finishing off with some texture by adding splatters using the same colours I used to blend. 

The beavers and accessories and trees are from the Beavering Away Stamp Set which I coloured up using copic markers. Then I added the bulrushes from the Lucky Duck Stamp Set alongside the dragon fly and fly. 

After everything was cut and coloured I layered it all together on to my card base and finished it up with my sentiment which I stamped out and heat embossed onto black card. That was my card finished off it was a really quick and easy card to make but looks super fun. I hope you like my card for today you can find all the products in the Time for Tea shop and get 10% off your orders using code T4TNATALIE10. 
Have a great weekend and Happy Crafting!

Wednesday, 9 February 2022

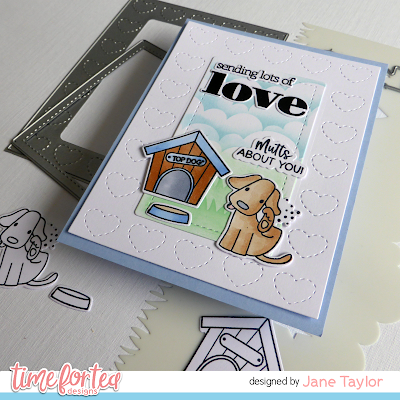
Sending Lots Of Love

 Hello!

Today I'm sharing a card I made using the A2 Stitched Hearts Cover Die and Bold Sentiments sets from the recent release combined with Dog Gone Mutts.


I started by cutting the stitched heart border and inner stitched rectangle from white card using the A2 Stitched Hearts Cover die. I then added some clouds and grass onto the stitched rectangle using the Slimline Scene Builder stencil.


Next I stamped coloured and die cut the images and a sentiment from Dog Gone Mutts and adhered them to the card.  I then decided to add a bit of interest to the top of the scene and stamped and die cut another sentiment using Bold Sentiments.

I hope you like my card using the awesome products from T4TD. If you'd like to purchase any items you can get 10% off by using my code - T4TJANE10.


Thanks for looking today. 
Stay safe and keep crafting!

Jane
x

Saturday, 3 July 2021

Dream Big the Sky's the Limit!


Happy Saturday everyone it's Natalie here with a beautiful night sky scene for you today. I'm loving the really big sentiment dies at the minute and the Dream Big Sentiment Die fits perfectly with the Paper Plane Pals stamps don't you think!

As always I began by cutting out my base panel using the new Slimline Scallop Nesting Dies and then used the Slimline Scene Builder Stencil to create my cloudy night sky. I blended some pale pink and orange clouds on the bottom layer then went over the top with some dark blues and purples. I started with the darker colour and worked my way inwards leaving the middle lighter to make the sentiment pop. The cloud details had been lost a little on the edges though so I blended them back in with some Picket Fence Distress Oxide ink. 
For the Sentiments I cut out the Dream Big Die twice once out of white card and then a second time out of glitter cardstock. I layered these on top of each other off setting it a little to give some added interest. Then stamped and heat embossed the rest if the sentiment onto black cardstock.
For the critters I stamped out the panda and plane as normal but I mirror stamped the bunny and other plane so they so they could be facing the opposite direction. To do this I just stamped them directly onto my silicon mat and just placed my copic paper over the top and rubbed to get the impression. The lines are never fully clear so after colouring I just go over the outline in copic marker. 
Once they were coloured I die cut out and popped them onto my card. It was missing something though so I used the star outline die from the Paper Planes Coordinating Die Set to die cut some silver stars. Then finished up adding some white dots with my gelli roll pen. 
The last thing to do was to add it to my card base I choose black as it just makes the colours pop so much.
I hope you like my card for this week if you want to pick anything up in the shop or anything else you can get 10% off your order using code T4TNATALIE10
Have a good weekend and happy crafting!


Monday, 28 June 2021

Mirror stamping paper pals

Hello crafty friends! 

It is DT Natalia here today, and I wanted to share with you how I made this slimline card using mirror stamping! 

It was my first time using this technique but I will certainly use it again as it is a game changer and stretches the use of our stamp sets so much. 

I thought this technique would go great with either the Paper Plane Pals or the Car Critters clear stamps, and this time I decided on the lovely paper plane pals. 

To start with, I stamped out the images from the set and set those aside. I then used my Waffle Flower Water Media Mat to do the mirror stamping and followed the steps below: 

  1. Take the stamp you want to mirror and place it on your stamping block (not your stamping platform for this one, I am afraid!)
  2. Ink it up with your ink of choice, I used memento as I was going to use my Spectrum Noir alcohol markers for colouring.
  3. Stamp the image onto the mat - be careful here not to move the block too much as you put it down as that will smudge the print and you won't get a neat impression. 
  4. Take a piece of cardstock and place it directly onto the stamped image on the mat - again, careful not to move it or the image will smudge. I found my first impression was never neat so I picked the image up a couple of times and I for me, the second image was the best of all.
  5. You will notice that the image is not as neat as if you stamped directly onto the paper with your stamp, but that is OK - use a black fine liner (I used my uni ball one) to go over the lines and nobody will ever know!  
Can you tell just by looking at my card which one is mirror stamped? 

I then coloured the images and used the coordinating dies to cut them out. For the mirror stamped images, I just fussy cut them and used a craft knife to make a slot in the place for the bunny to sit in. 

I thought the planes were looking a little too plane so I took the little hearts and stars from the stamp set and stamped them onto the planes with my memento dew drop inks. I did a bit of masking with a piece of paper so that the little decorations would be all over the plane, coming out the edges. 

If you look closely (it is always so hard to capture small details in pictures isn't it), you will also notice that I stamped some clouds onto vellum and used white embossing powder on them. I just think the little details is what finish up a card nicely and add to it!


Now onto the background: I used the middle from the slimeline scalloped nesting die set and die cut it from a pearlescent teal cardstock which has a bit of shimmer to it. Then I cut a white piece of cardstock just a bit smaller, where my elements would go. I used the new slimline scene builder stencil for the clouds, together with broken china distress oxide and a blending brush. What I love the most about this stencil is the fact that it is slimeline sized! so easy to create slimline scenes. 

I added the little birds flying on the sky directly onto the background and used a few gems and sequins from my little things from Lucy's cards to finish off the card. 

I hope you like it and most of all, I really hope it inspires you to try something new! 

Remember to use the code T4TNEILA10 to get a 10% off your shop - there is also a 30% off all standalone dies going on at the moment! (code does not apply) 

Sending hugs,

Natalia


Saturday, 26 June 2021

Sending Bear Hugs!


Well the weekend is finally here, feels like it’s been a long time coming this week. It’s another cloudy day here today so a day of crafting maybe in order! 

For today’s card I have an adorable Panda card you using the Pandamonium Party Stamp Set. It was nice to colour up some old favourites and the great thing about the pandas is when you don’t fancy doing loads of colouring then you don’t need to. I stamped them out and just added a little bit of shading with some warm grey copics and a little rosey cheeks and paws with R11. Then finished it off with three white dots on the cheeks using a white gelly roll pen.

I also coloured up some bits of bamboo and leaves and the balloons just to give it a pop of colour with the red and yellow. 

For the base of the card I used the Mini Slimline Scallop Dies which I taped together at the back using some washi tape whilst I stencilled onto it. I used the new Slimline Scene Builder Stencil to create some clouds and then went over the top with a bamboo stencil from another brand. When I finished this up it was way too much though like one of those magic eye stencils that send your eyes funny lol! To fix it I just cut out another white frame and layered it over the top. 

Before I placed my pandas on the card I wanted to create my sentiment to see how everything fit. I used the rectangle die from panda stamp set to cut out my base. Then added the same green distress oxide on top that I used for the bamboo and stamped straight on top of that. It’s a big sentiment box but I like the block of colour it adds to the card and breaks up the background a little. I popped this in the middle at the bottom and laid all my pandas and accessories around it and that was my cad finished up. Since the pandas don’t need colouring much and the slimline is quite small it really was a quick and easy card to create. This is perfect for when you need something last minute be sure to check out next weeks too when I create another quick and easy mini slimline card. 

Thanks for reading the blog hope it helps and you enjoyed my little tutorial. If you want to pick any of the items up in the shop or anything else you can get 10% off your order using code T4TNATALIE10. Have a great weekend and I’ll see you next week ❤️

Saturday, 12 June 2021

Hi Friends!


Hi friends Saturday is here again so that must mean its another card from me! It's been such a hot, sunny week I thought I would create a flowery bunny scene for you. I had been wanting to try out using the Landscape Edge Standalone Dies with the Die-namic Display card dies to create a different style edge. I love how it turned out and it was even better then I had pictured it in my head.
To create the base I got the Die-namic display card die out and roughly measured the size of the main die on my card stock then cut that out. I like to stencil my background before I die cut so it goes over the folds better. To stencil the clouds I used the new Slimline Scene Builder Stencil with Salty Ocean distress oxide ink. After I stencilled I added some splatters of the same oxide ink to give some added texture and set it aside to dry. 
Whilst waiting for it to dry I stamped out, coloured and die cut  my images and sentiment. Everything is from the sweet Blooming Bunnies stamp and die set. Once these were finished up I could work on the card base.
I die cut out the Die-namic Display Card from the clouds I stencilled and used the cloud die from the Standalone Landscape Dies set I cut out once and then had to line it up to cut out the rest as it wasn't quite long enough. 
I cut out my front piece and the middle piece from the die-namic display card and then did the same technique with the grass die and coloured them up with Twisted Citron Distress oxide and added splatters with the mowed lawn distress oxide ink. Then I just needed to stick everything together. I love how this technique adds some many more possibilities with what you can create with the Die-namic Display card Die. Giving the look of a completely new die set. Let me know if you try create your own I'd love to see! 
Hope you enjoyed my card for today and if you want to pick any of the Time for Tea products up in the shop you can get 10% off using code T4TNATALIE10
Have a great weekend and I will see you all next week!


Tuesday, 1 June 2021

Interactive Slimline Video Tutorial

 Hello DT Vic here today and I have a fun video tutorial to share with you using the Slimline Pull Tab Interactive Die. In my video I will show you how I put all the elements together to make your interactive card.


I was so excited to use this die and it has so many fun uses you can use this on pretty much any card. To make this card I first die cut all my pieces I need to create the slider part of my card. I then die cut a scalloped piece of yellow card using the Slimline Scalloped Nesting Dies. I also die cut a long rectangle using the Slimline Postage Stamp Frame Dies


For my background I wanted to add some pretty clouds so I used the Slimline Scene Builder Stencil and added some clouds to this piece of card. I then stamped my images using the Hillside Village Stamps and Coordinating Dies and the adorable snails from the You Got Mail Clear Stamps and Coordinating Dies

I started to put all my elements together and add my images onto my card. If you are using foam pads just be careful where to place your image as the pull tab will stop at the first snail. You don’t want to add any foam pads with an image on that will go across your slit as this will stop your image from moving. 

This is such a fun way to add some interaction to your cards and once you have made a few it will become easier to create your cards using the interactive elements. You can also add interactive elements to you card vertically so they can move up and down. I had so much fun creating this card and I know you will too. They are very addictive! 
I hope you enjoy the video tutorial today and don’t forget you can save 10% off your purchases using the code: T4TVICKI10 at the checkout. This includes the brand new release too! 
Don’t forget to tag us on your creations we love to see what you have made. 
Thanks for stopping by today!
Vic

Sunday, 30 May 2021

Happy Travels

 Good afternoon Teatimers and happy Bank Holiday Sunday,

DT Lyndsey here on the blog today, and I'm so excited to be sharing this card made using some of the new release items that were launched on Friday. 

This weekend's weather is just gorgeous and seriously making me think of my summer holidays. Just a UK based one for us this year as we have a BIG trip coming up next year that we need to save our pennies for! So in that line with that thinking today I wanted to share with you this adorable card and this little cutie looks like he is off on his travels too!


 If you have not seen the new release yet, you are absolutely missing out. For this card I've used quite a few items which are listed below.

Car Critters stamp and die set 

Hillside Village stamp and die set 

Sunray cover plate die 

Slimline scene builder stencil

To start with I stamped and coloured my images using my Spectrum Noir alcohol markers (colours listed below in order of lightest to darkest)

Car - TB2, TB3, TB4 

Wheels - IG5,  IG7, IG9 

Panda - IG1, IG3, IG5 

Scarf -  CR7,  CR11, DR3

Trees- LG1, LG3, LG5 - CG1, CG2, DG3 - TN7,  TN9 

Road - IG1, IG3, IG5 

I wanted to create a little scene so used the road from the Car Critters set and teamed it with the trees from the Hillside Village set, using the matching die to cut the top of the scene. I cut a piece of white card using the largest of the A2 Layering Dies and added a cloudy background with salty ocean distress ink and the Slimline stencil.

From white card I then cut out the Sunray cover die and created the ombre colour using Squeezed Lemonade,  Wild Honey and Abandoned Coral distress inks. I added this and the coloured scene to the cloud panel and trimed off any overhang.

I added the cute panda to the car and popped him on the road using foam pads - Doesn't he just look like he's driving through the country side off on his holibobs!😁 finishing off the scene by adding a few puffy clouds in the sky.

 Before adding the panel to a card blank I made a little frame using the A2 Nesting Frame Dies and added to the panel using foam pads for a bit of dimension. I then adhered this to a slightly larger panel of blsck card before adding to a 6x6 card blank trimed down to size leaving a small border.

I love how this scene turned out and totally love how easy it is to mix and match all the items of the new release to create many different cards. These items will also match perfectly with any of the previous releases too, the only limit is your imagination! I hope you have enjoyed my card today,  I absolutely had so much fun with this new release I can't tell you, and I have so many more cards to share with you soon.

Thank you so much for joining me here on the blog today. If you want to purchase any of the new release don't forget to use my code T4TLYNDSEY10 for 10% off your order!😊

Enjoy the rest of your Bank Holiday weekend

Lyndsey xx

Saturday, 29 May 2021

You've got Snail Mail


Hi everyone, so the new Time for Tea release is out and isn't it just super fun! What's your favourite? I love the You got Mail set its just super cute. It will pair perfectly with the older set if you have it in your collection too. You can have a whole family of snails then, it will be like one big party. 
So with that the snails had to be my first card, I wanted to create a layered garden scene for them so I used the Die-namic Display card die to cut out my base and stencilled it with the new slimline scene builder stencil using tumbled glass distress ink. After stencilling I added some splatters using the same ink to give some added texture. Once this was finished up I started on the rest of the elements for the background I cut out the panels that come with the Display card die but then used the landscape edge standalone dies on the edges to create my grass and soil. I ink blended these and added some splatters in the same colour to give some texture and popped them onto my base. I find if I do it this was its easier to see my layout and where to put things.
Then it was time for the fun part colouring  all the snails and accessories. I just stamped everything out then anything I didn't use on this card I had ready for another. As I was colouring up my snails I decided to add one with a pink body to add some brightness to the card. It just felt like it needed an extra pop of colour. I liked the idea of the snails bringing snail mail to the ladybird so coloured up my mailbox with some polka dots just like the ladybird and it turned out super cute. Once the big items were coloured up I popped them onto my base to see what I would need to fill in the gaps. Of course I needed my ladybird and some letters then I added some toadstools and flowers. 
The next thing to add was my sentiment which I stamped and die cut, I love how it cutes around the letters sometimes a banner strip is just too big and this is the perfect alternate. After adding everything though it felt like my sides were a little bare still. Then I remembered those fun paper planes from the Paper Planes Pals set so added a couple of those and drew in some little dashes with a black copic outliner and that was my card finished up. I hope you like my garden scene and I cant wait to see what you all create. If you still haven't bought your goodies yet don't forget you can get 10% off using code T4TNATALIE10 

Other Posts You Might Like