Pages

Showing posts with label A2 Layering Dies. Show all posts

Friday, 19 January 2024

Birthday Wishes


Happy Friday, DT Annalisa here sharing a cupcake birthday card featuring the beautiful Big Birthday Wishes Large Sentiment Die and the cute mouse from the Birthday Bear Clear Stamp Set.

I sprayed Distress Mica Stain Cocktail Party onto watercolour cardstock, heat-set the ink, and then die-cut it with the Big Birthday Wishes Large Sentiment Die. I cut two more pieces of paper using the die and glued them together for added dimension.

I ink-blended squeezed lemonade Distress Oxide onto white cardstock using my Beautiful Rainbow Blender Brushes. I then ink-blended abandoned coral Distress Ink through the Dancing Dandelions 6 x 6" Stencil. I used a stitched rectangle die to trim down the panel.


I used the A2 Layering dies to die-cut Neenah Metallic cardstock for the back panel, which I glued onto an A2 white cardstock card base. I die-cut vellum with the smaller Large Scallop Celebrate Frame Dies and used vellum adhesive to stick it to the card base.

I stamped and coloured (with Copics) the mouse from the Birthday Bear stamp set and cut him out with the coordinating dies. I added white gel pen accents with a Gelly Roll Pen

I used liquid glue to stick down the large sentiment to the card base. I added double-sided foam tape to the back of the mouse and cupcake and stuck him down so the candle was in place of the letter 'I' in the word wishes.


I used the tiny stars and circles in the  Open The Door Holiday Add-On Die Set to die-cut silver metallic paper. I used liquid glue to stick these down to the card to complete it.

Thank you so much for visiting my blog. Remember to use my discount code T4TANNALISA10 when you visit the Time For Tea Designs shop to get 10% off your order.

Friday, 6 October 2023

Sending You Rainbow Hugs


Hello, DT Annalisa here! For my project today, I am sharing a sympathy card for some friends who recently lost their dog. Losing a loved one is always hard - I wanted to let them know I have been thinking about them. I used the Pawsome Dies with the Pawsome Rainbows 6x6' Paper Pad to create this card.

I die-cut a panel from white card stock using the A2 Layering dies. I used the medium paw die in the Pawsome Dies set and cut it into this panel twice. I added double-sided foam tape to the back of this panel and set it aside.

I stuck a piece of patterned paper from the Pawsome Rainbows 6x6' Paper Pad to an A2 white card base, ensuring it would fit behind the 3 3/4 inch panel with paws cut into it. I then took the panel with paws and stuck it over the patterned paper. 


I stamped and coloured (with Copics) the small dog from the Sweet Village stamp set and cut it with its' coordinating die.

The sentiment is from Get Whale Soon; I stamped 'sending you' and 'hugs' and die-cut these out with their coordinating dies.

I used liquid glue to stick the sentiments and dog to the card to complete it. 

 
Thank you so much for reading my blog post. Remember to use my discount code T4TANNALISA10 when you visit the Time For Tea Designs shop to get 10% off your order.

Friday, 25 August 2023

I Chews You

Happy Friday, DT Annalisa here! Did you know Time For Tea Designs is five years old this month?! Congratulations to Jo and Ant for their success. To celebrate, they are having a birthday sale! I am so grateful to have been on the design team since 2019. I have loved every minute of it, as it has brought me tremendous joy during some tough years in my life. 

Today, I am sharing a card that features the brand new Gummy Bears stamp set from the latest release that is now live on the website! 


I used the A2 Layering dies to cut one of the pieces of patterned paper from the Pawsome Rainbows 6x6' Paper Pad. It is such a beautiful paper pad with many bright and pretty patterns. I used liquid glue to stick this to an A2 white card base.

Next, I die-cut a 3 3/4 by 4 1/2 inch piece of white cardstock using a stitched rectangle die. I used a light hand-to-ink blend squeezed lemonade Distress Oxide using my Beautiful Rainbow Blender Brushes to the center of the panel. I added splatter with a paintbrush, water and wild honey Distress Oxide ink. 


I stamped 'I chews you' in Versafine Onyx Black once the panel was dry and heat embossed with Icicle ultra fine embossing powder by Brutus Monroe (clear).

I stamped and coloured (with Copics) several images from the Gummy Bears stamp set and cut them out with my Brother Scan N Cut SDX125e (so handy when you don't have coordinating dies!) I added white gel pen accents with a Gelly Roll Pen

I used liquid glue to stick the stamped elements to the yellow panel. I then glued this to the card base and added three yellow enamel dots from the Sweet Summer Designer Enamel Dots collection to complete the card. 

Thank you so much for reading my blog post, use my discount code T4TANNALISA10 when you visit the Time For Tea Designs shop to get 10% off your order.

Friday, 17 March 2023

Get Whale Soon


Happy Friday! DT Annalisa here sharing a get well soon card featuring the Get Whale Soon stamp set and the Wonky Background Masking Stencil. I have been under the weather for the past week, so I thought it would be fitting to share this. Thankfully I am on the mend, as it is hard to be crafty when your head is congested! 

I ink-blended Tumbled Glass, Salvaged Patina and Peacock Feathers Distress Oxide Ink over the Wonky Background Masking Stencil onto some white cardstock using my Beautiful Rainbow Blender Brushes. I added splatter with a paintbrush, water and Salty Ocean Distress Oxide Ink. I also added metallic silver watercolour splatter with a paintbrush.

Once dry, I die-cut the panel with the A2 Layering dies. I used the same die set to cut grey card stock that I glued to an A2 card base. I love how these dies make it so easy to create a layered card like this without having to measure!

I stamped the images from Get Whale Soon with Lawn Fawn Jet Blank Ink and coloured them with my Copics. I added white gel pen accents and then used the coordinating dies to cut them out.    

I stamped the 'sending you hugs' to the bottom of the ink-blended panel using Versafine Onyx Black. Next, I added double-sided foam tape to the back of the panel and stuck it down to the card base.


I used liquid glue to stick down the pills and heart to the card base for the rest, I used double-sided foam tape. I added Glossy Accents for shine and added dimension, to some of the elements. I added blue Designer Enamel Dots from the Sweet Summer Enamel Dots, to complete the card.

Thank you so much for reading my blog post, you can use my discount code T4TANNALISA10 when you visit the Time For Tea Designs shop to get 10% off your order.


Saturday, 10 September 2022

Here's the Scoop!


Happy Saturday Teatimer’s hope it’s been a good week. I love the Autumn weather that's hitting us this week but I am really missing those hot summer days that are perfect for ice cream at the beach. These cute critters from the Cool Critters Stamp Set have to be one of my favourite Time for Tea stamp sets.  I have quite a few other cards for inspiration with them on my Instagram page. 


I began by cutting out the largest rectangle from the Layering Dies Metric Size to create my base which I inked up with distress oxide inks. I cut out two more rectangles which I used to cut out the waves and the beach again inking them up with distress oxides. 
For the clouds I used the Cloud Dies and layered over velum to give them a softer look. 
Then stamped and coloured up my images, I used COPIC colours to colour up my images. Then added some extra details for the cheeks and noses using a black and a white gelly roll pen. 
Once everything was cut and coloured I layered everything up on my card base. Finishing up with some dotted details randomly on my card with coloured gelly roll pens. 
I hope you like my card and if you want to get any of the products in the Time for Tea Shop you can get 10% off using code T4TNATALIE10 . Have a great weekend and don't forget to check back soon for more inspiration from the rest of the team. 


Friday, 5 August 2022

Have a Whale of a Time


Hello and welcome! DT Annalisa with another card I created using the brand new release! For my card, I experimented with watercolour and used the Fintastic Friends and Beach Buds stamp and die sets for this underwater-themed card.

I used my A2 Layering dies to cut down a piece of Tim Holtz Distress Watercolor Cardstock 4 5/16 by 3 3/4 inch panel. I pressed some Peacock Feathers Distress Ink onto my glass mat and sprayed it with a bit of water. I added some clean water with a paintbrush to the water colour panel and added some Peacock Feathers Distress Ink with my paintbrush. This created the water background for the scene. I also added some water bubbles and splatter.

A big thanks to Jenn Shurkus and Lawn Fawn and their 'Create with Us' series for the inspiration and how-to for this watercolour technique. As a perfectionist, I struggle with water colouring, but Jenn shows you how in this terrific 'pool party' class which you can watch anytime on replay.

I stamped (with Ink on 3 Blackout detail ink) and coloured (with Copics) the images and then die-cut them with their coordinating dies. I heat embossed the sentiments onto black cardstock using white Alabaster ultra fine embossing powder by Brutus Monroe. I then die-cut the sentiments out with their coordinating dies. I really like the wavy dies in the Beach Buds coordinating dies set!

I added foam tape to the sentiments, whale and dolphin and adhered them to the panel. I used liquid glue for the remainder of the elements.


The A2 card base was created using light blue card stock. I added the sea panel to this with foam tape.

I added glossy accents to the whale, small fish and water bubbles to complete the card.

Thank you so much for checkout out my blog post. Don't forget to use my discount code T4TANNALISA10 when you visit the Time For Tea Designs shop to get 10% off your order.


Friday, 3 June 2022

Mew Are Pawsome Shaker


Hello everyone, DT Annalisa here haring a pawsome rainbow shaker card. I love how the large paw opening lets the beautiful patterned paper shine through.

I used the A2 Layering dies to cut out a 5 1/2 inch by 4 1/4 inch piece of the Pawsome Rainbows 6x6' Paper Pad and adhered this with a tape runner to an A2 card base.


I used the same die set to cut a 4 3/4 inch by 3 1/2 inch piece of heavy white cardstock that I cut again with the large paw print from the Pawsome Dies. I cut a 4 7/8 inch by 3 5/8 inch piece of black card stock (and removed the inside) to frame the paw print paper.

I stamped die cut the critters and other elements from the following sets: Kitty Capers and  Coordinating Die set, Purrfect Day and Coordinating Die set Hey There Critters, and Coordinating Die set. I used my Copic markers to colour the images and added some white gelly roll accents.


I heat embossed the 'mew are pawsome' sentiment using VersaMark and white embossing powder (Alabaster ultra fine embossing powder by Brutus Monroe) and an embossing heat gun. I then die cut 'text with the coordinating die.

I used liquid glue to adhere the stamped and coloured elements to the white paw print panel. I cut and glued some acetate to the back of it the paw panel and added some doubled-up foam tape. I took some clear sequins from my stash, placed them in the center of the card and stuck down the paw panel on top.

I glued down the sentiment using liquid glue to complete the card.


Thank you so much for reading my blog post, you can use my discount code T4TANNALISA10 when you visit the Time For Tea Designs shop to get 10% off your order.


Friday, 3 December 2021

Wishing You Holiday Cheer


Happy December everyone! DT Annalisa here sharing a card wishing you holiday cheer! To create this card, I used the Takeout Coffee Cup Dies and the Tiled Wall 6 x6" Stencil. This die set was made for me as I am such a huge fan of coffee so, during December, I will be sharing not one but three cards using this die set!


I started creating my background using my Beautiful Blender Brush to apply Hickory Smoke Distress Oxide ink to the tiled wall stencil on a white card stock panel that I die cut with a stitched die. I added what remained on the brush down in between the tiles so that the grout didn't look so stark white in comparison to the tiles. Next, I added some white pigment ink on top of a snowfall stencil using a blender brush. Once the ink was dry, I also applied some Wendy Vecchi embossing paste using a spatula. 


For the coffee cups and hearts on the cups, I used the Let it Shine patterned paper from Lawn Fawn - don't worry, I will be sharing two cards using the new T4T beautiful papers! For the cup sleeves, I die-cut some Neenah Desert Storm kraft card stock and added some Vintage Photo Distress Oxide to the sides using a blender brush. After die cutting the coffee cup lids out of white card stock, I glued them down to the coffee cup using liquid glue. I also glued down the cup sleeves and hearts.

I added double-sided foam tape to the back of the coffee cups and placed them down on top of the tiled panel. I then used one of the greetings from the Sentiment Cards - Winter Wonderland | Black, to which I added foam tape to adhere it to the panel.


I placed the coffee cup panel on top of some glitter card stock that I die cut using the A2 Layering dies. I placed these on top of an A2 card base to complete the card.

Thank you so much for reading my blog post, you can use T4TANNALISA10 when you visit the Time For Tea Designs shop to get a 10% discount on your order.


Friday, 26 November 2021

Jumping With Joy


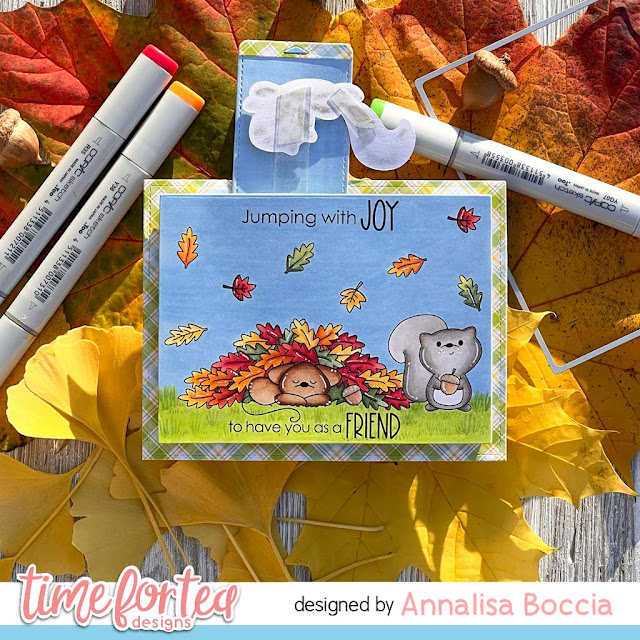
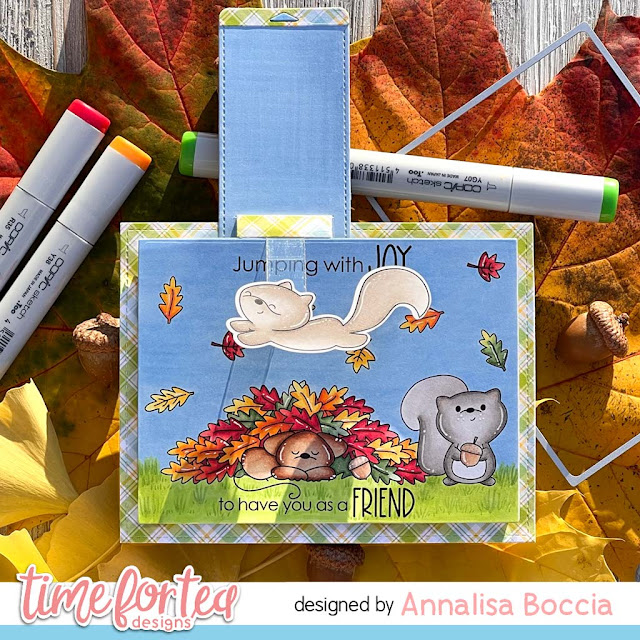
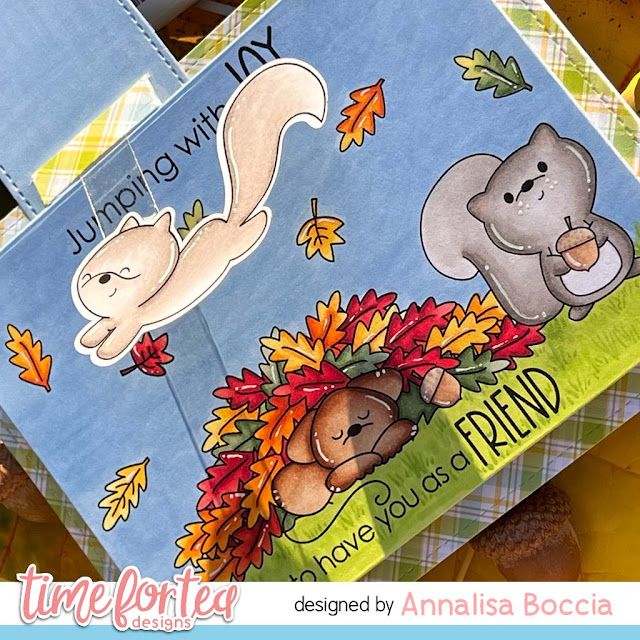
DT Annalisa here, happy new release day! I love new release days, as the design team gets to show you all what we have been working on for the last few weeks. My card today is a fun interactive fall scene featuring the new Jumping With Joy stamp set. I absolutely love squirrels, so when I first saw this stamp set, I knew that I had to make an awesome card with it.


To start, I stamped down the little mouse and acorns, masked these out and stamped the leaves and squirrel. Next, I stamped the leaves in the sky and the sentiment. I then coloured my scene in with copic markers. Separately, I stamped, coloured and die cut the jumping squirrel.

I used the third largest die in the A2 Layering dies set to cut out the scene.


I doubled up some foam tape and added it to the back of the scene, making sure not to block the interactive elements. I adhered this to a card base that I had added some green plaid patterned paper to. I had cut the paper with a stitched die that I had in my stash but you could also use the outer die in the Autumn Scene Cover Plate Die.

I had to use the flippy-flappy several times to get it to 'learn' what it had to do but once it was worn in a bit it worked really well.

Thanks for stopping by and reading my blog post, you can use my discount code T4TANNALISA10 when you visit the Time For Tea Designs shop to get 10% off your order.

Other Posts You Might Like