Pages

Showing posts with label Falalala Scalloped Slimline Dies. Show all posts

Sunday, 23 November 2025

Snow Much Joy!

Hello Team Timers!

Michelle here from the Design Team with another festive card, full of fun and snowy smiles. These two snow friends are ready to decorate the tree and dance under the falling snowflakes, all wrapped up in pastel winter magic.

Supplies used:

Snow Much Fun

Snowflakes - Falalala Slimline Dies


To start, all the images were stamped and coloured with alcohol markers and highlights were added with a white gel pen.


The background was ink blended in a soft mix of purple, blues, greens and touch of pink (Salvaged Patina, Peacock Feathers, Salty Ocean, Shaded Lilac and Saltwater Taffy Distress Oxides), then topped with splattered snow and layered snowflake die cuts (cut from white glitter cardstock) for extra texture. 

For the snowy ground, these were two hillsides die cut from white cardstock - the edges were lightly ink blended with Salvaged Patina Distress Oxide and then layered on top of each other. 


Next, I added a bright tree in the centre, the two snow friends and surrounding them with baubles and candy canes to finish the scene.

For the sentiment, I shopped my stash and found this perfect scripty style ‘Wishing You Joy!’. I heat embossed this onto bright pink cardstock (to match with the earmuffs on one of the snow people) using white embossing powder and the fussy cut around it.

I hope your season is merry, bright and full of sparkle!

Michelle

Friday, 8 December 2023

Merry Penguins


Happy Friday! DT Annalisa here
 sharing a sparkling penguin Christmas card that features the Mistletoe Kisses Digital Stamp Collection from Time For Tea Designs. I paired this with some beautiful patterned paper and dies.

I trimmed patterned paper from the Winter Wonderland Paper Pad 6x6" to 5 1/2 by 4 1/4 inches and used double-sided tape to stick it to an A2 card base. I die-cut white cardstock with the Falalala Scalloped Slimline Dies, trimmed the two longer sides to 5 1/2 inches and ink-blended them with peacock feathers Distress Oxide. I used liquid glue to adhere these to the sides of the card.

Next, I ink-blended peacock feathers and lumberjack plaid Distress Oxide onto white cardstock and trimmed out the letters 'merry' in alternating colours. I added sparkles to the bottoms of each letter with a Quickie Glue Pen and Lawn Fawn Prisma Glitter and then used double-sided foam tape to stick them to the card.


I used a stitched circle die in my stash to cut out a 3 1/4-inch circle from white card stock. I ink-blended salvaged patina and peacock feathers Distress Oxides onto the circle with my Beautiful Blender Brush. I added white splatter with a paintbrush, water and Copic opaque white.

I sized, printed and coloured the two penguins with my Copics and cut them out with my Brother Scan N Cut SDX125e. The mistletoe is from It's Penguin-ing to Look A Lot Like Christmas; I coloured and die-cut it with the coordinating dies. I added white gel pen accents with a Gelly Roll Pen

I applied liquid glue to the bottom of the circle and added Lawn Fawn Chunky Glitter on top. I then glued the penguins and mistletoe. I used double-sided tape to adhere the circle panel to the card. I added Sweet Summer Designer Enamel Dots to complete the card.


Thank you so much for reading my blog post. Remember to use my discount code T4TANNALISA10 when you visit the Time For Tea Designs shop to get 10% off your order.

Friday, 20 January 2023

Let's Seal-ebrate


Happy Friday! DT Annalisa here, today's project is a wintery slim-line card featuring the Sealed With A Kiss stamp set from Time For Tea Designs.

I sprayed Distress Mica Stain in Shiny Bauble to Distress Watercolor Cardstock by Ranger. This stain has a beautiful shine, and I love the light blue colour.


I used the Falalala Scalloped Slimline Dies to die-cut a scalloped border. I created a snowy hill using the Slimline Hillside Scene Dies, and ink blended this very lightly with Salvaged Patina Distress Ink before adhering it to the bottom left of the scene with liquid glue. I added the scalloped frame on top of this with liquid glue. I used double-sided tape to stick this panel to a slim-line card base.

I stamped and coloured the seals, fish and fishing pole from the Sealed With A Kiss stamp set and die-cut them with the coordinating dies. The winter hats and chunks of ice are from the Walrus Be Friends stamp set. I stamped, coloured and die-cut these with the coordinating die set. I added highlights with a White Gelly Roll Pen and sparkles with a Quickie Glue Pen and Lawn Fawn Prisma Glitter.


I used double-sided foam tape to adhere some elements (including the sentiment) and liquid glue for the rest. I love the overall shine on this card when you pick it up and move it around in the light. If you have never tried Distress Mica Stain I highly recommend it.


Thank you so much for reading my blog post, you can use my discount code T4TANNALISA10 when you visit the Time For Tea Designs shop to get 10% off your order.


Friday, 30 December 2022

Christmas tags with Digis


DT Annalisa here sharing my last T4T project of 2022, some Christmas tags I created using the Digital Tag Collection. These images are so adorable; I am particularly fond of Santa. I love his smile and waving hand.

I decreased the size of the digis to 70% in Photoshop, and they fit perfectly inside the tag die from the Memory Keeping Essential Dies. I used the tag-die on some patterned paper from the Winter Wonderland Paper Pad 6x6" and some other paper from my stash. I love how this die-set also has the dies to create the tag hole and supporting pieces.

I used my Brother Scan N Cut SDX125e to cut out around the frames surrounding the tag digis and then coloured them with my Copics. I added white gel pen accents using my Gelly Roll Pen.

I used foam tape to adhere the images to the tags after gluing down snowflakes that I cut with dies from the Falalala Scalloped Slimline Dies. I stardust added Stickles and some twine to the Santa tag and left the others plain. 


I enjoyed creating and sharing my various T4T projects throughout the year. Many thanks for reading and following along with my creations this year. I am looking forward to sharing more in 2023.

Thank you so much for reading my blog post, you can use my discount code T4TANNALISA10 when you visit the Time For Tea Designs shop to get 10% off your order.


Saturday, 10 December 2022

Gingerbread Latte Time!


Happy Saturday Teatimer's it's DT member Natalie here with another cute Gingerbread card. I had to get another one in before Christmas and I also wanted to create another coffee card. This one is a Gingerbread latte card you can check back on my other posts for a couple other coffee cards, including a black forest hot chocolate and a summery berry shaker card. 
This one I kept quite simple as a didn't feel it needed to be a shaker card as I wanted the focus to be on the Gingerbread Family. 
I started by cutting out the largest of the Eu Layering Dies  twice. I inked up one with some blue/green distress oxide inks and spritzed on some water for texture and splattered on some white acrylic paint to look like snow flakes. The second one I used to cut out the snow bank at the bottom using the Slimline Hillside Scene Dies. I layered this onto the base using some foam tape to create some depth. 
For the main features I used the Takeout Coffee Cup Dies  I used brown Distress Oxides to create the cup and a added a little splatters on the cream with the same colours. For the straw I coloured it with red copic markers and added stripes using a white gelly roll pen. 
The Gingerbread are from the new Gingerbread Family Stamp set I coloured them up with Copic markers and added some extra details with black and white gelly roll pens. Once these were all layered on I could see where I needed to place the big sentiment and snowflakes. These are both from the Falalala Scalloped Dies I adhered these and added some extra snow dots using my white gelly roll pen and that was my card finished up. I hope you like it dont't forget to check back for more inspiration and you can also get 10% off in the Time for Tea Shop using code T4TNATALIE10. 
 

Saturday, 26 November 2022

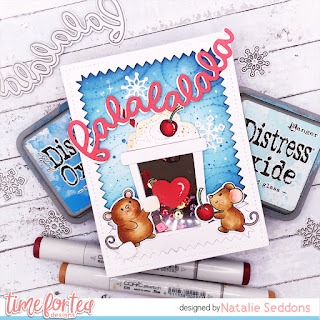
Falalala


Falalala, happy Saturday Teatimer's the weekends keep rolling on fast at the minute don't they! I have another sweet Christmas card for you this week. I had the idea of turning the bears from the Happy Trails stamp set into Polar Bears to create this snowy scene card. 

I used the Falalala Scalloped Slimline Die set to create the base layer cutting it out twice and ink blending on some blue/green distress oxides to create my background. I added some texture with ink splatters and some snow with white acrylic paint splatters. Using the second base I cut out a snow bank using the Slimline Hillside Scene Dies and added some foam tape behind to add some depth. Using foam tape I added a second scallop frame on the top so it matched the height of the snow bank. 
I also cut out some snow flakes and the falalala out of white card adding them to the background then adhering the images on top. 
Their igloo house comes from the It's Penguin-ing to Look a Lot like Christmas Stamp set and the little holly came from the Gingerbread Family Stamp Set
As always I finished up by adding some final touches with a white and black gelly roll pen. I hope you like my card and as always you can get 10% off in the shop using code T4TNATALIE10. 


Friday, 11 March 2022

Thank You Kitty

Happy Friday, DT Annalisa here. I am so excited that we get to spring forward this weekend here in Canada and get an extra hour of daylight in the evening! I am sharing a thank you card today featuring several Time For Tea Designs dies and one stamp set.

For the back panel, I ink blended some Tumbled Glass and Spun Sugar Distress Oxide using my Beautiful Rainbow Blender Brushes to some white cardstock. I added some water splatter using a paintbrush and set this aside to dry. I used a stitched square die to cut out white card stock, which I then die cut again using the Thank You Sentiment Die Set. I splattered on Tumbled Glass to this panel and set it aside to dry.

For the snow, I used the Slimline Hillside Scene Dies to cut white card stock, I die cut it a second time using the same stitched square die. I glued the snow piece to the 'thank you' square panel and then added this to the ink blended panel.

I used some coloured card stock to cut the little houses using the Home For Christmas Dies. I glued these down to the snow and thank you panel and then added some highlights with a white gelly roll pen. 


I stamped, coloured (with Copics) and die cut the kitty from the Happy Mail Critters and glued this down to the card base. I added the die-cut snowflakes I created using the Falalala Scalloped Slimline Dies to the card around the sentiment and in the kitty's paw.

To complete the card, I added some snow stickers and white enamel accents.

Thank you so much for reading my blog post, you can use my discount code T4TANNALISA10 when you visit the Time For Tea Designs shop to get 10% off your order.


Friday, 18 February 2022

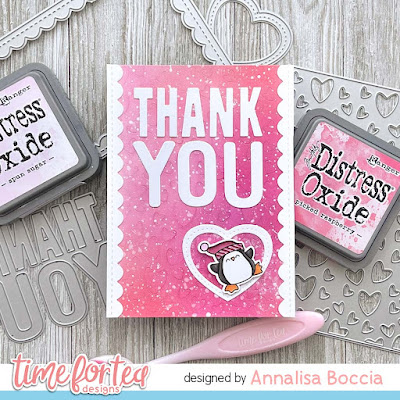
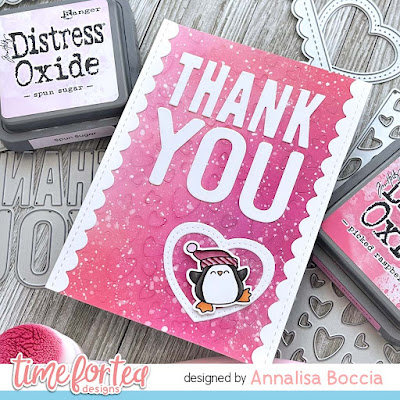
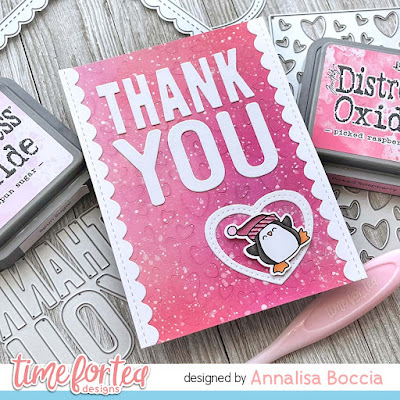
Thank You Penguin


Happy Friday! DT Annalisa here today sharing a thank you card using the adorable Skating By Penguins Clear Stamp Set and some Time For Tea Designs dies.

To start, I applied Spun Sugar and Picked Raspberry Distress Oxide using my Beautiful Blender Brush, I then added white splatter with a paintbrush. Once the panel was dry, I dry embossed it with the Scattered Hearts Cover Plate


I then used three dies to die cut some white card stock: Thank You Sentiment Die Set, Small Heart XOXO Die Set and Falalala Scalloped Slimline Dies. For the scalloped frame, I cut off the bottom and top and kept two scalloped strips of 5 5/8 inches. I used liquid glue to adhere the border, sentiment and heart to the pink panel.

I stamped, coloured and cut out the penguin and used some foam tape to attach it to the middle of the heart.


To complete the card, I added the decorated panel to a white card base made of heavy white cardstock. 

Thank you so much for reading my blog post, you can use my discount code T4TANNALISA10 when you visit the Time For Tea Designs shop to get 10% off your order.

Saturday, 18 December 2021

Falalalala Coffee Shaker Card


Happy Saturday everyone, I have been so excited to make a shaker card with the new Take Out Coffee Cup Dies. It was really easy to do too but you never know maybe one day Jo will do an add on set for us 😉
The rest of the card was pretty simple to do so to avoid a lengthy blog post I'll let you know how I made the shaker part. I began by cutting out the cup part out of 360 gsm white card twice, once out of brown paper and then again from white fun foam. I adhered the brown paper onto one and then on the second one I needed to cut out a window for the shaker. So using a ruler I measured 5 mm from the edge all around using dots to guide me then just joined them up using the ruler so it was all nice and straight. 
Then using the line as a guide I cut out the inside using my craft knife you want to make sure your blade is nice and sharp to get a clean cut, I used this then as a guide to cut out the middle of the fun foam and adhered them together with a piece of acetate sandwiched between them. 
I found it was easier to add the sequins into this part and adhering the brown paper onto the back. I used a mix of chocolate, gold and burgundy sequins as I was thinking about the Costa Coffee Black Forest Hot Chocolate when I was making this one. If i did it again though I feel like a pop of cream would have been great in there too!
Once this part was put together I added the rim of the cup in the same white card and cut out the cream for the top adding a little colour with some brown Distress Inks. I also cut the cream out of fun foam too so that it sat at the same height as the cup. I finished it up with a cherry and a heart die for a little extra detail. 
I just love how this one turned out and again I got to mix sets old and new which you know I love, Time for Tea stamps just work so well together which is what I love about them, it means you can still keep using your old favourites but adding a new twist with new designs!
For the rest of the card I used the Baked with more Love stamps, Hello Cupcake StampsZig Zag Frame and Tag DiesFalalala Scalloped Slimline DiesSlimline Hillside Scene Dies  and the new Snow Flurry Cover Plate Die. I told you I liked to mix and match my sets didn't I 😂
I hope you like my card for today if you want to purchase any of the items in the Time for Tea Shop you can get 10% off your orders using code T4TNATALIE10 . Happy crafting and have a great weekend!


Saturday, 20 November 2021

Falalalala


Happy Saturday everyone it's DT member Natalie here with a fun Christmas Coffee card for you today. The little reindeer's from the Happy New Year Critters are just one of my favourite designs from Jo and you can guarantee they will appear in so many of my Christmas designs. 
I was unsure what to make for my post today so tipped out all my coloured images I already had and  and had a tonne of the reindeer's left over. There was also the coffee cart and the hippo which got me thinking that the reindeer's might like a caffeine pick me up before they take to the skies on Christmas Eve. The hippo and coffee cart which are from the Snappy Before Coffee stamp set weren't quite the right colours though so I stamped them up and coloured them in more traditional Christmas colours.  
The base for the card is the Falalalala Scalloped Slimline Dies which is another one of my favourite Christmas Dies I added some Chipped Sapphire and Salty Ocean for the sky using the darker colour at the edge and blending it to be brighter in the middle. Once everything was stuck together I felt like it needed a few finishing touches with the snowflakes and I added some white gelly roll for some smaller stars and falling snow. 
I just love how this card turned out its such a fun design and I hope you like it too! You can find the products in the Time for Tea shop and get 10% off any orders using the code T4TNATALIE10
Have a great weekend and I'll see you all next week 💖

Thursday, 4 November 2021

Embossing onto Vellum Christmas Tag Video Tutorial

 Hello DT Vic here today and I am sharing a fun Christmas video tutorial. I have made some Christmas tags that are really fun to make and will give your gifts an extra bit of sparkle. 


I made three Christmas tags today and I show you in the video how to emboss onto vellum. I really love how effective this is and it adds a touch of glam to your crafts. I used the Memory Keeping Essential Dies to make my tags. I love the size of these tags and I think they are great to use a gift tag. For my images I used the Skating By Penguins Clear Stamp Set. I also used the Santa Paws Clear Stamp Set for some of my greetings. Another stamp which was super fun to use was the Squiggly Giggly A7 clear Stamp Set. I loved how this turned out on my tag. For the snowflakes I used the dies from the Falalala Scalloped Slimline Die


The copic markers I used to colour the critters are: 

BV23, BV25, E40, R81, R83, BG11, BG32, YR21, R20

I added some ribbon to the top of my tags once my images were adhered down. To finish the tags off I then added the die cut snowflakes and some sequins. You will also see in the video that I chopped off the end of a stamp for my greeting. This is because I wanted the greeting Love From Santa, but if I wanted to use the whole greeting its easy to line the stamps up on my acrylic block. You can also mask off the end of the stamp if you didn't want to cut your stamp. 

I hope you enjoy the video today and give embossing onto vellum a try if you haven't already tried it. Don't forget to show us your crafts we love seeing them. 

You can also save 10% off your orders using the code: T4TVICKI10 at the checkout and this includes all the new release products too. 

Thank you so much for stopping by today,

Crafty Hugs

Vic 

Tuesday, 13 July 2021

All to the sea!!!

 Hello friends, Claudia here with a card on the beach. I liked the idea of creating a fun scene and taking these kids to the beach to take a dip and have fun in the sea. 

I used characters from different sets to create my card, and I think the ones from the Car Critters set are ideal in this case. Then I thought that at the beach comes the hunger, so I used the set Bears Picnic which talks about picnics and in my opinion they are great for the beach too!


I created the base of my thin paper with the Slimline Scallop Nesting Dies set and the waves and sand with the Slimline Hillside Scene Dies set. I then blended with the Distress Oxide

I like to use stamps in alternative ways because I think creativity and originality is a lot of fun. 

 Greetings to all of you and good week !!

           Don't forget to use the code T4TCLAUDIA10 to get a FANTASTIC 10% discount!

Tuesday, 6 July 2021

Love Ya lots!


Hello Tea Timers, DT Claudia here with a very tender card about friendship. We happen to have a distant friend that we miss, my card is about that.  We can tell someone how much we miss them with a card and send it, right? 


For this card I used the set  Happy Mail Critters ,I love all those little beasts.  To start I created the background with theDistress Oxide

 I wanted to use a special sentiment, I thought of a die cut from the set Slimline Scallop Nesting Dies and I added a sentence from  brighters days Sentiments Cards


I really liked the result and hope you did too. I wish you a wonderful week and if you can prepare and send a card, it will bring you much joy and make someone happy!

Don't forget to use the code T4TCLAUDIA10 to get a FANTASTIC 10% discount!


Friday, 11 December 2020

Happy 2021


Happy Friday! Today I am sharing a snow-filled Happy New Year card featuring the Happy New Year Critters Clear Stamp Set and coordinating dies. That squirrel so cute and those balloons are adorable! This is one of my favourite cards that I have made this year.

I made the shaped card base with my Brother Scan N Cut SDX125e using an SVG cut file I purchased from Lori Whitlock's SVG Shop. After it was cut and assembled (I adjusted the design a bit by removing a snowman) I got to work on adding the adorable critters! I stamped, coloured (with Copics) and die cut out all of the elements. I die cut the snowflakes from white card stock using the Falalala Scalloped Slimline Dies and I love how they look. I stamped the 'happy new year' onto the bottom of the card base.

I used the balloon string line from the stamp set for the reindeer as it worked well in terms of length with my design. For the other balloons, I drew a line with a black marker and fussy cut them out. I used liquid glue to adhere the reindeer, squirrel, balloon strings and snowflakes down, for the other elements I used foam tape to add some dimension.

Once everything was on the card I added A LOT of snowflake dots using my white Gelly Roll Pen. I was inspired by the beautiful Christmas cards Sandy Allnock has been making lately with a lot of snow dots. If you aren't familiar with her work, I highly recommend you take a look. I have learned so much from her videos.

I have a 10% discount code for the T4T store which can be used on anything, anytime and has no time limit - T4TANNALISA10.


Saturday, 5 December 2020

Let it Snow!


Hi everyone Natalie here with another cute Christmas card to share with you all. I just love the new big bold Let it Snow Sentiment Die it's great for using as the main focus piece of your card. The new Skating by Penguins work so well with it and add a super fun touch. 
I started out by cutting out the Falalala Scalloped Slimline Die twice then popped out one of the insides of the frames to create the snowy sky. I wanted it quite bright so mainly used Faded Jeans and a light touch of Chipped Sapphire at the edges. I then spritzed it with some water and blotted it to add some snow texture. Setting this aside to dry I cut out a snow bank out of the other inside we cut out using the curved die from the Die-namic Display Card Die which I left plain white. The Let it Snow sentiment I cut out of white cardstock and then red glitter card and layered them together to give it some more depth. 
The penguins, snowballs and robin are all coloured with Copic markers once coloured in I cut them out with the coordinating die set and then popped my card together.
The card isn't a regular card base I used some red tape to stick the frame piece together with the inside. Then used that to measure out two pieces of white card the same size. One of them I stuck straight to the front panel. The other I scored a line across the top about 1cm down then added some red tape above the score line and attached it to the front panel and that was my card finished. 
As always you can get 10% off in the shop using code T4TNATALIE10 have a lovely weekend and I will see you next week!


Thursday, 3 December 2020

A Christmas Full Of Critters

 Hi Vic here today, I am in full swing of making my Christmas cards right now and I have a fun card to share with you today.


For my card today I used the Die-namic Display Card Dies and I die cut this using some white card. I then ink blended some blue distress ink Tumbled Glass and Faded Jeans onto the card using a Beautiful Blender Brush. Once my colour was built up I then added some white paint and water to make some splatters of snow. 


While this was drying I stamped the images I wanted to use on my card. I used the Carolling Critters stamps and dies and also the Christmas Surprise Stamp and Die Set and the Skating By Penguin Stamp Set. I coloured the images in with my copic markers before running them through my die cutting machine. Next I used the Starry Sky Stencil and some purple ink and I added this over my ink blended panel. I then put the card together using some double sided tape and PVA glue. 


I then adhered all my images to my card using foam tape. I wanted to add something more so I used the Slimline Falalala Die and die cut some snowflakes from this die set. I really love how detailed the snowflakes are and I adhered them onto some acetate before adhering to my card. I then heat embossed the sentiment Let It Snow using some white embossing powder and trimmed the sentiment down. I adhered this onto my card again using some more acetate. 


I loved how this card turned out and it was so fun to use different stamp sets. 

Don't forget you can save 10% off your purchase in the Time For Tea Designs Shop using the code:

T4TVICKI10 at the checkout. Jo will also be live on our Facebook page tonight where you can catch her at 8pm. Its a really lovely way to meet fellow crafters and craft along with Jo if you like, or you can just relax.

Thanks so much for stopping by today I hope you have a great day!

Vic 

Friday, 27 November 2020

Falalalala


Happy Friday everyone, DT Annalisa here, have you seen the great sale going on over at Time For Tea Designs right now?! If not, be sure to take a look at the 2020 Black Friday Collection, there are some great bundles up for grabs at terrific prices. The sale will end at midnight November 30th BST.

Today I am sharing a Christmas card featuring several new T4T products from the latest release, including the Carolling Critters Clear Stamp Set, Falalala Scalloped Slimline Dies, Layering Dies Imperial Sized- (USA sized) and paper from the Winter Wonderland Paper Pad 6x6". This is such a beautiful collection of papers. I usually struggle with using patterned paper but this collection has inspired me!

To start I stamped the critters and coloured them with my copics and added some highlights with my white gel pen. I added some foam tape to the back of them and set them aside to work on the rest of the card.

I die cut out the falalalala sentiment three times, twice from white card stock and once from some silver foil paper. I stuck them all together with liquid glue. Next, I die cut out a snowy hill and glued it down to the beautiful patterned paper which I had die cut out using my A2 layering dies. For the border around the card, I used the largest frame in the A2 Nesting Frame Dies (this is part of the Black Friday Sale and I use it all the time!) and coloured it using my BG copics. I used liquid glue to adhere this down on top of the snowy hill and patterned paper.

I stuck the critters down on top of the snow and then glued down the sentiment and music notes which I stamped on some white card stock.

To finish the card, I die cut several snowflakes from the Falalalala Slimline Dies. I just love how this card turned out.

Don't forget I have a 10% discount code for the T4T store which can be used on anything, anytime (including sales!!) and has no time limit - T4TANNALISA10. I so appreciate it when you use my code as it helps me to continue to be on the design team that I love so much.


Other Posts You Might Like