Pages

Showing posts with label Smitten Kitten Stamp Set. Show all posts

Thursday, 10 February 2022

Sending lots of love

Hello crafty friends, Kitty here. As it's Thursday though it's time for my latest card. I used those kitties again as they are just perfect for Valentine's which is just around the corner...

For this card I used the Smitten Kitten Stamp Set. I coloured the images with Copics and cut them out. I created the background by firstly blending Kitsch Flamingo and Spun Sugar Distress Oxide Inks. I then placed the Boho Tiles Stencil over the top and used Kitsch Flamingo and Picked Raspberry Inks. I die cut white card using the photo frame from the Memory Keeping Essentials Dies and the glitter heart from the same die set. I made it into a shaker panel and added sequins and gems. I used the Black Polka Dot Washi Tape for the strip at the top. Next I used the Bold Sentiments Stamps & Dies for both the sentiments. I popped all the pieces onto foam pads and added a heart embellishment to finish.


Thank you so much for stopping by today.
Don't forget you can use my discount code T4TKITTY10 across the store for 10% off your order.

Kitty xx

Thursday, 20 January 2022

So Lucky To Have You

Hello & Happy Thursday! Kitty here and it's time for my usual afternoon DT spot for Time For Tea Designs. I went full on bright and busy for this slimline card. It was so much fun to make and I love adding lots of little detail...


I started out my creating my background panel. I gently blended Salvaged Patina & Twisted Citron Distress Inks three times on a slimline panel. I then blended Twisted Citron onto card and die cut it with the Grass Die from the Landcape Edge Dies. I added this onto each section. I created the front panel by blended Kitsch Flamingo & Picked Raspberry Distress Oxide Inks. I then used the Chic Chevron Stencil with Picked Raspberry Ink over the top. I used a Square Label Die to create the three windows and added white dots around them with a pen. I then added acetate behind the windows, added sequins to each window and fixed it onto the back panel to create the shaker windows. I used the Smitten Kitten Stamp Set for each of the images. I coloured them with Copics, cut them out and fixed them in place on the windows. I cut the sentiment from the Brighter Days Sentiment Cards into three pieces and added them along with some heart embellishments.


As always, thank you ever so much for joining me today, don't forget to join us tomorrow for our Blog Hop. You can use my code T4TKITTY10 for 10% off your order at Time For Tea Designs.

Kitty xx

Sunday, 16 January 2022

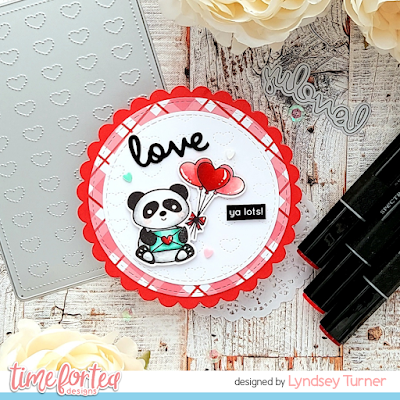
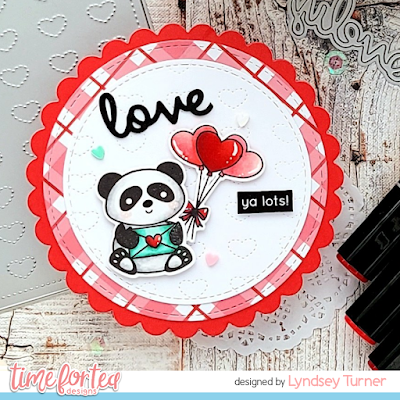
Love ya lots!!

 Good afternoon Teatimers,

I'm sharing this cute little circle card with you today featuring one of the adorable pandas from the Pandamonium Party stamp set. I thought this sweet little fella with his love letter would be perfect for a Valentines Day make.

To start I coloured my images using my Spectrum Noir markers (colours listed below in order of lightest to darkest)

Panda - IG1, IG3, IG5 

Red - CR7,  DR5,  DR6

Pink - CR3, CR5, CR6 

Green - GT1, GT2, GT3 

To create the shaped card I cut a scalloped circle from a red card blank making sure to overlap the die over the fold. I then cut another circle to add to the front. 

I die cut the Dotty Hearts Cover Plate from white card before cutting out a circle using the Circle of love Nesting Dies. This was then added to a larger circle cut from a piece of paper from  the Joyful Winter 6x6 Paper Pad and finally added onto the card.

I added my cute panda to the front along with some balloons from the Smitten Kitten stamp set. I used the 'Lovely' from the Slimline Scalloped Nesting Dies cutting off the LY to leave the word LOVE this was die cut 3 times to give dimension. Finally I used one of the Brighter Days Sentiments to complete my message.

Thanks for joining me here on the blog today, don't forget to use my code T4TLYNDSEY10 for 10% off your order in store.

Enjoy the rest of your weekend 

Lyndsey x

Thursday, 13 January 2022

Happy Valentine's Day

Hello crafty friends, DT Kitty here. It's Thursday and that means my usual weekly DT post. I am loving the pink and green combo at the moment it just makes things pop! The combo is perfect for Valentine's Day which is not long away now...

I started out by creating the background. I blended Spun Sugar & Kitsch Flamingo Distress Oxide Inks. I then used the Scene It Stencil to create the clouds, using Picked Raspberry Distress Oxide Ink. I blended some Twisted Citron with a little Mowed Lawn Ink and added some ink splatters. I die cut it using the grass die from the Slimline Hillside Scene Dies. I then mounted the panel onto white card then onto paper. I used the Time For Tea Smitten Kitten Stamps, the flower from the You've Got Mail Set and the butterflies from the Up Up & Away Set. I coloured each of them with Copics and cut them out. I added some highlights with a white pen. I stamped the sentiments onto white card. I attached each of the images and sentiments onto the card with foam pads - you know I love a bit of dimension!


Don't forget you can get 10% off your order at Time For Tea Designs using the code T4TKITTY10.

I will be back next week with another card, have a great evening!!

Kitty xx

Wednesday, 12 January 2022

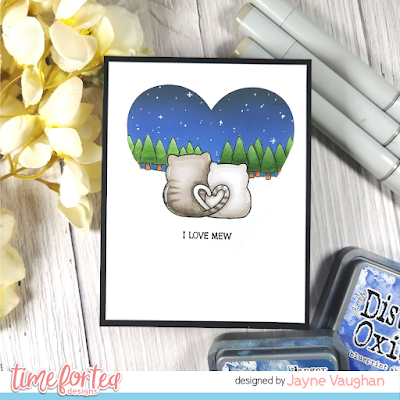
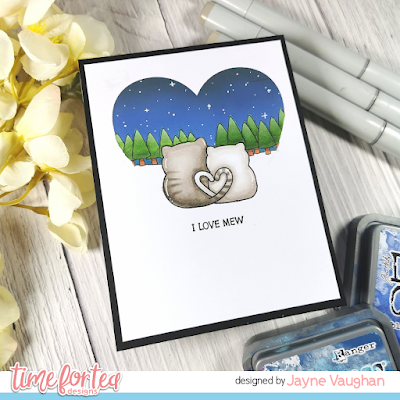
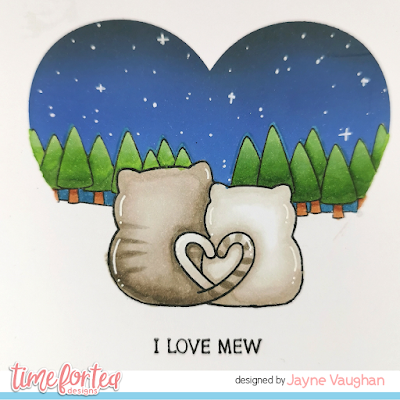
Creating a Valentines Day scene with masking

Happy New Year, tea-timers! Welcome to the first step-by-step blog of 2022! Today we're going to be looking at creating a scene using masking, which was requested by one of our Facebook group members. Let's dive straight in!


Here's what you'll need:

- Stamps for your chosen scene (I've used the Smitten Kittens stamp set and the Winter Backgrounds set)

- A stencil, if you'd like to create your scene within a small area (I used this heart stencil)

- Ink for stamping (I used Gina K Onyx Black amalgam ink, as it is Copic friendly)

- Markers or other colouring medium

- Masking paper, masking tape or even Post-It paper or tape (I use Gina K Masking Magic)

- Scissors for fussy cutting

- Inks for blending (I used distress oxides in Blueprint Sketch, Chipped Sapphire and Black Soot)

- Blender brushes or foams

- Black fineliner and white gel pen

- White and black cardstock


Instructions

1. Create a guide - I like to grab a piece of scrap paper and stamp out my scene, as a guide. You don't need to worry about masking anything off at this point, you're just working out where you want your images to go. You can then refer to this guide later when creating your actual scene, or even lay it down in your MISTI/stamping tool, line your stamp up on your guide, pick the stamp up with the MISTI door, remove the guide, then stamp your image down on your card.

2. Today, I'm going to create my scene inside a heart, for Valentine's Day. I used washi tape to fix my cardstock to the reverse of the stencil, then I stamped my images within the heart frame.

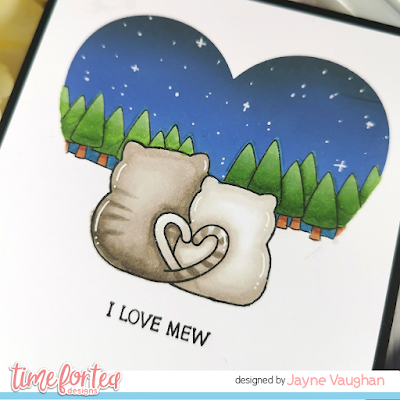
3. The key to creating a one-layer scene with masking, is to stamp the image you want in the foreground first. Here, it's our kitties. Then, stamp the same image on to masking paper and fussy cut along the stamped line.

4. Place your mask over your stamped image, being careful to line it up precisely.

5. Stamp your next image over the masked-off image. For this scene, it's our line of trees. Again, stamp the image onto some masking paper and fussy cut, then apply over the stamped image on your card. Keep going with as many images as you want to use, going from the front to the back.

6. After stamping and masking the trees, add some post-it/masking paper to the bottom of the image to protect it, and ink blend the night sky above the line of the trees. Use the lightest colour at the base of the trees, working up to the darkest colour at the top.

7. Peel off your masking paper to reveal your scene!

8. Colour in your image with your preferred medium. I used Copics in the following shades:

Cat 1: W5, W3, W1

Cat 2: W3, W1, W0

Trees: YG67, YG17, G24 / W27, W25

Sky (above tree line): B97

9. Add some stars to the night sky using white gel pen, and some accents to the kitties also with white gel pen.

10. Draw in the bottom of the kitties below the stencil line, using black fineliner.

11. Stamp your sentiment below the scene.

12. Finally, add the finished scene to a black card base!


Is there anything you'd like to see in a future tutorial? Let me know!

And don't forget, if you're buying anything from the T4TD store - use discount code T4TJAYNE10 to get 10% off your entire order! Happy crafting!

Thursday, 7 October 2021

Really Really Love You

Hello crafty peeps, DT Kitty here with my usual weekly Thursday spot. This week I went with a sweet clean and simple card using some cute critters...


For this card I started out by blending some Kitsch Flamingo & Spun Sugar Distress Oxide Inks. I then die cut a the small frame from the Smile Inverted Scallop Frames Die Set from white card and glued it directly onto the card. I used stamped the cute critters and accessories from the Smitten Kittens Stamp Set. I coloured them with copic markers and cut them out as I didn't have the coordinating dies for this set. I arranged them on the card and fixed them with foam pads. I used the Brighter Days Sentiment Cards for the sentiment and simply cut it onto three pieces. To finish I added a few clear gems.


Dont' forget to use my code T4TKITTY10 to get 10% off your order at Time For Tea Designs.

Kitty xx

Friday, 27 August 2021

Sending Paper Hugs


Hello everyone, Annalisa here sharing the INSIDE of a card rather than the outside, (shocking I know!) because the inside is the show stopper on this card. I love how this pop-up card turned out using the Happy Mail Critters from Time For Tea Designs.

I used my Brother Scan N Cut SDX125e to cut a card base and inside the pop-up area for the card base. I purchased the design from Lori Whitlock's SVG Shop (Mailbox Pop-Up Card) and adapted it to create my card. The sky was ink blended using Salty Ocean Distress Oxide Ink and the grass was from some green patterned paper I had. I coloured the tree and leaves with Copic markers.


The mailbox, bird and heart envelope are from the Happy Mail Critters, the planters, bush and small leaves and flowers are from the Windmill Add On die, the mouse is from Treat Yourself, the cat is from the Smitten Kitten and the flower and butterfly are from Be Slothy.

I stamped, coloured (with Copics) all of the elements and die cut them out. The Windmill Add On die elements were coloured using Distress Oxides (Mowed Lawn, Lucky Clover, Picked Raspberry, Vintage Photo, Peacock Feathers, Squeezed Lemonade, Faded Jeans.) I added a green splatter to the greenery and some white gel pen highlights to some of the elements.

I used liquid glue to adhere the critters and other items to the inside of the card. I finished up the inside by stamping the sentiment 'hello, sending paper hugs."

Thank you so much for visiting the T4T blog, you can use code T4TANNALISA10 when you visit the shop to get a 10% discount on your entire order.


Sunday, 21 February 2021

Another Gorgeous card from Guest Designer Lyndsey!

 Happy Sunday everyone,


I'm back today with another card for my guest slot with Time for Tea Designs using the Smitten Kitten stamps. Still on the love theme with these cuties, but as Valentines Day has been and gone his time I've used the cute kitty couple image for an Anniversary card.


I adore this cute pair and they are just perfect for anniversary/wedding cards.

I coloured the couple up with my Spectrum Noir markers using the following colours (darkest to lightest)

Left kitty - GB5, CT4, FS7, FS5, TN2
Right Kitty - BG7, BG5, BG3, BG1

For the background I used the Sparkle Cover Plate Die cut from white card and backed with pink polkadot paper, matted onto bright pink card. 

For the scene I took a plain heart and inked the clouds using the Scene it 6x6 Stencil. The grass was cut from the Landscape Edges die set. I layered up the 'happy sentiment die to give it some dimension and stamped the 'anniversary' from the stamp set in the bottom right hand corner to finish.

Thank you for popping by the blog today.

Lyndsey x

Saturday, 20 February 2021

A quick and easy Anniversary Card

 Happy Saturday everyone have you had a good week? Surprisingly I have another Smitten Kittens card to share with you all today. I'll be mixing it up next week I promise but I'm sure you will all agree they are totally adorable. 

Todays card is perfect for anniversary's also an added bonus it was really quick and easy to make so perfect if you need one last minute. I used the Dotty Hearts Cover Plate Die to create my base and stencilled a heart on using the Large Heart Masking Stencil and some Worn Lipstick and Picked Raspberry Distress Oxide inks. I started at the bottom with the darker shade and blended up into the lighter one to give an Ombre effect. I also used the Picked Raspberry on a sheet of card and stamped my sentiment on there and cut into a small rectangle with my paper trimmer. 
The kitties I had left over in my stash that I had already coloured up. When I get a new set I tend to stamp out around 3 of each image and colour them all up at the same time. I find this method works so much easier as you already have all the pens out. Its also great to do when your feeling a bit crafty but you don't want to make a card.
I popped them both onto my card alongside the balloons and popped that onto my card base. I hope you like it and don't forget you can get 10% off in the shop using code T4TNATALIE10


Wednesday, 17 February 2021

I Love Mew - A Masculine Themed Card

Happy Wednesday!

It's DT Shabneez and I'm sharing a card that's a little more masculine as my husband doesn't appreciate cards with lots of pink, although he's more than happy to wear a pink shirt......!


Instead of inks I decided to use papers for the background as I thought they went really well with the night time scene I created.  I die cut a couple of circles from the Circle of Love Nesting Dies to create a frame.  I added a small die cut circle for the moon and the Landscape Edge Standalone Dies for the grass.  I die cut a speech bubble from the Speech Bubbles Co-ordinating Die Set and stamped 'I love mew' with the Smitten Kitten Stamp Set.


I coloured the cats image using my Chameleon pen from the same stamp set and cut them out before sticking them amongst the die cut grass.  To finish I stamped out 'Happy Anniversary'.

You can get 10% off anything in store using my code T4TSHABNEEZ10 and don't forget to watch Jo and Ant on their Facebook Live at 8pm tomorrow with an exciting new release!


Other Posts You Might Like