Pages

Showing posts with label Pandamonium Party. Show all posts

Sunday, 16 January 2022

Love ya lots!!

 Good afternoon Teatimers,

I'm sharing this cute little circle card with you today featuring one of the adorable pandas from the Pandamonium Party stamp set. I thought this sweet little fella with his love letter would be perfect for a Valentines Day make.
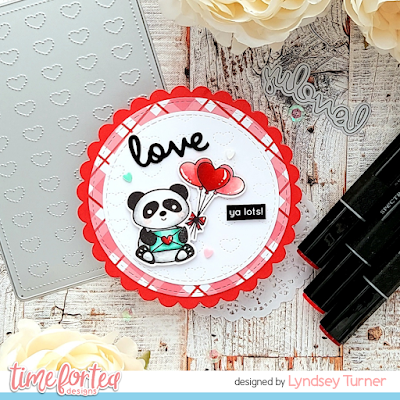
To start I coloured my images using my Spectrum Noir markers (colours listed below in order of lightest to darkest)

Panda - IG1, IG3, IG5 

Red - CR7,  DR5,  DR6

Pink - CR3, CR5, CR6 

Green - GT1, GT2, GT3 
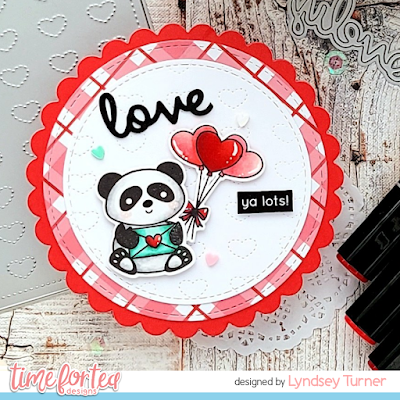
To create the shaped card I cut a scalloped circle from a red card blank making sure to overlap the die over the fold. I then cut another circle to add to the front. 

I die cut the Dotty Hearts Cover Plate from white card before cutting out a circle using the Circle of love Nesting Dies. This was then added to a larger circle cut from a piece of paper from  the Joyful Winter 6x6 Paper Pad and finally added onto the card.

I added my cute panda to the front along with some balloons from the Smitten Kitten stamp set. I used the 'Lovely' from the Slimline Scalloped Nesting Dies cutting off the LY to leave the word LOVE this was die cut 3 times to give dimension. Finally I used one of the Brighter Days Sentiments to complete my message.

Thanks for joining me here on the blog today, don't forget to use my code T4TLYNDSEY10 for 10% off your order in store.

Enjoy the rest of your weekend 

Lyndsey x

Sunday, 11 July 2021

Pandamonium

Good afternoon everyone,

Lyndsey here and today I'm sharing this cute CAS card using the adorable Pandamonium Party stamp set


Sometimes it so easy to get caught up with new release items that you forget you have some cracking older sets that have not seen enough love. These pandas are one of my favourite sets so I thought they needed an airing.

I had the idea of the panda peeking out from an aperture in the card and keeping the whole background very simple with just a pop of colour.

To start I coloured my image with my Spectrum Noir markers (colours listed below in order of lightest to darkest)

Panda - IG1, IG3, IG5 

Balloons - GT1, GT2, GT3 & PP1, PP2, PP4 

Hat & Present - TB1, TB3, TB4 


To start I cut a piece of white card using the A2 Layering Dies and added a strip of stripy paper from the Brighter Days 6x6 Pad across the bottom of the card. I then took a circle die and cut an aperture out towards the RH side and stamped the sentiment just above the aperture.

Before adding the panel to the card blank I found a scrap of card that I'd previously used with the Mandala Stencil and thought this would make a great pop of colour behind my image.

Both the panel and the images were added to the card with foam pads for dimension.

This was such a simple card to make but really creates an impact with the pop of colour from the stencil and images.

Thank you for joining me here on the blog today, enjoy the rest of your Sunday.

If you want to purchase any of the items I've used today, you can use my code T4TLYNDSEY10 for 10% off your order 😀

Lyndsey 

Saturday, 26 June 2021

Sending Bear Hugs!


Well the weekend is finally here, feels like it’s been a long time coming this week. It’s another cloudy day here today so a day of crafting maybe in order! 

For today’s card I have an adorable Panda card you using the Pandamonium Party Stamp Set. It was nice to colour up some old favourites and the great thing about the pandas is when you don’t fancy doing loads of colouring then you don’t need to. I stamped them out and just added a little bit of shading with some warm grey copics and a little rosey cheeks and paws with R11. Then finished it off with three white dots on the cheeks using a white gelly roll pen.

I also coloured up some bits of bamboo and leaves and the balloons just to give it a pop of colour with the red and yellow. 

For the base of the card I used the Mini Slimline Scallop Dies which I taped together at the back using some washi tape whilst I stencilled onto it. I used the new Slimline Scene Builder Stencil to create some clouds and then went over the top with a bamboo stencil from another brand. When I finished this up it was way too much though like one of those magic eye stencils that send your eyes funny lol! To fix it I just cut out another white frame and layered it over the top. 

Before I placed my pandas on the card I wanted to create my sentiment to see how everything fit. I used the rectangle die from panda stamp set to cut out my base. Then added the same green distress oxide on top that I used for the bamboo and stamped straight on top of that. It’s a big sentiment box but I like the block of colour it adds to the card and breaks up the background a little. I popped this in the middle at the bottom and laid all my pandas and accessories around it and that was my cad finished up. Since the pandas don’t need colouring much and the slimline is quite small it really was a quick and easy card to create. This is perfect for when you need something last minute be sure to check out next weeks too when I create another quick and easy mini slimline card. 

Thanks for reading the blog hope it helps and you enjoyed my little tutorial. If you want to pick any of the items up in the shop or anything else you can get 10% off your order using code T4TNATALIE10. Have a great weekend and I’ll see you next week ❤️

Monday, 19 April 2021

Today is going to BE AWESOME

Happy Monday crafty friends! 

DT Natalia here today, and I am back with a colourful and fun card! 

I am really into rainbow colours lately, so I decided to use this palette to create a bright background for this card.

I started off by masking my A2 panel top and bottom with tape and doing some ink blending on the rectangles one at a time. I used the following distress oxides colour combinations: 

  • wilted violet, broken china, cracked pistachio and squeezed lemonade
  • worn lipstick, dried marigold, squeezed lemonade and cracked pistachio 
  • faded jeans, broken china, wilted violet and picked raspberry

Once my inked panel was ready, I stamped these cute pandas and the accessories from the Pandamonium Party set and coloured them in with my Spectrum Noir markers. For the party hat and presents, I added some dots and lines with some sparkly ZIG Wink of Stellar markers. I then added some highlights with a white gel pen and fussy cut them - they were now ready to go!


After that, I prepared some black cardstock with anti-static powder and stamped the 'today is going to be awesome' from the Speech Bubbles set and fussy cut that as well. I really like this set as it sentiments for multiple occasions and they are fab to go onto any card!

The next step was to trim the height of my panel by 1/2 inch each size so that the blue cardstock underneath would show. I thought that tied up the card nicely together. 

I then assembled the pandas, presents, hats, muffins and sentiment onto the card front with some 3D foam and added some Lucy mixed gems and sequins from Little Things from Lucy's cards to finish it off! 


I love how happy this card turned out! These guys sure look like they are going to have an awesome day!

You can use code T4TNEILA10 at checkout to save 10% off your shop! 

Sending hugs,
Natalia

Monday, 9 November 2020

Time for some Pandamonium!

 I am so, so, so excited to be here. My name is Amy and I have just joined this awesome DT. This is my first project as DT here so please be kind :) I felt like we all needed something bright and happy with everything that is going on so what better than a panda with googly eye?? OK so I went one better and it's not only a panda with googly eyes its also on an action wobble!! I couldn't resist. 

This adorable set of stamps are called Pandamonium Party and in my personal opinion they wont fail to make people smile. I added a tiny bit of shade around their white bits with a light grey triblend marker, Coloured the hat and the balloons with more triblend markers before adding some sparkle with a crafters companion sparkle pen. To make the balloons look shiny with some glossy accents. I used the coordinating dies to cut them all and then added the hats and balloons before fixing on their googly eyes. 

 For the background I used my time for tea beautiful blender brushes and some distress oxide inks to make this colourful background (I used Wilted Violet, worn lipstick and antique linen) before then adding sparkle using some pineapple glacier paste with the starry sky stencil

The squares behind them I cut using the quilted square nesting dies. The sentiment is from the stamp set and the rectangle that it i stamped on is from the coordinating dies. I heat embossed it in white embossing powder to stand out and match with the black and white of the pandas.

 I hope this has given you all a little smile and that you are all staying safe and well. Don't forget if you do want to get any Time For Tea Designs goodies then you can use my code T4TAMY10 to get 10% off of your order :D

Huge Hugs


Amy xx

Time For Tea Designs products I used:


Saturday, 9 May 2020

Colourful Hugs


Hello everyone, DT Annalisa here and today I am sharing a colourful card featuring the new Scattered Hearts Stencil as well as some other Time For Tea Designs goodies. This heart stencil is just perfect to help spread some cheer to your friends and loved ones.
I used my blender brushes to apply Spiced Marmalade, Squeezed Lemonade, Picked Raspberry and Peacock Feathers Distress Oxide inks to the Scattered Hearts Stencil. I then removed the stencil and used the same colours with a much lighter pressure to add colour to the white card stock background that remained. To finish the background I added splatters of water and picked it up with some paper towel.
I stamped the bear and sentiment from the Pandamonium Party stamp and die cut them out using the coordinating die set. I then die cut the two frames from the Smile Sentiment and Scalloped Frame Die Set from some heavy white card stock.
I adhered the two frames to the scattered hearts background with liquid glue. I then stuck down the panda and the sentiment. To finish the card I added some Crystal Stickles to the heart on the envelope.
If you are interested in purchasing any Time for Tea Designs products be sure to Use code T4TANNALISA10 when you visit the shop to get a 10% discount off your entire order.

Friday, 27 March 2020

Hamster Party

Hello everyone, Annalisa here and today I am sharing a birthday card featuring the Hooray Hamsters stamp set and coordinating dies, as well as the new Ever Decreasing Circles stencil. In addition to this I used several stamp sets, I just love mixing and matching sets whenever I can.

To create the background, I die cut some white card stock using the Hooray A6 Panel Die, blended on some Tumbled Glass Distress Oxide Ink with my Beautiful Blender Brush and then used the Ever Decreasing Circles stencil to add the darker blue circles over the top of this. I then applied some translucent embossing paste from Wendy Vecchi, once this was dry, I added some white splatters using my Picket Fence Distress Paint.


I created the grass area by cutting out some white card stock using the Hooray A6 Panel Die, blended on some Mowed Lawn Distress Oxide Ink with my Blender Brush. I added some water droplets and white splatters and then die cut the section using Stitched Hillside Borders die set from Lawn Fawn. I attached the grass to the dotted sky background using liquid glue.

For the scene, I stamped and coloured critters and other elements from three stamp sets: Hooray Hamsters, Hip Hop Horray (worm) and Beauty Sleep (clouds). I adhered the critters and elements to the card using liquid glue.
To finish the card I stamped Happy Birthday (from the Say Anything stamp set) and die cut it using the dotted square die included in the Pandamonium Party coordinating die set.


If you are interested in purchasing any Time for Tea Designs products be sure to Use code T4TANNALISA10 when you visit the shop to get a 10% discount off your entire order.

Friday, 13 March 2020

Create Pandamonium Card Making Tutorial and Video

Happy Friday everyone!!

Jo here with our end of the week Crafty inspiration in the form of our FB Live Craft with Jo video!


In today's video I got to play with some new stencils and dies to make this super cute card.

Be sure to watch the video below for more detail on how I put together the frame and stencilled my background.


My background panel was cut from super smooth card stock using the new Hooray Cover Plate Die. This die cuts a A6 size panel which fit perfectly on my top folding card base.

I layered the Square Grid Masking Stencil and the Bamboozled Stencil to add some colour to my background.


My images were stamped with Memento Tuxedo Black Ink and coloured with my Copic Markers.


I added finishing touches with my Black Glaze Gelly Roll pen to the noses, white Gelly Roll pen for highlights and some Unicorn Stickles to the gift.


My frame was cut using 2 of the dies from the new Quilted Square Nesting Die set. I cut 4 frames and layered them together to create my own chipboard effect element. This really draws you in to the design and adds some great dimension.


 My sentiment was stamped with Versafine Onyx Black Ink underneath my focal panel.


I loved how this turned out. It was great fun playing with all these new dies and stamps and making something bright and cheerful while it was dark and raining outside!!

Please join us next Thursday for another FB Live Craft with Jo. 8PM GMT.

Details of the products I used are listed below.


Friday, 6 March 2020

Pandamonium birthday

Hello friends!
Anila on the blog today sharing a slimline card here. 


I have used the Pandamonium party stamp set and coordinating dies along with the Quilted squares die set.
Stamped and die-cut the images. Die-cut the quilted sqaures and coloured them using various distress inks.
On a white card panel, I stamped the leaves and stalk from the same stamp set using various green coloured inks. While stamping these, I eye-balled the placement of the squares on the card. 
Stamped the sentiment. Adhered the colourful squares with Pandas over them. 
Foam mounted the panel on a card base. 


Thank you for stopping by.

Products used

Hammy Time

Happy Friday! Annalisa here and today for my DT inspiration project I am sharing a celebration card featuring the brand new Hooray Hamsters stamp and die set as well as the Dotty Hearts Panel Die. I love the stitching around the border and the curved corners of this panel die so I decided to use it for the background layer of my card.


To start I stamped the party scene, coloured it using copics and added some highlights using my white Gelly Roll Pen. Next, I die cut out the Dotty Hearts Panel Die and coloured around the edge with my BG13 to match the hat, balloon and sign colour. To fill in the scene I also used the Pandamonium Party (heart and circle balloons), Fairy Garden (dotted lines), Toucan Do It (hearts) and Pawsome Christmas (star) stamp sets. It is always great to be able to use the smaller stamps in sets to get more use out of them.

I rounded the corners of the white card stock the scene was on and then adhered it to the teal background to complete the card.

Head over to Time For Tea Designs and use discount code T4TANNALISA10 to get 10% off your whole order including the new release stamps.

Monday, 2 March 2020

Hooray Pandamonium

Hi Everyone! 

It's Cat here with one of my cards made using some of the products from the new March release 

They are so adorable, and if you haven't had a chance to see them yet, then head over to the T4TD shop Here

You can get a 10% discount if you use the code T4TCATRIN10


For this card I have used the 'Hooray Hamsters' and the 'Pandamonium' clear stamp sets and coordinating dies. THe hamsters and pandas have been coloured with ProMarkers and Black glitter. 

For the backdrop I have used the 'Check Me Out' Stencil a Time for Tea Design Blending Brush and Tim Holtz distress inks (Cracked Pistachio, Salty Ocean, Chipped Sapphire)  

I have also used the 'Square Grid Masking Stencil' to cut out and distress the square boxes that the hamster and pandas are in. 

Finally I white embossed the sentiments using the White WOW  embossing powder .

I hope you like it!
Crafty Hugs
Cat
-x-

Friday, 28 February 2020

Full Product Reveal & Giveaway!!


Hi there!!

Happy Friday!
Sorry its a late one! I don't know where the time goes.
We have been sharing a few sneaky peeks all week of the New release and now I can finally bring you the FULL Product Reveal.

Please watch the video to see all of the amazing new products that will be available in the Time For Tea Designs store from 9am 1st March. (GMT).


You are also invited to join our Insta Hop tomorrow at 12pm. Its your chance to win some of the new release worth up to £55.00!!! How great is that?

Just Hop on over to our Instagram page @timeforteadesigns for all the details of how you can win!


See you there!

Jo
XOXO

Other Posts You Might Like