Pages

Friday, 29 September 2023

Let's Party


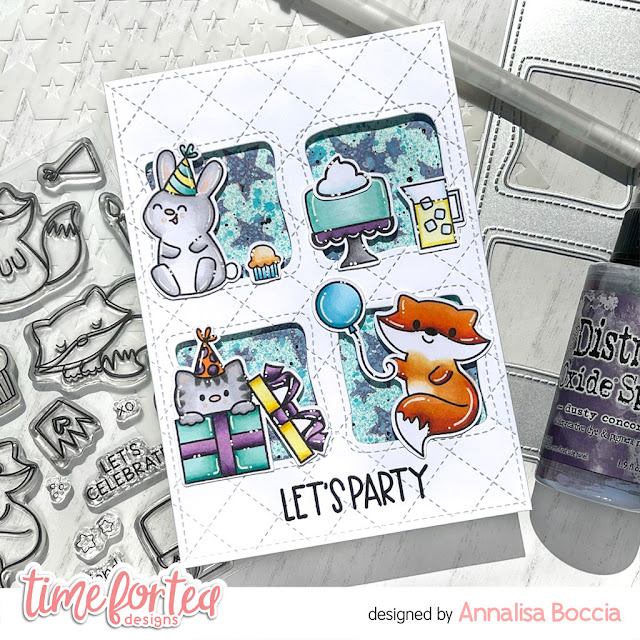
Happy Friday! DT Annalisa here, my T4T project today is a celebration card featuring the Let’s Party stamp set. The kitty popping out of the gift is my favourite stamp in the set. When I was a teenager, my parents got me a ginger kitty for my birthday as a complete surprise and I loved it. 

I sprayed Dusty Concord Distress Oxide Spray through the Movie Star 6 x 6" Stencil, removed the stencil and sprayed Salvaged Patina Distress Spray to create the background panel. I added black watercolour splatter once the panel was dry. I added this background to an A6 card base.


I ran white cardstock through my Bigshot twice, once using the Stitched Quilted Cover Die and a second using the Wonky Windows Cover Die. I stamped the Let's Party sentiment to the panel using my MISTI and then used double-sided foam tape to stick it to the card base.

I stamped and coloured (with Copics) images from the Let’s PartyBirthday Fox, and Birthday Cake stamp sets and cut them out with their coordinating dies. I added white gel pen accents with a Gelly Roll Pen


I adhered the images to the card base using liquid glue or double-sided foam tape for dimension. 

Thank you so much for checking out my blog post. Remember to use my discount code T4TANNALISA10 when you visit the Time For Tea Designs shop to get 10% off your order.


Thursday, 28 September 2023

Let's Party

Hey there, Tea Timers!!  It's Amanda here!  Today I get to share a card I made using the Let's Party Stamp Set from the New Release

To make this card, I'm going to start by creating my background!  I ink blended Catherine Pooler's Hot Tub and Skylight inks on a white cardstock panel.  I flicked some white paint mixed with water on it using a paint brush.  Then, I cut it down to fit in the upper 2/3 of my card base.  

I blended Buttercream on a smaller strip of cardstock and then stamped some of the tiny stamps from the Let's Party Stamp Set , also in Buttercream.

I stamped my sentiment in between these 2 color panels with black ink and then added some stars using Spiced ink.


Next, I stamped my images from the 
Let's Party Stamp Set and colored them in with Copic markers.  I used my color palette as a guide in choosing colors.

After die cutting them out with the coordinating dies, I assembled my card!  I glued down my panels.  Then, I used 3D foam squares to prop up my stamped images.


Aren't those little critters just too cute?!  That's all I have to share with you today!  Come back tomorrow for more inspo from other designers!
Xx, Amanda


Wednesday, 27 September 2023

New home

Hey there Tea-timer friends...

DT Ashlee here, I hope you are all well and getting in lots of crafty time!

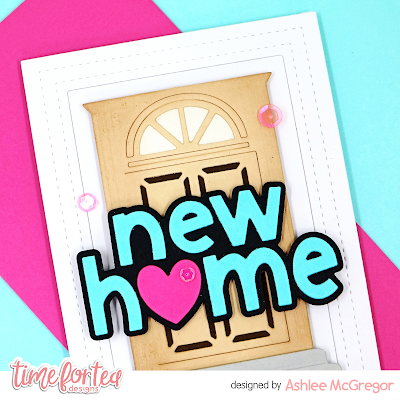
Today I'm sharing a new card using just die cuts, yep I didn't use any stamps on this card just a range of Time for Tea designs dies....


I used these T4T products for this card....


To create the card I die cut the base using the wide stitched frame dies and a piece of light grey cardstock. I then die cut the open door pieces and adhered them all together. I added a little bit of brown inking around the edge of the door. This was then added to the card base using foam tape to start adding dimension. I die cut steps from a darker grey card and adhered those with foam tape too....


I die cut all the sentiment layers from different colours of cardstock and adhered those over the door using foam tape. To complete the card I added a touch of pretty pink sequins!

I like how this card turned out with using just dies, how about you challenge yourself and make one too?!


Thanks for checking out my card, I hope you liked it! Until next post happy crafting, hugs Ashlee. 

Monday, 25 September 2023

I CHEWS You!

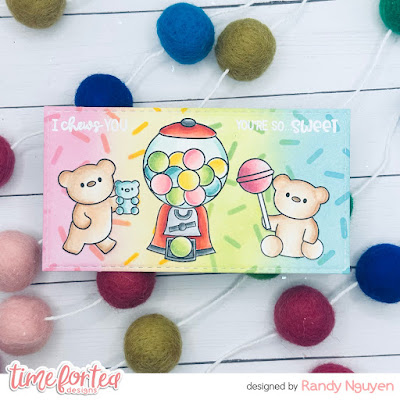
 Hi Tea Timers, welcome back to the blog. Today I have another super sweet, super easy slimline card using the new Gummy Bears stamp set. The set not only features the iconic candy but also a wonderful gumball machine, bears and more candy!


Sets used:


I first stamped out my images and fussy cute them. For the bears I used the following Copic Marker combos to color them: E15, E13, E11, E01, E00. I then used RV21, RV23, RV25, YG21, YG23 YG45, Y11, Y15, Y19, R22, R24, R27 for the other images.


I took a mini slimline panel and blended it with Kitsch Flamingo, Scattered Straw, Twisted Citron and Salvaged Patina. I then took then confetti stencil and blended it with Picked Raspberry, Mustard Seed, Mowed Lawn and Peacock Feathers.

I like to layout my images first to see where I want the sentiments to go. I decided on using two sentiments on either side of the panel. I heat embossed them with embossing ink and white embossing powder.


I then adhered my images using liquid adhesive and foam tape. I wanted it to look like the bears were sharing candy so I added the lollipop and the mini gummy bear as an accessory for each bear.

I hope you enjoyed this blogpost today for this quick and easy card. All of the products I used are linked above. If you purchase any of the sets, used the code T4TRANDY10 at checkout.

Happy crafting!

Sunday, 24 September 2023

Sweet Birthday

 Hello everyone!

I'm Lorena, and one more week I'm here to show you a new card!

This time I used Birthday Cake Clear Stamp Set


For the base of the card I have used Snow Flurry Cover Die, I love this type of dies, simple but with that false stitching making shapes.
I have used pink ink for the entire base of the card, and finally in a darker shade of pink I have stamped many muffins that have the set of stamps 

Then I colored a lot of stamps from this set, it is a spectacular set with different elements to celebrate the perfect birthday!
For my card I chose, the cake, a lot of beef, cupcakes, pieces of cake ...


I hope you liked this week's card, it is very simple but very funny, what do you think? 😉

See you soon! 
HUGS 💖

Lorena

Friday, 22 September 2023

Hey, Congrats


 Happy Friday, DT Annalisa here! The first day of Fall, or autumnal equinox, arrives tomorrow, so I am sharing a card with a fall feel. It features the Birthday Fox clear stamp set from Time For Tea Designs.

For the background, I ink-blended tumbled glass and salty ocean Distress Oxides with my Beautiful Blender Brush onto Distress White Heavy cardstock by Ranger. Using a paintbrush, I added splatters of water and uncharted mariner Distress Oxide. For the grass, I ink-blended twisted citron, mowed lawn Distress Oxides and added water splatters. 

I die-cut the grass with the Slimline Hillside Scene Dies and stuck this to the sky panel with liquid glue. I then added this panel to an A2 card base.

I stamped and coloured (with Copics) the foxes from the Birthday Fox clear stamp set and cut them out with my Brother Scan N Cut SDX125e. I added white gel pen accents with a Gelly Roll Pen. I did the same process with the leaves from Jumping With Joy and Bee and Butterfly from I Really Dig You.

I used liquid glue to stick the leaves to the card and double-sided foam tape for the rest of the critters. 

The hey letters were die cut from black cardstock using the Hey, Hello, Hi Dies. I die cut vellum using the word shadow die in this set. I used liquid glue to adhere the letters to the shadow area and then behind the letters and stuck this to the sky area on the card. 

I stamped congrats from the You’re Engaged stamp set with VersaMark ink and heat embossed using white Ultra Fine Embossing Powder by Brutus Monroe. I die-cut the sentiment using the coordinating die set. I used liquid glue to stick the congrats to the bottom of the card. 

Thank you so much for reading my blog post. Remember to use my discount code T4TANNALISA10 when you visit the Time For Tea Designs shop to get 10% off your order.

Thursday, 21 September 2023

Happy Birthday to My Foxy Friend!

Hey there, Tea Timers!!  It's Amanda here and today I am sharing another card using some products from the New Release

Today, I am using the Birthday Fox Stamp Set.
To create this card, we're going to start by trimming down a piece of white cardstock to 4" x 5.25".  On this panel, we'll stamp champagne/wine bottles all around the background.  I always start in the center and then work my way out to the end.


Next, we'll grab an oval die and cut it out.  We'll blend Catherine Pooler's Wintergreen ink all around it and then give it a little spritz from a water bottle to create some water droplets.
Then, we'll stamp and color all our images with Copic markers.  I've used the coordinating dies to cut out the stamped images, but you could also use a Scan n' Cut or scissors!
Next, we'll assemble our card.  We'll use liquid glue to adhere our front panel to the card base.  Then, we'll use glue to adhere our oval.  Next, we'll use 3D foam squares to attach our fox and bottle.
The last step is to add a few sequins with the tiniest bit of glue!


That's it for me today, friends!  I hope you love this cute little foxy card!
Xx, Amanda


Wednesday, 20 September 2023

Let's PARTY fox!

Hey there Tea-timers...

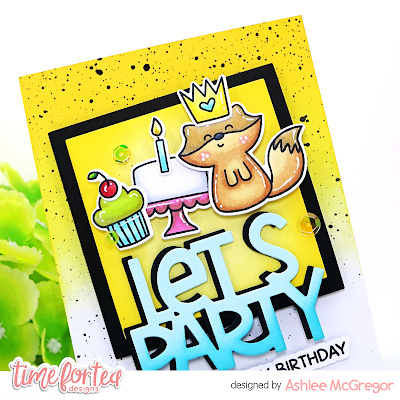
DT Ashlee here, who's ready to party?! I hope you are because I have a party themed card to share which might make you want to get your party on too.... 


This card uses these Time for Tea designs products :

To create this card I started with a white card base that I inked with distress oxide ink Mustard seed. I then splattered it with Gansai Tambi paint. Once it was dry I adhered a layered square set from the simple squares die cut from black and yellow card. 

I die cut the Let's party sentiment from black and blue card stock so I could adhere them together slightly off set to create a shadow. Also added little ink shading to the bottom of the blue cut. This was adhered so it would hang off the focal square. 


I stamped a bunch of images from the Birthday fox set and coloured them up with Spectrum noir tri-blend markers before die cutting them with the co-ordinating dies. These were all arranged and adhered above the sentiment. 

To complete the card I added a stamped sub sentiment also die cut with the co-ordinating die and a touch of pretty yellow sequins!

This fox is ready to PARTY! 


I hope you enjoyed my card today, thanks for stopping by. Until next post happy crafting, hugs Ashlee. 

Monday, 18 September 2023

"Calories Don't Count! Happy Birthday!"

 Hi Tea Timers, welcome back to the blog. DT Randy here with a quick and easy card using the new Birthday Cake stamp set. The set has images of so many delicious goodies that I wanted to highlight some of them, specifically the bottle of Champagne and the delicious cake!

Sets used:

Birthday Cake Coordinating die set available here

I first stamped out my images and fussy cut them out. For the cake, I used the following Copic Marker combos: RV21, RV23, RV25, E00, E11, R21, E22, E24. For the cake stand I used BG11, BG13, BG15. For the bottle I used, YG21, YG23, Y11, Y13, Y15.


I then took the polaroid die and cut it out of purple cardstock. I heat embossed the sentiments directly onto the polaroid using embossing ink and white embossing powder. 

I trimmed down a piece of white cardstock to fit the back of the polaroid. I blended Kitsch Flamingo and Tattered Rose on the back piece. With white water color, I splattered it across the piece.


To create my background panel, I took an A2 panel and blended it with Picked Raspberry, Mustard Seed, Mowed Lawn and Peacock Feathers Distress Oxides. 

To complete my card, I adhered the polaroid onto the card panel using foam adhesive tape.

I hope you enjoyed this tutorial today. I always have to remind myself that not all cards need scenes or lots of elements. Clean and simple ones have as much impact as well. All links to the sets I used today are above. Use the code T4TRANDY10 at checkout if you purchase any sets.

Sunday, 17 September 2023

Sweet Bear Hugs

 
Hello!!

Today I debut in this blog as a DT member of Time for Tea, and that's why I'm going to introduce myself:
I'm Lorena, I live in Spain. I love coloring, and creating cards!!
I am very happy for the opportunity to be on this team, of course I love TimeForTea products! 💖

Now I want to show you the card I made, using the fun Gummy Bears stamps


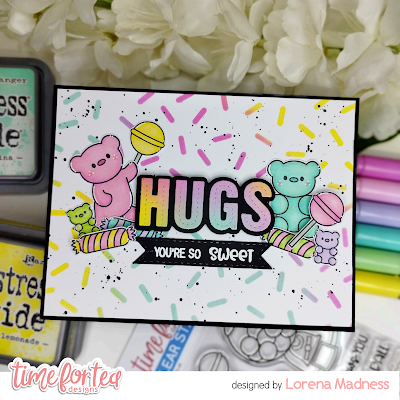
To make the background, I used a white cardboard with another in black base, use the 6x6 Confetti Stencil, mixing different colors of ink, yellow, fuchsia and mint green...
And finally, some splashes with black ink.

Then I used the Hugs Stitched Sentimient die, and I inked the letters with the same ink colors used for the Confetti in the background, and for the background of the die I decided to use black cardboard to make it stand out against the white.

I loved making this card, with all those colorful bears and their jelly beans.
I hope you liked it too! See you soon

Greetings! 💗


Friday, 15 September 2023

Eat the Cake and Party


Happy Friday. DT Annalisa is here today sharing a card encouraging you to eat the cake! It features the Let’s Party stamp set from the latest release

I ink smooshed picked raspberry Distress Ink re-inker mixed with water onto watercolour cardstock. Once it was dry, I used the Stitched Quilted Cover Die to add texture to the background. I love this die so much! 

I trimmed patterned paper from the Gorgeous Gingham 6x6' Paper Pad and ink blended salvaged patina Distress Oxide onto it using my Beautiful Blender Brush. I used double-sided tape to stick it down to the pink panel. I then stuck the completed panel to an A6 card base.

I die-cut white card stock using the large Wide Stitched Frame Dies and adhered it with double-sided tape to frame the card.

I stamped and coloured (with Copics) several images from the Let’s Party and Gummy Bears clear stamp sets and cut them out with my Brother Scan N Cut SDX125e. I added white gel pen accents with a Gelly Roll Pen

I used double-sided foam tape to stick the images to the card. 

I used the eat the cake sentiment die-to-die-cut teal-coloured card stock three times. I used liquid glue to stack them on top of each other and then to the card base. I also die-cut the confetti from the same card stock and used liquid glue to stick it to the card.

I inked the small confetti stamps with picked raspberry Distress Oxide and stamped them onto the pink background. I added three bright pink Designer Enamel Dots (Summer Haze) to complete the card.  

Thank you so much for reading my blog post. Remember to use my discount code T4TANNALISA10 when you visit the Time For Tea Designs shop to get 10% off your order.
Thursday, 14 September 2023

Let's Eat Cake!


Hey there, Tea Timers!!  It's Amanda here and today I am sharing another card using some products from the New Release

For this card, I used the 6x6 Confetti Stencil in my background.


I stamped my images from the Birthday Cake stamp set, colored them with Copic markers, and then cut them out with the coordinating dies.


I've also used the Let's Party Large Sentiment Die that I have diecut out of black cardstock.


That's all for me today, friends!  I hope you have had a great time here on the Time for Tea Designs blog and come back for more inspo soon!

Xx, Amanda


Wednesday, 13 September 2023

big birthday wishes....!!

Hey there Tea-timers...

DT Ashlee here and today I've got big birthday wishes inspiration to share!

I've been having lots of fun creating with the brand new release from T4T, it's all so much fun....


Time for Tea designs products used for this card are :


To create this card I started with a yellow card stock base. I then die cut the star stitched cover die from green card stock and then add green ink splatters to it. The cover panel was then adhered to the yellow base using foam tape just so it popped up slightly from the base. 

Using the sentiment die I die cut it twice, once from black card stock and then once from a teal blue card stock. These were adhered together with liquid glue slightly off set creating a shadowed sentiment. I used foam tape to adhere this to the card base.

I stamped, coloured and die cut the sweet little birthday cake and candle and added that to the top corner of the card. 

To complete the card I added a sub sentiment "happy birthday" from the Birthday fox set (die cut using the co-ordinating die) and a touch of sequins!


 I hope you enjoyed this big birthday wishes card ready for a birthday! 

I will be back next week with more T4T inspiration. Until then happy crafting, hugs Ashlee.

Monday, 11 September 2023

"Let's Celebrate" with Birthday Fox

Hi Tea Timers, welcome back to the blog. DT Randy here with a tutorial using the new Birthday Fox stamp set. The foxes in this stamp set are just so adorable and I wanted to create a fun 'surprise' card with them.

Sets used:

Coordinating die set available here
Winter Trees die set

I first stamped out my images and fussy cut them out. The coordinating dies are available as well. I then used the following Copic Marker combos to color them: YR00, YR12, YR, 14, YR16, YR18.

I set the foxes to the side and started to work on my background. I first took an A2 card panel and with a cloud stencil, blended it with Salvaged Patina and Scattered Straw. I love using both colors as it gives a sun and sky look. 


I then took another A2 panel and cut the grass pieces using 2 of the dies in the landscape set. I blended the grass pieces with Twisted Citron, Mowed Lawn and Forest Moss. I splattered it with white watercolor to give it some interest.

I then took the winter trees and die cut them from white cardstock. With Gathered Twigs and Antique Linen Distress Oxides, I blended over each trunk.

To assemble my card, I first adhered the grass pieces to the sky background. I then placed where I wanted each fox to go so I could see where I wanted to place my sentiment. I then heat embossed the sentiment using embossing ink and white embossing powder. 


I then adhered the trees using liquid adhesive. I added each fox, with the sleeping fox in the middle and the two foxes on either side, ready to surprise the birthday fox. I added their accessories to complete the card.

I hope you enjoyed this quick tutorial today. If you like any of the sets used in my post, check out the links above and use the cod T4TRANDY10 at checkout for extra savings. Happy Crafting!

Saturday, 9 September 2023

It's raining rainbow sweets!


Hi everyone, DT Emma here sharing with you this weekend my bright and colourful sweet based card using the Gummy Bears stamp set from the new release. 

I started with the background, as this release is all about birthdays I wanted to keep everything bright and colourful so I decided to ink blend a rundown background using the following distress oxides:

Scattered Straw
Kitsch Flamingo (the orange colour between the yellow and pink is actually scattered straw and Kitsch Flamingo blended together)
Shaded Lilac
Broken China
Salvaged Patina

I didn't ink all the way to the centre of the card as I wanted a nice white edge around my main image. Once I had ink blended the background I splattered some water to lift some spots of ink and then splattered some gold ink over the whole card. 


I stamped and die cut the small sweets from the Gummy Bears stamp set along with the gumboil machine.  I used the following copic markers to colour the images:

Machine: BG13, BG11, BG10, BG49 and YR23 (for the turning handle)
Gumballs: B01, Y15, G03 and R35
Sweets: V01 and V15, Y02, Y15, YG01, YG03, R30, R32, Y21 and Y35. 
White gel marker for the highlights on the images. 

I stamped and die cut the sentiment "I chews you" adhering this to the base of the gumboil machine. I then adhered all my images to the card. I finished the card by adhering it to an A2 cardblank. 

Hope you all have a lovely weekend! 


Other Posts You Might Like