
Pages

Showing posts with label WoW Embossing. Show all posts

Monday, 6 December 2021

Stinkin' hugs!

Hello, Tea Timers! 
It is Natalia with you here today. How are you liking the new Time for Tea release? I know I am biased but I can't get enough of the cute critters! These skunks from the Stinkin' Cute set are so sweet!

I really enjoyed colouring them with my Ohuhu alcohol ink markers, and then adding some highlights with a white gel pen.

For my background, I did some dry embossing with the new Houndstooth stencil. As you know, I love a lot of white space on a card, so doing some dry embossing is a great way of adding some dimension of interest while still preserving that white space.
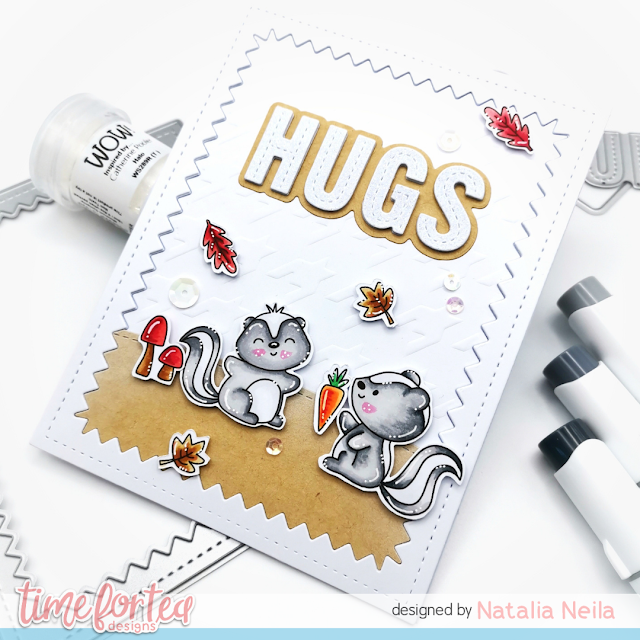

I die cut the hill from craft cardstock with the die from the Slimline Hillside Scene set. This is my go to set for scenes, no doubt! I don't often use craft card but this time I thought it was nice with the autumn colours. I did do a bit of ink blending on the top of the hill with Hero Arts unicorn white ink. It is subtle, but it makes a difference, I think!

For the sentiment, I used the Hugs Stitched Sentiment die. I die cut it three times from white cardstock and then once more from shinny white cardstock which I made with Halo WOW! embossing powder.

And finally, I used a newly acquired frame die from the Zig Zag Frame & tag dies set. I will certainly use this often because I absolutely love how it finishes off a card!

I will post a reel on my IG account this week, so look out for it if you want to see the process! I also really changed my mind after the reel so the card there looks a tad different. 

Use the code T4TNEILA10 for a 10% off the shop

Sending hugs,
Natalia


Monday, 22 November 2021

Cosy winter & embossing powders with stencils!

Hello, Tea Timers!

Did you see the WOW! embossing and T4TD collaboration blog hop? So much inspiration and sparkle! Make sure to check it out for a chance to win a giveaway voucher!

For my card, I used an the Line Em Up stencil with three gorgeous WOW! embossing powder colours: Blue Glitz, Cummerbund and Halo (soooo shinny!!).
I made a reel showing how I made it which you can see here.

I then used the A5 Cosy Winter Stamp set and coordinating dies, which is an awesome set with lots of lovely critters and accessories. I coloured them with my Ohuhu alcohol markers and added some highlights with a white gel pen. Of course I had to add some glitter to their scarves too! It is a Christmas card after all :)


I hope you like it and don't forget to use the code T4TNEILA10 for a 10% off your shop!

Sending hugs,
Natalia

Monday, 12 July 2021

A cuppa thanks

Hi crafty friends! 

It is DT Natalia with you today. I hope you had a great weekend!

For this quick and easy card, I used a stamp that I have had for a long time from Time for Tea but never got round to using it - the Plaid background stamp set - I love the pattern on that stamp, it is so pretty. Instead of using ink, I decided to do some heat embossing with it. That blue is just gorgeous! It is hard to capture on the picture, but it is a bit glittery. It is Cummerbund from Catherine Pooler. I cut that to a square shape to fit on my A2 panel nicely. 


I then stamped the fun cat, panda and sugar cubes from the Terrific Pals stamp set and coloured them in with my Spectrum Noir alcohol markers.  I went for pastel colours this time as that would go well with the background. 

I used the coordinating die to cut them out and then arranged them on my background before sticking them down with double sided foam tape. To finish it off, I added the 'a cuppa thanks' sentiment on black cardstock with white embossing. I die cut it three time to build some dimension, which I think makes a huge difference on a card! 

I really like how quick this card was to make - what about you? do you like quick cards of rather elaborated ones? 

Remember to use the discount code T4TNEILA10 in your next order at the shop for a 10% off! 

Sending hugs,

Natalia

Monday, 7 June 2021

'Flying by to say hi' shaker card

Happy Monday Teatimers! 

DT Natalia with you today with another card I made with some of the new release stamps and dies. I have probably said this before, and I will say it again, but I love shakers! Shaker cards, shaker tags, anything shaker! So as soon as I saw this Sun Ray Cover Plate die, I knew what I was making with it.


The stamps in this card are from the new Paper Plane Pals stamp set. I really love pandas so he was my first go to! I coloured them with my Spectrum Noir (CTs and BPs) and then added some white gel pen to add some highlights. I used the coordinating dies to cut them out too - this just makes it all so much easier!

For the background, I used some Izink Dye Sprays I bought years ago and had never used! It was fun. I used watercolour cardstock as you have to add water for the ink to move. I then sprayed with the Silver Sparkle shimmer spray - sooo shinny! 

I then used the Sun Ray Cover die plate and prepared my shaker elements. Each sun ray is a shaker on its own as I wanted the sequins to be visible at all times. I used the Large Foam Roll to create my shaker sections, this foam tape makes it so easy!

The embellishments in the shaker are from My Little Things from Lucy's cards, I really like the pinks and yellows in this mix and they went really well with the colours in my card!


Lastly, I used the tiny heart and start die cuts from the coordinating die set to have some small elements to add to my card. I love that the die set comes with all the coordinating dies, even for the smallest elements! 

Remember to use the code T4TNEILA10 for an awesome 10% off your shop!

I hope you like it!

Sending hugs,
Natalia

Monday, 24 May 2021

So hoppy you're my friend

Happy Monday crafty friends! 

DT Natalia here with you today, and I am back with a new card featuring the Tulip Add On Die Set and the Blooming Bunnies stamp set


When I craft, I like thinking of different ways in which I can stretch my dies and stamps, and use them differently. In this case, instead of using the Tulip Add On Die panel on a slimline card as I did last week (check it out here if you missed it!), I decided to use the gorgeous die cut tulips as the central focus of my card. 

I used alcohol inks to create three different panels from which I die cut the tulips. I used Dandelion, Sunset orange and Poppyfield, and on every panel I used Sterling Alloy for the shine effect - pictures do not pay the shimmer justice, specially these pictures I took yesterday, the weather was so grim here in the UK!


The orange panel on this card is and A2 size - 4.25x5.5" and the white panel is slightly smaller - 4x5.25". Each tulip has 3 white layers of cardstock plus the yupo paper tulip on top. Just as Laura Fadora says; #dimensionislife - and I can only agree. The 'friend' word die cut follows the same process, with a vellum shadow. If you follow me on Instagram, you already know I am hooked to these word sentiments from Time for Tea Designs; they are a perfect size, and they come with shadow, which I very much love with a sentiment! 

The bunnies are coloured with my Spectrum Noir markers and I used EB7, MB4, MB3, MB2 and MB1. For the cheeks I used PP3 and then I added some highlights with a white gel pen.

I used white embossing powder for the 'so hoppy you're my' sentiment and used the Blooming Bunnies coordinating die to die cut it and the bunny.


To save 10% off your shop, remember to use the code T4TNEILA10  

I hope you like the card and have a wonderful week ahead! See you next Monday with something very exciting!

Sending hugs,

Natalia

Thursday, 12 November 2020

Reveal Day 2 - New Year Critter Card

  Hello Vic popping in today to share some of the exciting new release! You are going to absolutely love the New Year Critters! 


I can't pick a favourite critter as they are all so cute. I loved colouring these cuties in. 

For my card today I ink blended a piece of card using some red, Pink and Orange distress ink using the Beautiful Blender Brush.I wanted to add some stars to my background and I used the star from the Mew Are The Best Stamp Set. I used some Versamark ink and Wow Gold Embossing Powder and heat set this.I then used the brand new Die-namic Display Card Die and I just used the small die with tabs on which I die cut twice, I then used the grass edge die from the Landscape Edge Die and ran this through my die cutting machine again. I then inked up the card sing some green distress ink and adhered the grass panels to my card. 

Next I stamped and coloured in the critters. I then die cut the letters 2021 and adhered them to my card using foam pads. Once these were adhered down I then adhered the critters down.


I had so much fun creating this card!! I hope you are all enjoying the previews of the exciting new release! There are so many fun products in this release you will be spoilt for choice. 

Don't forget you can use the code: T4TVICKI10 at the checkout to save 10% off your orders.

Thank you so much for stopping by today! 

Vic

Saturday, 14 December 2019

Penguin Penny Slider Card

Good Morning!

Jo here with all the details of the project we made during our FaceBook Live Thursday evening.

Be sure to check out the video below which shows the edited highlights from the Live event.

We made this super cute Penguin Penny Slider Card using the new Time For Tea Designs Cardstock and the Warm Winter Wishes Stamp and Die Set along with some other classic sets.


I cut our Tropical Teal Cardstock from one of our Hello Rectangle Nesting Dies and stamped the snowflakes with a stamp from the Christmas Deer Stamp Set.


I stamped our Penguin and Tree from the Warm Winter Wishes Stamp set and coloured on Copic Markers.
I die cut them with the coordinating dies.


I used stickles to add shine to the star and edges of the branches and some Nuvo Crystal Drops to add shine to the baubles.


I used the die from the Christmas Deer Die Set to cut two of my tree and snowy hill landscapes. The one in the fore front had the slider mechanism die cut into it. The Slider Die is from the Best Fishes Die Set.
I doubled up my shaker tape to line the slider panel and used a piece of the same tape to attach my Penguin to the penny that makes the slider mechanism.


My sentiment is from the Christmas Deer Stamp Set and is heat embossed onto our Moon Mist Card stock. I used this same cardstock with the largest Hello Rectangle Nesting Die to make my card blank.

I hope you like the card today. Slider cards are so much fun to receive and even more fun to make! 

All the products I used are listed below.

make sure to watch our FB Live Events every Thursday at 8pm for more demonstrations and inspiration.


Friday, 22 November 2019

Christmas Tags using Hexagon Nesting Dies & Wow Embossing Powder


Happy Friday everyone!

Jo here with another catch up post after last nights FB Live. 

Do watch the video below. This is the edited version of last nights tutorial so its easier to watch if you're short of time but want some inspiration for your Christmas Tag making!
You will also get a sneak peek at some new products arriving in store next week!!


I absolutely loved making these adorable tags and Ant was a fantastic assistant as always.

 In this tutorial Ant did some colouring with Copics for me, colouring all the critters, using graduating shades to create depth to his characters. He did a great job!

We cut all our tags from our Hexagon Nesting Dies, layering up the largest with the next one down in size. We used some brand new & totally gorgeous cardstock that we will be sharing with you next week so stay tuned!! :)

I stamped, coloured and die cut the background tree scene which is part of the Christmas Deer Stamp & Die set.


You can see Ant also had some fun giving his dog a 'Mario' style moustache!! :D Very cute!!

We created some sparkly snowy backgrounds for our scene using WOW embossing powders sprinkled directly onto our cardstock and melted with my heat gun.

These beautiful Powders will be available in store next week!


Finally I added some highlights with my White Gelly Roll Pen and added some extra sparkle with my Stardust Stickles.


I am so pleased with how these turned out and they were really simple to make too. I'll definitely be making some more.

If you'd like to see what we get up to during the Live show then please do watch us on FB Live at 8pm every Thursday. The more the merrier.

All the products I used that are currently available in the shop are below.


Other Posts You Might Like