Pages

Showing posts with label all occasion critters. Show all posts

Tuesday, 11 January 2022

Let's Have Coffee!


Hi friends!

Welcome back to the blog. It's Miki here and today I have a new T4TD card to share with you. Do you remember my card from last week? I used the die cut heart from that panel to create today's project and I hope you like it.

You can go back to last week's post to find out how I made that stenciled panel, link here.

For today's card I took the Boho Tiles Stencil and dry embossed an A2 card panel. I then cut it down to 3.75'' x 5'' and glued it on an A2 card base, leaving a white border around. I then used the nested heart die to cut it from white cardstock 3 times. I glued them together at the back of my stenciled heart to add some dimension and glued it to my embossed panel towards the top.

Next, I used the All Occasions Critters and stamped the little guy with the donut. I coloured him in using my Spectrum Noir Illustrator markers, die cut him using the matching die and added some white highlights. I thought he'd need a coffee so I decided to add a coffee sentiment. I stamped the let's sentiment from the all occasions critters set and embossed it in WOW! Opaque Bright White and cut it using a matching die. I then created some coloured cardstock - I took a scrap piece of paper and added some Kitsch Flamingo distress oxide on top. I used the Coffee sentiment die and die cut the word coffee in pink and then 2 more times from white. I glued them together for added dimension. I then die cut the shadow from vellum and glued my sentiment on top.

I added the critter and sentiment strip to my panel using foam tape and glued the word coffee in between. To finish off the card I added some sequins from the Spring Garden mix from Lucy's Little Things.

I hope you like today's card, I love the critter and I think it goes really well with the sentiment. If you shop on the T4TD website, please remember to use my code T4TMIKI10 for 10% off your whole order.

Hugs,
Miki

Monday, 15 November 2021

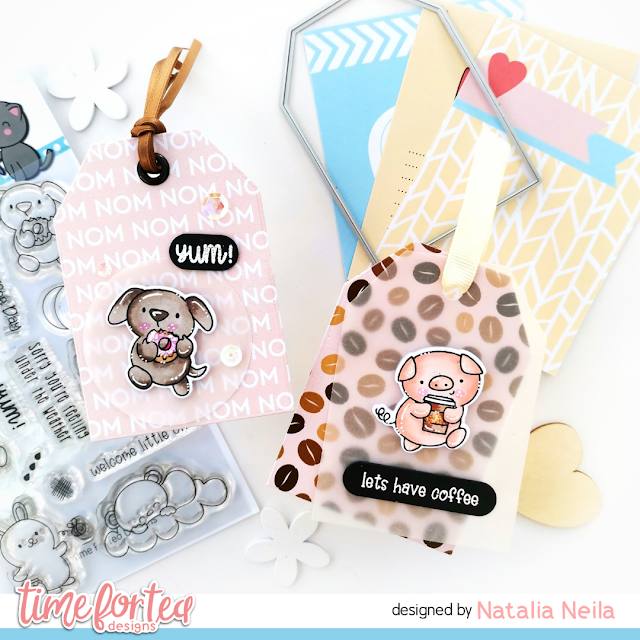
Doughnut, coffee & vellum tags!

Hello, Tea Timers! 

It is DT Natalia with you today. You probably have learned by now that I love making tags! I really like that they are a small project so they feel quicker to make. So I was very happy when I saw the tag die in the new Memory Keeping Essentials die set

For the stamps, I decided to use these cuties from the All Occasion set, which I love. Aren't they super adorable?


Instead of making my own background, I chose a couple of papers from the Sweet Summer Journaling cards. I thought the theme was perfect! And the colours are so, so pretty.

I used vellum in two different ways, so that the little guys wouldn't get lost in the background: for the doggy I die cut a circle from vellum and for the piggy I did a whole tag overlay. The way vellum softens the background is so pretty. 

I used a few sequins and a heat embossed sentiment to finish off the tags. These were a quick an easy project, and I hope it inspires you to create! 

Use the code T4TNEILA10 for a 10% off the shop!

Sending hugs, 
Natalia

Monday, 2 August 2021

Happy bee day!

Hello crafty friends and happy Monday from sunny Spain! 

Yes, it is DT Natalia here with you today - as some of you know, I came over to visit my family - it has been sooo long since I was able to come - I am just happy!

How are you liking the new release? Which ones are your favourite? I did say I had my inspiration cards ready to go, and here is a bee one with the 'waste' (or as I call it, the negative) from the new Bee Hive slimline die.

I LOVE this die, I have made another card with it and it is a slimline shaker (coming soon!) and I can't wait to use it some more for other fun backgrounds. 

Now let's dive into how I made this card! 


The very first thing I did was choose my rainbow distress oxide colours for my hexagons. I went with:
  • kitsch flamingo
  • worn lipstick
  • ripe permission
  • squeezed lemonade
  • twisted citron
  • cracked pistachio
  • tumbled glass
Aren't distress oxides the best? I used the beautiful blender brushes (I have a few, different sizes). Once my panel was blended, I sprayed what I call 'perfect pearls water' - basically I have a small plastic spray bottle I fill up with water, and then I add a teaspoon or so of Perfect Pearls pigment powder - it is just SOOO shimmery! Impossible to capture on photos, but so nice in real life! 

The best thing about this card? I still have the positive panel from the die cut to use for another one 😊 

I also used the die cut with craft foam to use under my inked panel for dimension. The die cuts the foam like butter, it's brilliant! My foam happened to be a light pink which I thought was beautiful if you looked at from the side. 

I assembled all my hexagons onto the foam with liquid glue and set them to a side. 


For the card panel, I used 250gms cardstock and cut it to a 4x5.25". I then arranged my hexagons on the side - and guess what, I eye balled it! If you know me, you know I measure and make templates for EVERYTHING - but this time, I went for it and only used a T-ruler to help me align the inner raw of hexagons - I think it turned out alright! I used the Happy Bee Day sentiment from the All Occasions set directly onto my panel with some black Versafine ink.

Now my panel was ready, I stamped the cute bunny and bees from the All Occasions set, coloured them with my Spectrum Noir and used the coordinating dies to cut them out. I used double sided foam tape to give them some more dimension and added them onto my card panel.

Lastly, I used some candy floss pink cardstock and cut it to and A2 size (4.25x5.5") and used craft foam to mount my panel onto it. I love how the pink border ties it all up together!

If you haven't yet bought your new release goodies, you can use the code T4TNEILA10 to get a 10% off your order! Happy shopping!

Sending hugs, 
Natalia

Monday, 26 July 2021

Under the weather foiled shaker card

Hello there, crafty friends! 

Welcome back to our blog, it is DT Natalia with you here today. 

This is the last card I made with some of my favourite supplies from older releases - because, as you've probably seen announced, there is a new release coming up on Thursday! And I can't wait for you to see it!!

I have already shared a reel on Saturday showing you how I did the foiling on this card with the Scattered Raindrops stencil without a foiling machine!! I used versamark ink and WOW bonding powder with WOW fab foils to do the rainy background of this shaker. 

I used the cat and sentiment from the All Occasions Critters stamp set and coordinating dies and the smallest of the Smile inverted scalloped frame dies to build my shaker part. To build the shaker, I die cut the frame from white cardstock 7 times - did I go overboard? Probably! But I wanted my sequins to move freely, so mission accomplished! 


For the inside of the shaker, I used the cloud die and cut that from vellum and the fence die which I cut from white cardstock, both from the Windmill Add On die set which is fantastic for scene building! The grass was ink blended with Mowed lawn, squeezed lemonade and lucky clover and then I used the hillside stitched die.

I used the outer stitched frame from the autumn scene cover plate to create my A2 (4.25x55") base card panel - this is one of the dies I reach for the most! I love how much the stitched detail changes the look of the card. 

You can use the code T4TNEILA10 to get a 10% off your shop! 

I hope you like the card and I wish you a happy week!

Sending hugs,
Natalia

Friday, 7 May 2021

You Are Loved


Happy Friday! DT Annalisa here, sharing a 3D shadow box card featuring several adorable stamps and papers from the new Brighter Days release.

The adorable bunnies are from the Blooming Bunnies stamp set, the grass, flowers and dragonfly are from the Lucky Ducks stamp set, and the sentiment is from the Brighter Days stamp set. There are so many cute creatures and elements in these stamp sets, perfect for creating scenes which I love to do. The bee is from the All Occasion Critters Clear Stamp Set and the butterflies are from Up, Up & Away. I stamped, coloured (with Copics), cut out all of the elements, and set them aside until the card was ready to assemble. 


The clouds are from the Windmill Add On die, I added some Distress Oxide in Speckled Egg to add some colour. The pink and blue die-cut flowers on the top right and bottom left are from the Spring Blooms Dies, they were cut from some pink and blue card stock.

I used my Brother Scan N Cut SDX125e to cut a card base design from Lori Whitlock's SVG Shop which I adapted to create my card. I used the new Brighter Days 6x6' Paper Pad for the pink front panel of this card as it is perfect for a spring card like this. I coloured the tree in the background and flowers and leaves on the front of the card with my Copics. The sky was created using Distress Oxides in Mermaid Lagoon and Broken China with my Beautiful Rainbow Blender Brushes.


Once the card was assembled, I added all of the elements with liquid glue. I also added the 'you are loved' sentiment to the front of the box card with glue.

These types of cards take me several hours to create but I love doing them, so I hope you enjoy seeing and reading about them!

Thank you so much for visiting the blog, you can use code T4TANNALISA10 when you visit the shop to get a 10% discount on your entire order.


Tuesday, 20 April 2021

CAS card doing some noline coloring

Hey everyone, Lien here. Today I am sharing this card where I did some noline coloring using my Copic Makers. The stamp set I am featuring on this card is the All Occasion Critters by Time For Tea Designs.

You can watch the video below or click HERE to watch on the Time for Tea Designs Youtube channel.


I started by coloring in the cutie from the All Occasion Critters stamp set from Time For Tea Designs. I stamped it out using Fadeout Noline Coloring/Detail Ink from InkOn3. Next, I used my Copic Markers to color it in and I used the matching dies to cut the image out. 


For my slimline panel, I used the Slimline Scalloped Trio Circle Nesting Dies from Time For Tea Designs. I created a blue gradient using Distress Inks. Next, I could stamp out the sentiment on the bottom of this panel.


With all the items ready, I assembled the card. I finished it of using Teardrops embellishments. 


Thinking of buying some T4TD supplies? With T4TLIEN10 you will get 10% of your order at Time For Tea Designs! Happy shopping xxx 


Supplies:
  • Time For Tea Designs - All Occasion Critters
  • Time For Tea Designs - All Occasion Critters Die
  • Time For Tea Designs - Slimline Scalloped Trio Circle Nesting Dies
  • Transotype: Perfect Coloring Paper
  • Gina K. Designs Amalgam Ink
  • InkOn3: Fadeout Noline Coloring/Detail Ink
  • Distress Inks: Black Soot, Chipped Sapphire, Faded Jeans, Broken China, Tumbled Glass
  • Copic Markers: E47, E57, E13, E11, E18, E15, E33, E53, R59, R39, R37, R35
  • MICRON Fineliner 01
  • Little Things from Lucy's Cards: Teardrops
  • NUVO Deluxe Adhesive
  • Thin Foam Squares from Scrapbook Adhesives
  • Paradise Adhesive Roller


Thursday, 7 January 2021

Buzzing Critter Card

 Hi DT Vic popping in today with a jam packed critter card. I always love to mix up my Time For Tea Designs stamps and make scenes with them and I went overboard on this one!


For my card today I used the All occasions critter stampsBe owlsome stampBuzzing for you stamp, Bee happy stamp and some adorable snails. To start with I ink blended my background using green, pink and blue pigment ink. I then stamped my images and coloured them in with my copic markers. Using the coordinating dies I die cut them out.


For the grass I used some light green card using the Landscape edge dies I ran the grass die through my die cutting machine and adhered the pieces to the bottom of my card. I then started to add all my critters to my card. 


I then heat embossed the sentiment onto some black card and used white embossing powder. I trimmed this down and adhered this onto my card.

I love how this turned out with all the little critters and the tiny bees.

Thank you so much for stopping by today don’t forget you can save 10% off your purchases using the code: T4TVICKI10 at the checkout.

Have a lovely day!

Vic

Wednesday, 22 July 2020

Sneak Peek Day 5!

Welcome to Day 5 of our Sneak Peek Week!

Elaine has the most adorable slimline card for a new arrival.


Hello crafty friends!
DT Elaine here to share a neutral themed 'new baby' card using 'Slimline Scalloped Frame Die' along with an image and sentiment from 'All Occasion Critters'.

I first cut the large slimline scallop frame from some hot pressed watercolour cardstock and then stamped the cute bear sleeping on a cloud using my Antique Linen distress ink.  The stamped image line gradually disperses and fades as water and ink are added with a paint brush.. I use a size 2 round brush. 
To watercolour the image I used just four distress inks; Antique Linen, Vintage Photo, Iced Spruce and Worn Lipstick.  To use the inks for watercolouring I smooshed the ink on to my glass media mat (any non porous surface will do, sometimes I use a piece of laminated paper) and added some clean water to my paintbrush.  I then picked up some ink from the mat and started painting.  I started with the lightest colour, Antique Linen and them moved on to the darker colour, Vintage Photo.  The key to this technique is to be very patient and let your layers dry before going back in to add shading and depth with a darker colour.  The paper and paint brush you use will give different results so dont be afraid to take your time and enjoy the learning process.  It really is trial and error.

Once the image was coloured I cut out a mask and covered the bear and cloud.  I used the 'Sunnyside Up Again' stencil all over the card panel and used a Time for Tea blending brush to lightly ink on some fluffy clouds with Vintage Photo distress ink.  Before I removed the bear mask I added some splatters using watered down distress ink and some Perfect Pearls in Copper.  Once the splatters have dried the image mask can now be removed.

Finally for the sentiment I used 'Welcome Little One' stamped with Archival Ink in 'Potting Soil'.

My card base is a piece of kraft card cut to 20.8cm by 17cm and scored at 8.5cm on the 17cm side.  The scalloped frame panel was glued to the front of the kraft cardbase using liquid adhesive.

I hope you enjoyed this card and the soft whimsy feel!  The new release is launching on Friday 24th July and a full reveal of all the products along with inspiration will be shown on the Time for Tea Designs Facebook live on Thursday (23rd July) so be sure to tune in!  

Happy shopping folks!

Elaine xoxo

Look out for more examples of our new Slimline Dies in the full reveal tomorrow!

Join us on FB Live at 8PM BST where Jo will do a full run through of all the new stuff!


Sunday, 19 July 2020

Sneak Peek - Day 2!

Happy Sunday everyone & welcome to Day 2 of Reveal Week!


Jennifer & Annalisa are here today sharing some fabulous sneak peeks from the New Release!


Good morning everyone! DT Jennifer here on this lovely Sunday to share my first sneak peek with you as we gear up for the AMAZING July release here at Time For Tea Designs

You are going to go CRAZY for all these new crafty goodies, I promise you!

Here on Day 2 we are sharing sneaks of of the stamp and coordinating die set "All Occasion Critters", as well as the Grateful For You background stamp set. My card today features a sweet night scene celebrating a new baby!

To create this card, I used Distress Oxide Inks in Black Soot, Chipped Sapphire, and Tumbled Glass, which I applied using large sized Beautiful Blender Brushes. Once the ombre background was completely dry, I stamped the star in a random pattern using the Tsukineko Embossing ink pad and heat embossed them with Sparkling Snow EP from Wow!. I used the coordinating dies to cut out the moon, bear, and sentiment after I had stamped them in Memento Tuxedo Black ink and colored with Copic markers. Most layers are popped up on 3D foam pads, which I used for absolutely EVERYTHING I make!

Be sure to keep checking back all week for more peeks and more inspiration from the DT. Tune in to the Facebook Live on Thursday July 23rd for the FULL REVEAL ahead of Friday's launch.

When you're shopping, be sure to add my coupon code T4TJENNIFER10 to save 10% (that just means you can spend MORE!!) ;) Happy crafting lovelies!


More inspiration from Day Two below!

Hello everyone! DT Annalisa here and today I am sharing a SNEAK PEAK of some of the newest Time For Tea Designs stamps!! The new release will be LIVE on Friday, July 24th, 2020. For my card, I used two new stamp sets - "Background Scene" and "All Occasion Critters. I just LOVE these two new sets and had so much fun colouring them.


To start I stamped the little piggy and kitty and then masked them off. Next, I stamped the background scene elements on top of the masked critters. I added the sentiments 'hello' and 'let's have coffee' - one from each set - to complete the adorable scene.

I removed the masks and got to work colouring the scene with my copics. Oh, how I loved colouring this happy card!! If you are interested in the colours I used I will list them at the end of this blog.

Once the colouring was complete I die cut out the scene using the second largest rectangle from the Hello Rectangle Stitched Nesting Dies. I also die cut out some black card stock from the same die set. I used double-sided tape to stick the scene to the black card stock. I then added this to a white card base to complete the card.

Be sure to use my discount code - T4TANNALISA10 - for 10% off in the T4T shop which can be used on anything at any time - yes, even on new releases!

Copics used:
Grass and Trees: YG21, 23, 17, 67, 01, 03
Bark: E27, 23
Pig: R20, 0000, E00
Coffee cup holder: E44, 43, 42 Cup: B07, 95, 21
Umbrella: B97, 95, 21 and W2, 0, 00
Mountains: W7, 6, 5, 4, 2, 1 and C1, 00
Hot air balloons: R89, 29, 05; B97, 95, 21; Y02, 00
Sky: BG000, B0000 and Y02, 00, 000
Sun: Y17, 02, 11, 000
Clouds: C1, 00

Join us tomorrow for more sneaks of the new release!

Other Posts You Might Like