Pages

Saturday, 27 June 2020

Rainbows & Unicorns - Texture Paste and Correcting Mistakes


Hi! I hope you're all having a wonderful weekend!

Jo here with a new card and video tutorial!

Be sure to watch the video below to find out how we made this rainbow filled Unicorn card!

In the video you will see how we made this colourful rainbow background using our latest addition to the Beautiful Blender Brush range.


 I also use some sparkly texture paste to add sparkle and dimension to my clouds.


I made a couple of little smudges, tears and mistakes along the way - it was LIVE after all :) But I show how easy it is to work with your mistakes and correct them without scrapping your project.


This was such a fun and colourful card to create. These adorable unicorns riding on the rainbows are too cute!


I really enjoyed making this card. I hope you enjoy the video and find some inspiration to make your own rainbow unicorn card.

Details of the products I used are below.

Don't forget you can join us every Thursday at 8pm for our Live Craft with Jo event.

Happy Crafting

Jo xoxo

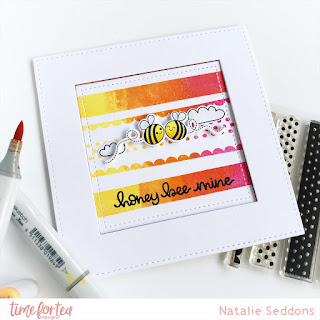
Honey Bee Mine


Hi Guys I hope you have had a good week looks like you have all loved the new release things sold out so fast! I have had so much fun creating with it and I know you will too!
Today's card is another framed one I just really love this look at the minute in fact I've run out of white fun foam I've done that many cards using this technique recently. It's such a simple design but frames your image and makes it pop.
I started my card by cutting out the base with some 300gsm white card stock this just makes it really sturdy. I used one of the larger squares from the Quilted Square Nesting Dies and for the inner square die I used one of the smaller ones which fits the length of the washi tape perfectly. Once that's all cut I started on the washi tape background. I started out by stamping the middle one but I off set it to the top a little not so much but just enough to make the bees when we place them sit in the top third of the piece as its more pleasing to the eye than a central. I used a combination of Squeezed Lemonade, Picked Raspberry and Carved Pumpkin Distress Oxides for the ink I laid the colours all down at once on the stamp they blend easily so no worry about having harsh lines. Just be careful to lay your light colour first as the darker ones do tend to transfer onto your ink pad. You could probably do three stripes at once but I wasn't entirely sure what I was doing at this point so I started with one and worked from there.
Once the background was done I set it aside to dry for a while so I didn't smudge those lines and worked on my bees. These are another great stamp to use for quick and simple colouring. I also stamped and cut out two clouds for a little extra detail. Then making sure my ink was dry I could stamp my sentiment I actually used one from the older Bee set Bee Happy  it just fit the strip nicely and looked really cute. The bees were popped up with foam tape and I just tucked the clouds underneath.
Then all was left to do was make the card base and cut out the fun foam. I made the card base myself by cutting out two of the larger rectangles then on one I scored a line across the top around 1cm's down then added some double sided tape and stuck them together. This is a great technique for unusual shaped or sized cards which mine mostly are. It is very rare you will find me make a standard sized card. To cut the fun foam I cut out the larger square first then used the card frame we made before as a guideline to where I needed to place my centre die then cut that out. I attached my frame to the card base first as its easier to line up this way and then popped in my centre piece and that's my card all finished up for today. 
I hope you have a great weekend and happy crafting!


Friday, 26 June 2020

Thank You Lilly


Today's card features more of the new Time For Tea Designs June release - the Thinking of You Lily A7 Clear Stamp Set and coordinating die, as well as the Thank You Sentiment Die Set. I love the font and thickness of the Thank You die as well as the size as it nicely fills up the front of a card so it can be used on its own with a nice background if you like.

For the background, I used some cold-pressed Arches watercolour paper and my Kuretake Gansai Tambi watercolours. I often struggle with watercolour backgrounds as I like to control what it looks like which isn't really possible with watercolours as they have a mind of their own! Once the paper was dry, I used the largest die in the Hello Rectangle Stitched Nesting Dies to cut it out to get the beautiful stitching on the edges.
Next, I die cut out the Thank You sentiment onto some white paper and stamped and coloured the Lilly with my Copics. I adhered the sentiment and the Lilly to my background with liquid glue.
Don't forget I have a 10% discount code for the T4T store which can be used on anything, anytime and has no time limit - T4TANNALISA10

Thursday, 25 June 2020

Owl be here for you!

Hello...!
DT Anila on the blog today sharing this set of Owlie cards.
I have used the newly released A7 stamp set called Be Owlsome.


Stamped the images, coloured with Zig markers. Die cut them. I used a stitched rectangle die from the Quilted nesting square dies for the background.
Adhered the images on the card
Added the sentiment.


All the products used will be available at Time for Tea Designs and avail extra 10% off your entire purchase across the website using my code T4TANILA10

Thank you for stopping by


Anila

Buzzing For You and Thinking of You Lily

Hi DT Sharon here today. I hope you all enjoyed the new releases that were revealed and all the inspiration the T4T DT have been sharing? I loved them all so much I made so many projects , the ideas just kept on coming!
So today I have 2 projects to show you, the first is a shadow box card.


I've used the Box clever die set  for the base. I blended some distress oxide inks over it to get the colour. I then stamped the hexagons from the Buzzing for you stamp set randomly over it. For the inside of the box I used the Scene it stencil to make the background clouds and grass. The sun and clouds dies are also included in the box clever set. I used the hearts die from several of the new releases to make the flowers. Then the bees were stamped, coloured and die cut and I attached them to the box using acetate. I wanted to make them look like they were floating in the air. Lastly I just added the sentiments.


For my second project I have used the Thinking of you Lily stamp and die set. I've used the set in 3 different ways.


For my first card I stencilled the white card with the Scattered Triangles stencil. I then stamped three lillies onto vellum with clear embossing ink and embossed them with white fine embossing powder. I coloured the lillies from the back using alcohol pens. 
For the purple card I stamped the lillies onto the white card with a purple ink randomly. I stamped a further lily using black and ink and coloured it with alcohol pens. I then placed it over a lily with 3D foam pads. The green dotty strip is using the Washi Strips stamp set with a green ink and then fussy cutting it out. 
For my last card I have just used gold embossing powder on cream linen card and navy card. I've also used the Squiggly Giggly stamp set to make the background and the Scalloped Frame die set which incidently has 35% off at the moment!

I hope I've inspired you today and you enjoy all the new releases. I have a code too to get 10% off across the store, just use the code  T4TSHARON10

Happy crafting and stay safe!

Sharon
x


Wednesday, 24 June 2020

Fancy A Biscuit?

Happy Wednesday!

It's DT Shabneez here. As so many people are baking during lockdown I decided I'd bring the baking to my paper crafting and made biscuits - jammie dodgers to be precise!


I used the newly released mini frame and banner die set to create the jammie dodgers.  I coloured in my card stock then stenciled over the middle using the Splish Splash stencil.  The hearts in the middle are from the Toadally awesome die set and the sentiments from the Baked With Love set stamped on to the banners from the new set.


I added glossy accents to the hearts and I used the Diamonds Are Forever Stencil to make the background for my biscuits.

Hope I've not made you too hungry!

See you again soon!

Products Used:

Load image into Gallery viewer, Mini Frame & Banner Die Set

Load image into Gallery viewer, Baked With Love Clear Stamp Set

Load image into Gallery viewer, Splish Splash 6 x6" Stencil

Load image into Gallery viewer, Diamonds Are Forever 6 x6" Stencil


Saturday, 20 June 2020

Life is what you Bake it!


Hi Guys so the new release is finally here what do you think? I love the smaller stamp sets and the fact that they work so well together with older Time for Tea sets. The cute little mouse has to be my favourite he is an add on to the Baked with Love stamp set. After all you cant have a chef with a cute little oven to bake their goodies. The matching die set even enables you to add an interactive element letting you open the oven door.
This is the first card I made with the new release I combined the new Bake my Day with the Washi Stripes. The Washi Stripes are a fab edition to the collection as they are great for making your own backgrounds or a touch of decoration. Here I stamped them out to make some wallpaper in my kitchen scene. I found if I cut my square out first too using the Square Quilted Nesting Dies it was easier get my lines straighter. 
The mouse and accessories were super simple to colour as they are small so great for quick cards. I even added some of the accessories from the Baked with Love Stamp set.
I finished my card off with a chunky frame I'm really loving this look at the minute and it's really easy too do. I used one the larger square dies to cut out the outside and used the same size die to cut out the middle. Then did the same again with some fun foam you could just use foam tape but this makes sure our frame is super sturdy. Then I stuck them together and popped my image in the centre and stuck it to my card base.


Friday, 19 June 2020

Happy Birthday - Lily flower

Hello,
DT Anila on the blog here today. 
I am sharing this sneak peek of the newly released A7 stamp set called "Thinking of you Lily" 


I have coloured the image using Zig markers and cut it. 
Adhered a distressed panel from the Rainbow brights essential paper pack. 
Foam mounted the flower and the sentiment over it. 
Added few clear pearl drops.


All the products used will be available at Time for Tea Designs and avail extra 10% off your entire purchase across the website using my code T4TANILA10

Thank you for stopping by

Anila

Buzzing about your news

It is a NEW RELEASE day! EEK! So many new goodies! DT Annalisa here and my card features the new Buzzing For You A7 Stamp set and dies. The bees are adorable and I just LOVE the huge BUZZING sentiment, it really pops on a card.

To start I stamped the bees, clouds and sentiment. I then coloured the bees and the sky behind them using Copics. I used the largest die from the Bee Happy Hexagon Stitched Nesting Dies to cut around the bees.

For the background, I applied Squeezed Lemonade and Dried Marigold Distress Inks on the Sunny Side up Again stencil on some white card stock. I framed this on some black card stock to which I added some dotted white lines with my Gelly Roll Pen.

I glued the bee mini-scene onto the sun and black card base and then added some clear rhinestones and a single heart which I have had in my stash forever!


If you are interested in purchasing any of the T4T products used in my project, I have a 10% discount code for the T4T store which can be used on anything, anytime and has no time limit - T4TANNALISA10

Saturday, 13 June 2020

Life is not a Fairytale!


Hi Guys I cant believe it Saturday already its been a busy week and it's flown by! This week I got to use one of my never before used stamps, don't you just love that feeling of using something in your stash and knocking it off the #nbus pile (never before used stuff). It's a fun challenge that I found on Instagram but also shows me I have far too many stamps or not enough colouring time. I think i'll go with the latter!
I just love the snarky sentiment on this Time for Tea stamp so I was excited to be able to finally colour it up and the Sparkle Cover plate fits perfectly with it.
I began by cutting the Sparkle Cover Die and the largest of the Hexagon Dies I coloured the sky on the Hexagon with Salty Ocean and Chipped Sapphire Distress Oxides and spritzed with water. I cut another Hexagon for the grass and cut it so it cover the bottom quarter then coloured it with my green Copic adding some flicks to represent blades of grass. To get the cut blades of grass at the top I Used the grass stamp from the Moovelous Stamp set and die cut that and stuck it along the top. The join I then covered with the Princess that I again coloured with Copics and I just had to use Cinderella Blue. 
The sentiment I heat embossed on some Black Cardstock I really like this technique as the white against the black really pops!
The blue back to the Sparkle Cover Die I coloured the same way as the sky just to add to the night time feel. I wanted my Sparkle Panel to be raised so an easy way to do this is to cut out the Sparkle Cover Die out of some white fun foam. It saves doing lots of cutting with foam tape and makes sure the whole of the back is sturdy. I just used Cosmic Shimmer Glue to attach them together. Then I popped it on my card base and added some stars to the sky using a white Gelly roll pen and small star sequin inside the Magic Wand and it was all finished up!
I hope you like my card and tutorial for this week and don't forget you can get 10% off in the shop using the code T4TNATALIE10
Have a great weekend and I will see you all next week!


Other Posts You Might Like