Pages

Friday 30 August 2024

Lime All Yours Bunnies


Happy Friday, DT Annalisa here today I share a lime-coloured punny card. Who doesn't love a good pun? I combined new and older Time For Tea Designs stamp sets to create this scene.

I started by adding several drops of twisted citron Distress Paint onto my glass matt and spraying it with water. I pressed water-coloured cardstock into the paint several times to create a bright green background.


Once the background was dry, I used the Simple Square Nesting Dies to die-cut it out. I then glued it to a 4 1/2 inch by 4 1/2 inch card base.

I used the same die set to cut some patterned paper to a 4-by-4-inch square. I then used the Heart Nesting Dies to cut into this patterned paper. I also cut a 4-inch by 1/2-inch piece of green patterned paper and glued it to the bottom area.


I stuck down vellum paper on the card base in the area where the heart opening was. I then used liquid glue to adhere the green patterned paper to the card base.

I stamped and coloured (with Copics) two bunny images from Blooming Bunnies, the lime from Squeeze the Day and the butterfly and bee from I Really Dig You. I cut the images out with their coordinating dies. I added white gel pen accents with a Gelly Roll Pen.


I used double-sided foam tape to stick the bunnies, lime and sentiment to the card base. I used liquid glue to stick the butterfly and bee.

I used the letters in 'lime' from the Appletini Puffy Alpha Stickers and stuck them above 'all yours' in the center of the heart opening in the card.


Thank you so much for reading my blog post, be sure to use my discount code T4TANNALISA10 when you visit the Time For Tea Designs shop to get 10% off your order.

Tuesday 27 August 2024

Bright birth announcement πŸ‘ΆπŸŒˆ

Happy tuesday!

I'm not sure which countries have the same tradition as us Dutchies do, but I do know it's not common to send birth announcements everywhere, so let me explain. When a baby is born, we send out cards to all our relatives, friends, colleagues, aquantainces, etc. The card will always reveal the baby's name, gender, date of birth, weight and length. The new parents spend ages on picking the right card for their newborn. Some design them theirselves and will have personal references in the drawing or image on the front. I always try to use some of the birth announcement details on my cards I send out in return to congratulate the new family.

I have a huge love for bright colors, as you might have already noticed 🀑 Imagine how delighted I was when I got asked to design a card for a newborn baby, and the birth announcement had a rainbow on it! Plus, it had a cute mouse on it and the baby's name in a huge font. The idea to make a card inspired on these details resulted into this bright and colorful card:


For the base, I used the simple nesting dies A6. I die cut 2 panels out of white cardstock and blended rainbow colors with Distress oxides spun sugar, dried marigold, squeezed lemon, twisted citron and tumbled glass on the smaller panel. 

Using 1 shade darker for all colors (kitsch flamingo, carved pumpkin, mustard seed, mowed lawn and salty ocean) together with the Scattered Hearts 6 x6" stencil, I created the rainbow hearts background. I adhered this colored panel onto the slightly larger white panel and adhered this onto a white A6 card base, creating a subtle frame.


Now all I needed whas a cute mouse and letters for the baby's name! I found the mouse in the Hey There Critters Clear stampset. Stamped and colored it and cut it out with scissors. 
For the name I used the Anthony's Alpha Dies and die cut each letters twice out of smooth white cardstock. Glued the two letters together to make it a little more sturdy and creating a little depth after glueing them onto the background panel. 

Last but not least I added enamel dots in pretty matching colors and that finished my birth announcement inspired card!


I hope you like it!
All the best,

Monday 26 August 2024

Big Birthday Wishes - Slimline Card

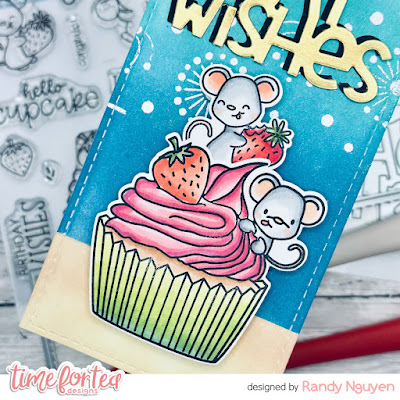
 Hi Tea Timers, DT Randy here, back with a new slimline card I created pairing a large sentiment with a large image to create this fun and easy birthday card. With then sentiment including the word "wishes," I thought it would be cute to pair it with the dandelion stencil.

I initially was going to create a standard A2 card but the slimline card ended up being the perfect size for both elements.

Sets used:


I first stamped out my images and used the coordinating die sets to die cut them out. I then used Copic Markers to color the images.


For the sentiment, I die cut it twice, once using gold cardstock and another time using black cardstock to have a shadow effect. The shadow effect definitely helps the sentiment pop.

I then die cut out the largest slimline die from white cardstock. I die cut it out from a second smaller scrap piece of cardstock for the bottom portion of the card.

I blended Salvaged Patina, Peacock Feathers and Uncharted Mariner Distress Oxides onto my large slimline piece. I set it the side to let it dry for a bit.


On the smaller piece, I blended it with Antique Linen and Tea Dye Distress Oxides to create my bottom piece.

I took the larger slimline piece and patted it with my antistatic powder. I then took the stencil and blended it with embossing ink. I covered it with white embossing powder and then heat set it with the heat gun.

To assemble my card, I first glued down the bottom piece with liquid adhesive. I then adhered the sentiment. First the shadow piece and then the gold cardstock a bit off centered to it.


I adhered the mice onto the back of the cupcake near the top using liquid adhesive. I then adhered the images to the card using foam tape.

I hope you enjoyed this blogpost today. All the products I used are linked above. Don't forget to use the code T4TRANDY10 at checkout for extra savings. Happy crafting!

Friday 23 August 2024

Zesty Bunny


DT Annalisa wishing you a happy Friday! Today, I am sharing a lime green happy card featuring Squeeze the Day and Fruitful Friends stamp sets from Time For Tea Designs. I love how bright this card turned out. 

I started by adding several drops of twisted citron Distress Paint onto my glass matt and spraying it with water. I pressed water-coloured cardstock into the paint several times to create a bright green background.


Once the panel was dry, I stamped the sliced fruit from Squeeze the Day onto it with Versafine Onyx Black, poured on Icicle ultra fine embossing powder by Brutus Monroe (clear), and heat set it.

I cut down the panel using the A2 Nesting Frame Dies and used double-sided tape to adhere it to an A2 card base.

I stamped and coloured (with Copics) images from Squeeze the Day and Fruitful Friends and cut them out with their coordinating dies. I added white gel pen accents with a Gelly Roll Pen.


I stamped 'You're Simple the Zest' with VersaMark ink onto black card stock. I then added Alabaster ultra fine embossing powder by Brutus Monroe (white), taped off the excess, and heat set it with a heat gun. I used the coordinating dies to cut out the sentiment.

I used double-sided foam tape to adhere the images and sentiment to the card. I then added three white enamel dots from the Sweet Summer Designer Enamel Dots to complete the card.


Thank you so much for reading my blog post. Remember to use my discount code T4TANNALISA10 when you visit the Time For Tea Designs shop to get 10% off your order.

Tuesday 20 August 2024

Coffee.... and you!

I can't bear a day without coffee. Gives me a headache. Which makes me an addict πŸ™ˆ Also explains why I keep returning to coffee themed cards, I just enjoy it so much!

For today's card I used the Bearing Gifts Clear Stamp Set and their coordinating dies. Colored the cute critters with Copic alcohol markers.


Then I die cut a panel out of smooth white cardstock using the Simple Nesting Dies - A6 and used distress oxides tumbled glass together with the 6x6 Scene Builder Stencil for the sky and fired brick together with the Tiled Wall 6 x6" Stencil for the wall. 
I die cut a strip of grass out of green cardstock using the Slimline Hillside Scene Dies.


With the Coffee Sentiment Die combined with 'and you' from the stamp set, I created a sentiment using black cardstock, white glitter cardstock and white embossing powder. I stamped on part of the sentiment directly onto the background with the help of my stamping tool and black ink.

Time to assemble! First, I die cut a card out of black cardstock, using the Sweet Scalloped Dies. I adhered the colored panel and the grass onto that, using double sided tape. Lastly, I added the bears with their coffee cups and the coffee sentiment onto the card by using 3D foam tape.


 Another card finished! Now first, let's get a cup of coffee πŸ˜‰

Monday 19 August 2024

Love is... Sharing your popcorn

 Hi Tea Timers, welcome back to the blog. Today, I have another quick and easy card combining an older set but this time with one of the new stencils.

I've been wanting to create with the 'Movie Night' stamp set again and thought it would be cute to pair it with the 'Sunburst' stencil. I wanted it to look like the film was shining bright from behind the critters, onto the screen.

Sets used:

I first stamped out my images and used the coordinating die set to cut them out. I then used Copic Markers to color the images.

I then took an A2 panel and blended it with the stencil using Scattered Straw, Mustard Seed and Fossilized Amber.


With the sentiments, I heat embossed them onto blue cardstock with white embossing powder and embossing ink.

I trimmed down the sentiments into two separate strips. 

To assemble the card, I first adhered the critters onto the movie theater chairs using liquid adhesive. I then adhered the chair using foam tape.


I added the sentiments above the chair using foam strips.

I thought it looked a bit empty so I decided to stamp out the film clapper and the image of the popcorn. I die cut them out using the coordinating dies and used Copic Markers to color the popcorn.


To complete my card, I adhered the two items on either side of the sentiments using foam tape.

I hope you enjoyed this tutorial today. All the items I used are linked above. Don't forget to use the code T4TRANDY10 at checkout for extra savings. Happy Crafting!

Friday 16 August 2024

One In A Melon


Happy Friday! DT Annalisa here sharing a colourful fruit-filled card I created using the new Fruitful Friends stamp set and coordinating dies. I combined these with the Slimline Postage Stamp Frame Dies that are on a super Summer SALE until August 18th!

I used Tim Holtz Distress Sugary Gumdrop Mica Stain, Twisted Citron and Mowed Lawn Distress Oxide Sprays on water-coloured cardstock. I love the shine the mica stain gives! Once the panel was dry, I trimmed it to 4 1/4 by 5 1/2 inches and glued it to an A2 card base.

I die-cut vellum with the Slimline Postage Stamp Frame Dies. I then used the  Simple Square Nesting Dies to die-cut four small squares from white card stock. I ink-blended two with abandoned coral Distress Ink and two with twisted citron and mowed lawn Distress Oxides. I added stitched lines along the outside of each square with a white Gelly Roll pen.


I stamped and coloured (with Copics) several images from Fruitful Friends and cut them out with their coordinating dies. I added white gel pen accents with a Gelly Roll Pen. The butterfly is from I Really Dig You, I die-cut it with the coordinating dies.

I used liquid glue to adhere the squares to the vellum postage die-cuts. Next, I glued the stamped and coloured images to the small ink-blended squares and then used double-sided foam tape to adhere them to the card base.

I die-cut the letters 'melon' from white card stock using Anthony's Alpha Dies. I ink-blended the top of each letter with abandoned coral Distress Ink and the bottom with twisted citron and mowed lawn Distress Oxides. I added white gel pen accents with a Gelly Roll Pen.


I die-cut the same letters from black cardstock and glued the ink-blended letters to these (slightly offset to create the look of a shadow). I used double-sided foam tape to adhere the letters to the card base.

I masked off the word 'melon' from the 'you're one in a melon' sentiment stamp, and inked it with Versafine Onyx Black. I trimmed it down with a slim rectangle die and used double-sided foam tape to stick it to the card.


Thank you so much for reading my blog post. Remember to use my discount code T4TANNALISA10 when you visit the Time For Tea Designs shop to get 10% off your order.

Tuesday 13 August 2024

Hey, let's shellabrate!

Summertime!! At least, for me it is! I am currently enjoying the sun and sea in a foreign country and although the beach consists out of rocks mainly, I'm showing a sand 'n sea theme card today!

I started by stamping and coloring the images from the Beach Buds Clear Stamp Set and set those aside to focus on the background.


I used the Stitched Slimline Slopes Dies with white cardstock and took the inner pieces to color up with distress oxides. Salvaged patina, peacock feathers and uncharted mariner for the blue pieces. Antique linen and vintage photo for the beach pieces. Both splattered with water and acrylic ink.
Pieced them back together into the frame after it had dried.


For the sentiment I used the Hey, Hello, Hi Dies and added the same beach colors and splatters onto the letters. I die cut a banner from the Beach Buds Coordinating Die set out of light blue cardstock, and stamped on the sentiment from the stamp set using watermark ink and clear embossing powder.


Adhered all the images and the sentiment onto the card base using 3D foam tape and that finished off my card! Hope everyone is enjoying summer!

Regards,
~Ilona~


Monday 12 August 2024

"This Is Where I Fell Asleep" - The Sequel

 Hi Tea Timers, welcome back to the blog. Today, I have a tutorial with one additional bookmark I created using the Book Buddies stamp set. 

I wanted to show that you can mix and match the critters from various stamp sets and pair them with the new Book Buddies stamp set. I decided to use the super adorable, sleepy sloth from the Movie Night stamp set.


Sets used:

I first stamped out my images and used the coordinating dies to die cut them out. I then used Copic Markers to color the images and set them to the side to start working on my bookmark.


On the smaller inner piece for the bookmark, I die cut it out of white cardstock. I then blended this piece with Seedless Preserves, Worn Lipstick and Uncharted Mariner Distress Oxides.

I then took my embossing buddy and tapped it over the blended piece. This is the quickest way to emboss over a blended piece without having to wait for it to dry. 

I then took the stencil and blended the piece with embossing ink, making sure to live a bit of the bottom free for my sentiment. Once completed, I poured white embossing powder over it and then heat set it with a heat gun.


On the lower part of the piece, I heat embossed my sentiment using embossing ink and this time gold embossing powder.

I then die cut the large bookmark die from navy cardstock. I adhered my inner piece using liquid adhesive.

To assemble my images, I first adhered the larger bookstack with liquid adhesive and the smaller bookstack right in front of it. I decided to add the sloth to the smaller bookstack and the bookworm to the larger one.


To complete my bookmark, I tied a ribbon to the slot at the top so that it is easier to pull out the bookmark from the book.

I hope you enjoyed this blog post today. All of the items I used are linked above. Don't forget to use the code T4TRANDY10 at check out for extra savings. Happy Crafting and Happy Reading!


Friday 9 August 2024

You're One in a Melon


Happy Friday. I am sharing a colourful and fruity card featuring the
Fruitful Friends stamp set from Time For Tea Designs. I paired this stamp set with two new stand-alone dies from the latest release.

I created the colourful background using inks from Altenew; Citrus Burst, Bamboo, Limeade, Pink Pearl, Cotton Candy, and Sunkissed. I swiped directly from the small square ink pad onto white cardstock. Once the ink was dry I used a stitched rectangle die in my stash to cut out a panel, I then used double-sided tape to stick this to an A2 card base.


I added several drops of twisted citron Distress Paint onto my glass matt and sprayed it with water. I pressed water-coloured cardstock into the paint several times to create a bright green background.

Once it was dry I die-cut it using the Stitched Circle Dies. I adhered it with liquid glue to a piece of black cardstock which I die-cut with the Scalloped Circle Dies. I then adhered these to the card base with double-sided foam tape.


I stamped and coloured (with Copics) several images from Fruitful Friends and cut them out with their coordinating dies. I added white gel pen accents with a Gelly Roll Pen. The butterfly is from Squeeze the Day which I die-cut with the coordinating dies.

I used liquid glue to adhere the stamped images to the card base. I stamped the sentiment, die-cut it out, and adhered it to the card base with double-sided tape.
To complete the card, I added Frosted Lace Stickles from Ranger to the images.


Thank you so much for reading my blog post. Remember to use my discount code T4TANNALISA10 when you visit the Time For Tea Designs shop to get 10% off your order.


Tuesday 6 August 2024

Bookworm


Dearest gentle readers,

Are you a booklover as well? If you are, you will most likely get the reference to the Bridgerton books! Which is what I had in mind when creating this colorful card. The costumes used in the series are magnificent to look at with all the colours 😍  I stamped the images from the Book Buddies A6 Stamps and used the brightest alcohol markers I could find to color them. I used the coordinating dies to cut them out. 


For the background I used the Sweet Scalloped Dies combined with a matching size rectangle from the Simple Nesting Dies - A6 set. I used distress oxides salty ocean, dried marigold and carved pumpkin together with the Tiled Wall 6 x6" Stencil and splattered with white acrylic paint. I die cut a small strip of woodgrain cardstock for the floor and adhered it onto the panel.


Again using the simple nesting dies, I die cut a bigger rectangle out of rainbow cardstock and adhered this onto a white cardbase. After that, I adhered the scalloped rectangle and the colored background on top of that using double sided tape. 

I stamped the sentiment onto black cardstock with watermark ink and used white embossing powder. Adhered the sentiment and all the images with 3d foam tape (0.5 mm and 1mm.).


I found some lovely enamel dots and added Ranger glossy accents to the worm's glasses and that finished my card! Hope you enjoy this bright and happy card!


All the best,

Monday 5 August 2024

"Warm Hugs"

 Hi Tea Timers, welcome back to the blog. I was looking through my stash and came across the 'Warm Hugs' large sentiment die set and immediately thought of the images of the sloths hugging the tree. I knew I had to create a quick card using both sets.

This is going to be a very quick and simple card but I love making it since it's such a sweet sentiment and cute images.


Sets Used:

I first stamped out the images and used the coordinating dies to die cut them out. I then used Copic Markers to color the images and set them to the side.


To create my panel, I took a piece of white cardstock and cut it down to 5.5in x 4.25 in. I then blended it with Cracked Pistachio, Peacock Feathers and Salvaged Patina Distress Oxides.

Once I blended my background, I took white watercolor and splattered it across the panel. I then took some gold watercolor and splattered that around the panel as well.


I then took the large sentiment and die cut it out of gold cardstock and black cardstock.

To assemble my card, I first adhered the sentiment die cut from the black cardstock with liquid adhesive. I then adhered the sentiment die cut from gold cardstock on top but offsetting it just a bit


I then took my two sloth images and adhered it above and below the sentiment using foam tape.

I hope you enjoyed this blog post today. All the items I used are linked above. Use the code T4TRANDY10 at checkout for extra savings. Happy Crafting!

Friday 2 August 2024

This is Where I fell Asleep


Happy Friday, DT Annalisa here sharing my first bookmark project using the new Bookmark Dies from Time For Tea Designs. The three dies included in this set are perfect for creating bookmarks for your book-loving friends.


I die-cut the outer bookmark die from heavy white cardstock. To create a look of wallpaper, I ink-blended antique linen Distress Oxide through the Diagonal Stripes Stencil with my Beautiful Blender Brushes. I masked off the bottom using masking tape. I moved this tape to cover the top part of the bookmark and ink-blended lost shadow Distress Oxide ink for the floor section.


I stamped and coloured (with Copics) several images from Book Buddies and cut them out with their coordinating dies. I added white gel pen accents with a Gelly Roll Pen.

I used glue to stick the stamped elements to the bookmark and then stamped the sentiment 'This is where I fell asleep' using Versafine Onyx Black.


I added the Clear Bubbles Designer Enamel Dots to the bookmark to complete it.

Thank you so much for reading my blog post. Remember to use my discount code T4TANNALISA10 when you visit the Time For Tea Designs shop to get 10% off your order.


Other Posts You Might Like