Pages

Showing posts with label It's Penguin-ing to Look a Lot Like Christmas. Show all posts

Friday, 19 December 2025

Colourful Penguin Christmas


Happy Friday before Christmas! DT Annalisa here today sharing a sweet and colourful penguin scene I created using the It's Penguin-ing to Look A Lot Like Christmas stamp set from Time For Tea Designs.


To make the background panel, I used watercolour paper and Distress Watercolour Pencils in Cracked Pistachio, Salvaged Patina, Peacock Feathers, Shaded Lilac, Picked Raspberry, and Spun Sugar. I followed a technique from one of Jenn Shurkus’s Get Cracking on Christmas tutorials on YouTube. She has so many fantastic tutorials, a wonderful blog, and terrific classes. I highly recommend checking her out if you want to learn more about using Distress Watercolour Pencils.


Once the A2 panel was dry, I used a palette knife to spread White Embossing Paste by Wendy Vecchi over a snow stencil from my stash. After letting it dry for about an hour, I attached the panel to a card base using double-sided tape.

For the card images, I stamped elements from several sets: Skating By Penguins (ice), Merry Cheesemas (round Christmas ornament), and It's Penguin-ing to Look A Lot Like Christmas (penguins and igloo). I coloured everything with Copic markers and cut the pieces out using the coordinating dies. I added white gel-pen accents with a Gelly Roll Pen and added a touch of sparkle to some images using a Quickie Glue Pen and Lawn Fawn Prisma Glitter.


I adhered the images to the card base using either liquid glue or foam tape for added dimension.

Thank you so much for reading my blog post! Don’t forget to use my discount code T4TANNALISA10 when you shop at Time For Tea Designs to receive 10% off your order.


Friday, 5 December 2025

Cheesy Christmas


Happy Friday, DT Annalisa here! Today I’m sharing a cheesy Christmas card featuring the Merry Cheesemas stamp set and the Say Cheese Cover Plate Die. I love that I was able to use a non-traditional Christmas colour for the background of this project!

I began with watercolour paper and a mix of Squeezed Lemonade, Scattered Straw, and Rusty Hinge Distress Inks, along with Fossilized Amber Distress Oxide. I pressed the inks onto my glass mat, spritzed them with water, and then swiped and pressed the paper into the colour. I heat-set the panel between layers to build depth and texture.


Once the panel was dry, I die-cut it with the Say Cheese Cover Plate Die. I adhered the panel to a card base with double-sided foam tape and used liquid glue to secure the small cheese-hole pieces in place.

Next, I stamped several images from the Merry Cheesemas stamp set, coloured them with Copics, and cut them out using my Brother ScanNCut SDX125e. I added highlights with a white Gelly Roll pen. The mistletoe image is from It's Penguin-ing to Look A Lot Like Christmas, the heart is from Seasons Tweetings, and the red stocking is from Santa’s Nice List.

I added sparkle to some of the images using a Quickie Glue Pen and Lawn Fawn Prisma Glitter, then adhered everything to the card with liquid glue.

Thank you so much for reading my blog post! Don’t forget to use my discount code T4TANNALISA10 when you shop at Time For Tea Designs to receive 10% off your order.


Monday, 13 October 2025

Christmas Tags


Hi. Design team member Koren Wiskman here. I hope that I can inspire you to create something fun with all of these awesome T4TD supplies. Today I am using the It's Penguin-ing to Look A Lot Like Christmas pre-printed images as well as the Coordinating Dies to create this project. I'm also using the Santa Stop Here Stamp Set for the Sentiments. 

I used a tag die from my stash to cut out these tags, but you can create similar looks using whatever you have in your stash. I cut them from my favorite light gray cardstock. 

Background

For the "background" or tag panels of these tags, I simply cut a piece of heavy weight white cardstock to act as a background panel. For the one tag with a snowy background, I used opaque white texture paste and a snow stencil from my stash. The other two tags are plain white panels. 

Images

The images on these tags are from the Time For Tea Designs It's Penguin-ing to Look Like Christmas Pre-printed images, but if they are no longer available, you can use the clear stamp set to stamp and color your own images. I also used the Coordinating die set to cut them out. They are popped up onto the tags using foam squares. 

Sentiments

The sentiments for these tags are from the T4TD Santa Stop Here Stamp Set. As of today, this set is on sale, just in time for your Christmas projects. I stamped the sentiments using coordinating colors of ink and fussy cut them by hand.


Emblishments

To add a little fun to my tags, I grabbed some ribbons and twine from my stash to spruce them up a bit. 


I hope that I've inspired you to create something today. Check out the Santa Stop Here Stamp Set and the It's Pengun-ing to Look A Lot Like Christmas goodies available in the T4TD shop. 


KOREN

Monday, 25 August 2025

No Coloring using Pre-Printed Penquins

Hi. Design team member Koren Wiskman here. I hope that I can inspire you to create something fun with all of these awesome T4TD supplies. Today I am using the It's Penguining to look a lot like Christmas A4 Pre-Printed Cardstock Sheets and the Winter Trees Die Set to create this project. Make sure you check out the rest of the Pre-Printed cardstock selection. 


The card size is A2 (4.25in x5.5in.) The front panel is cut to 3.25in x 4.75in. This is my favorite size card to create. I have tried so many others but this size is the one that keeps my heart happy. My card bases are typically made using a neutral gray cardstock. These two details about my cards rarely change. 


Background

For this background I grabbed some heavy weight black cardstock and cut it to my normal 3 1/2 by 4 3/4 inches card panel size. I then used white pigment ink and a blending brush to ink blend some white cloud like vibes. I then added the panel to my splat box to get splattered with white acrylic paint. 

I also cut some birch trees using the Time for Tea Designs Winter Trees Die Set. I also added them to my splat box. 

For the ground I used a very old snowy hills edge die. You could easily take scissor to a piece of cardstock and get a similar look. I prefer the ease and clean edges of the dies. 


Focal Images

This is where it gets good. I used T4TD Pre-Printed A4 Cardstock sheets that are already colored. I didn't have to do any coloring. Which makes for super fast and easy mass production of Christmas cards. Also, if you have a hard time coloring or can't afford coloring mediums. This is where it's at! The images are colored beautifully and they look adorable. They even have coordinating dies. I did however add these images to my splat box as well. everything got splattered. Except the sentiment. 


Sentiment

The Pre-Printed sheets also include sentiments that coordinate with the dies. This was super easy. 


Everything was popped up using foam adhesive.


I hope that I've inspired you to create something today. Check out the It's Penguinging to look a lot like Christmas Pre-Printed and other A4 Cardstock Sheets in the T4TD shop, you will not be disappointed. 


Koren

Friday, 27 December 2024

Penguin Christmas Shaker


Happy Friday! DT Annalisa here sharing my last Christmas card of the year, a colourful shaker featuring the It's Penguin-ing to Look A Lot Like Christmas stamp set from Time For Tea Designs.

I started with watercolour paper and die-cut using the Stars Stitched Cover Die. Then, I sprayed the die-cut panel with Mermaid Lagoon and Uncharted Mariner Distress Spray Stain and used my Heat It craft tool by Ranger to dry it. After that, I added some shimmer by spraying the panel with Cocktail Party Mica and Merry Mint Mica.

I used White Silver Neenah cardstock to cover the entire surface of the card base. Next, using double-sided tape, I adhered acetate to the back of the inked star panel. I placed 3mm double-sided tape on the back of the panel and attached it to the card base. Before securing the star panel, I sprinkled Candy Christmas sequins mix from Pawsome Stamps in the appropriate areas.

I stamped and coloured several images from the It's Penguin-ing to Look A Lot Like Christmas set using Copics, then cut them out with their coordinating dies. I added white gel pen accents with a Gelly Roll Pen. The Christmas tree and candies are from Gingerbread Family - Our House to Yours.

To add some sparkle, I applied small dots of glue to select areas on the stamped images using my Quickie Glue Pen by Sakura and dipped them into Lawn Fawn Prisma Glitter. I then secured all the stamped elements to the card using liquid glue.

For the sentiment, I stamped "Happy Christmas" from the Simple Sentiments set onto black cardstock with VersaMark ink. I sprinkled Alabaster ultra-fine embossing powder by Brutus Monroe (in white) over the stamped sentiment and heat-set it. I used a small rectangle die to cut it out.

To finish the card, I added some clear dots from Pretty Pink Posh for an extra touch.

Thank you so much for reading my blog post! Don’t forget to use my discount code T4TANNALISA10 when you shop at Time For Tea Designs to receive 10% off your order.


Friday, 8 December 2023

Merry Penguins


Happy Friday! DT Annalisa here
 sharing a sparkling penguin Christmas card that features the Mistletoe Kisses Digital Stamp Collection from Time For Tea Designs. I paired this with some beautiful patterned paper and dies.

I trimmed patterned paper from the Winter Wonderland Paper Pad 6x6" to 5 1/2 by 4 1/4 inches and used double-sided tape to stick it to an A2 card base. I die-cut white cardstock with the Falalala Scalloped Slimline Dies, trimmed the two longer sides to 5 1/2 inches and ink-blended them with peacock feathers Distress Oxide. I used liquid glue to adhere these to the sides of the card.

Next, I ink-blended peacock feathers and lumberjack plaid Distress Oxide onto white cardstock and trimmed out the letters 'merry' in alternating colours. I added sparkles to the bottoms of each letter with a Quickie Glue Pen and Lawn Fawn Prisma Glitter and then used double-sided foam tape to stick them to the card.


I used a stitched circle die in my stash to cut out a 3 1/4-inch circle from white card stock. I ink-blended salvaged patina and peacock feathers Distress Oxides onto the circle with my Beautiful Blender Brush. I added white splatter with a paintbrush, water and Copic opaque white.

I sized, printed and coloured the two penguins with my Copics and cut them out with my Brother Scan N Cut SDX125e. The mistletoe is from It's Penguin-ing to Look A Lot Like Christmas; I coloured and die-cut it with the coordinating dies. I added white gel pen accents with a Gelly Roll Pen

I applied liquid glue to the bottom of the circle and added Lawn Fawn Chunky Glitter on top. I then glued the penguins and mistletoe. I used double-sided tape to adhere the circle panel to the card. I added Sweet Summer Designer Enamel Dots to complete the card.


Thank you so much for reading my blog post. Remember to use my discount code T4TANNALISA10 when you visit the Time For Tea Designs shop to get 10% off your order.

Friday, 24 November 2023

You Had Me At Coffee

Happy Friday, DT Annalisa here with another coffee-themed card - I have been on a roll for the last few weeks! I created this card using the large You Had Me At Meow Sentiment Dies that I adjusted to read 'You had me at coffee' by adding the Coffee Sentiment Die. It is always fun to get more use out of dies like this!

I used the Large Scallop Celebrate Frame Dies to cut out watercolour paper on which I ink blended ground espresso Distress ink through the Coffee Beans 6 x 6" Stencil. Next, I applied tea-dye Distress Oxide Spray and heat set the panel. I then added ground espresso Distress Ink splatter using water and a paintbrush. 


I die-cut teal cardstock with the 'You had me at meow' and 'coffee' sentiment dies and then ink blended peacock feathers Distress Ink for a deeper colour. I ink smooshed ground espresso Distress Ink onto the coffee text for added texture. I die-cut vellum with the coffee shadow die and used liquid glue to adhere it to the 'coffee' text. 

For the images on this card, I used Snappy Before Coffee (coordinating die set) and It's Penguin-ing to Look A Lot Like Christmas (coordinating dies) that I coloured with Copics and added white gel pen accents. 


I die-cut the letters/text three times for dimension and glued them all together with liquid glue. I then used liquid glue to adhere all the elements to the card.

I added stickles for sparkle on the bottom of all the letters and some of the images.

Thank you so much for reading my blog post. Remember to use my discount code T4TANNALISA10 when you visit the Time For Tea Designs shop to get 10% off your order.

Friday, 10 March 2023

Birthday Penguins


Hello everyone, DT Annalisa here today! For my card, I am sharing a winter birthday card that features the adorable It's Penguin-ing to Look A Lot Like Christmas stamp set. I love using this set to create not only Christmas cards but winter cards as well. 

I used the Waves Cover Die to cut some patterned paper from the  Winter Wonderland Paper Pad 6x6". I used double-sided tape to adhere the resulting slopes down to a 4-by-5 3/4 inch card base, to which I added some stitched lines using a rectangle stitched die.


I stamped the 'it's your Birthday' sentiment from Beach Buds and cut it out with the coordinating die set.

I stamped and Copic-coloured the penguins and igloo from the It's Penguin-ing to Look A Lot Like Christmas stamp set. I die-cut them using the coordinating dies and then added white gel pen accents and Lawn Fawn Prisma Glitter (I used a Quickie Glue Pen to adhere the glitter).


Thank you so much for reading my blog post, you can use my discount code T4TANNALISA10 when you visit the Time For Tea Designs shop to get 10% off your order.


Thursday, 23 February 2023

Have a SWEET Birthday!


 Hello, Tea Timers!  How cute are these little penguins from the It's Penguin-ing to Look A Lot Like Christmas stamp set?


In case you're not following me on Instagram yet, you can follow me @craftyandcreativevibes.

I love stretching my supplies, so I decided to create a birthday card using these Christmas stamps and the Christmas Candy Layering Stencil!  For my "floor", I used Heffy Memo Tape to mask off the top of the card and then I ink blended Be Mine and Party Dress.
For my candy background, I used Chiffon and Glitz and Party Dress.


I stamped my images from the It's Penguin-ing to Look A Lot Like Christmas and Gingerbread Family stamp sets.  I colored them in with OLO alcohol markers and then die cut them using the coordinating dies.


For my "birthday", I grabbed a generic birthday die.  Then, I attached everything to my card using 3D foam squares and glue.


That's all for me today, friends!  Come back tomorrow for more inspiration from another Design Team member!!  Xx, Amanda


Wednesday, 25 January 2023

L O V E mini slimline shaker with Ashlee

Hey there Tea-timers...

It's Valentine's week at Time for Tea designs which means daily inspiration full of Love. So for today I have a shaker card to share with you all that I made inspired by the candy heart lollies that you can get....


To create this card I started by die cutting the card base/shaker frame from the Mini slimline scallop die. I then die cut a bunch of hearts using the Stitched hearts cover die from shades of pink and grey cardstock before adhering them to the card base. 

Now that those steps were complete it was time to fill the shaker with a whole bunch of gorgeous embellishments before adhering to the base to seal it all in!

It's always so much fun to fill a shaker with a bunch of pretty things and then give it a good ol shake don't you think?!


I wanted a big bold sentiment so I die cut the letters L O V E using Anthony's alpha die set from grey and black cardstock. The two layers were adhered together with liquid glue slightly off set to create a shadow....

The sub sentiment I heat embossed with WOW! Opaque bright white embossing powder on black cardstock. 

All the sentiments were then adhered on the top of the shaker along with the cute penguin that was stamped, coloured and die cut from the It's penguin-ing to look a lot like Christmas set. (Coloured using Spectrum noir tri-blend alcohol markers)


That complete's the Valentines shaker card and now it's ready to shake, shake, shake!

Have you made a valentine's card or planning to create some?! 
Be sure to check out all the design team's inspiration this week because they sure have some fabulous cards to shared and inspire you with...

Happy crafting, hugs Ashlee.

Wednesday, 18 January 2023

Party penguins

Hey there Tea-timer friends...

 Who's ready for some new Time for Tea designs inspiration featuring the super adorable penguins from the "It's penguin-ing to look a lot like Christmas" set?!

If so you are definitely in the right spot because I have a birthday card coming up with some partying penguins...


I haven't made a shaker card in so long and I really don't know why because they are SO much fun and I just love the end result. Shaky, shaky, shaky......

I made the shaker portion using the "Hooray sentiment & cover plate die" and filled it with lots of pretty sequins and embellishments!!


To add a sentiment I heat embossed the Happy Birthday on black cardstock using WOW! Opaque bright white embossing powder then adhered it to the card using foam tape....


The two penguins were stamped then coloured with Spectrum noir tri-blend markers before die cutting with the co-ordinating dies. I adhered those to the card base with foam tape too and then completed the card with a few clay embellishment dots.

These penguins are ready to party and shake, HOORAY!

I hope you enjoyed today's card from me, happy crafting. Hugs Ashlee

Wednesday, 4 January 2023

A lot like....?

 Hey there Tea-timer friends...

It's DT Ashlee here with my first Time for tea designs post for the new year, HAPPY 2023 everyone!!

Now I know we just celebrated Christmas and we have a whole year till it's that time of year again but it's never too early to get a start on Christmas cards is it?!

Today's card uses the It's penguining to look a lot like Christmas stamp and co-ordinating die set....


To create the card I started with a coloured cardstock base which I stamped the sentiment directly onto using Memento tuxedo black ink. 


I then stamped, coloured and die cut the images from the penguin set...
(These were all coloured with alcohol markers).

All the images were adhered with different levels of foam tape to give lots of dimension. I love using foam tape on my cards to make them pop!


To complete the card I added a small touch of sequins adhered with micro glue dots....

I hope you enjoyed today's inspiration. I look forward to sharing more with you for 2023!! Happy crafting, Hugs Ashlee.


(Want to do some shopping in the T4T store?! You can use discount code T4TASHLEE10 for discount)

Thursday, 15 December 2022

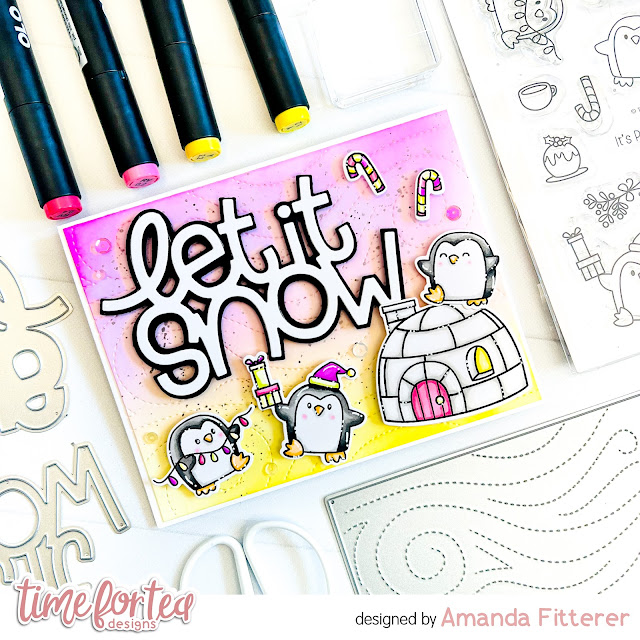
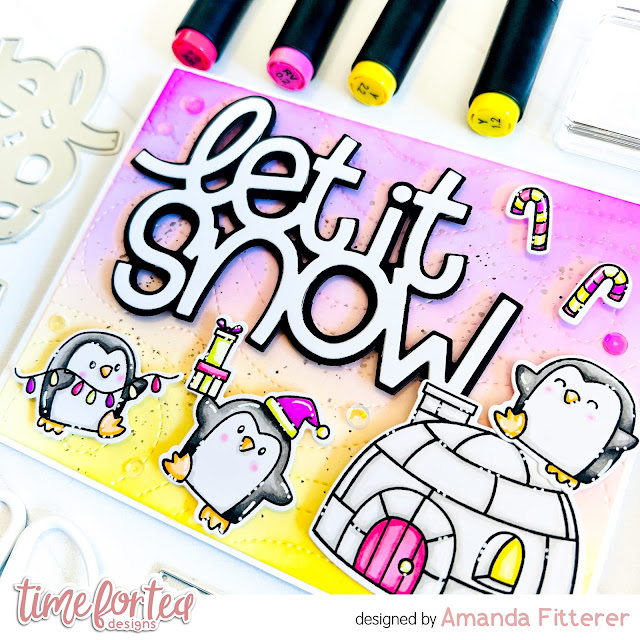
Let it Snow Penguins


Happy Thursday, Tea Timers!  It's Amanda here!  Today, I get to share with you the cutest little penguins from the It's Penguin-ing to Look A Lot Like Christmas stamp set!

To create this card, I created a beautiful background blend using Catherine Pooler's Pucker Up and Chiffon ink pads.  I used the Snow Flurry Cover Die to create a fun texture in the background!  Although it may look subtle, it really helps pull the card together, doesn't it?!


I used the NEW Let it Snow Sentiment Die Set to create my sentiment.
I stamped and then colored my cuties from the It's Penguin-ing to Look A Lot Like Christmas stamp set.  I used OLO markers to color my images and then used a White Gelly Roll pen to add some highlights and dots.


I had SO much fun making this bright and cheery card and I hope you enjoyed it too!


Thank you so much for stopping by the blog today!  I hope you're feeling inspired by this post!  Come back next week for another happy card!
Xx, Amanda

Other Posts You Might Like