Pages

Showing posts with label hillside village. Show all posts

Friday, 17 July 2026

Slimline Thank You


Happy Friday! DT Annalisa here, and today I'm sharing a mini slimline thank-you card featuring stamps, dies, and a stencil from Time For Tea Designs.

To create the background, I sprayed Snow Flurries and Frosty Mind Mica Stain onto a 6" × 3" watercolour panel. Once it was completely dry, I adhered it to a mini slimline card base using liquid glue.


Next, I created the brick detail by ink blending Lost Shadow Distress Oxide through the Tiled Wall 6" × 6" Wall Stencil onto white cardstock with a blending brush. I trimmed the panel to 6" × 1" and adhered it to the card front.

I then stamped images from the Hillside Village, Sweet Village, and Darling Daffodils stamp sets. After colouring the images with Copic markers, I added white gel pen accents for extra detail. I adhered the images and sentiment to the card front.

To complete the design, I die-cut a frame from white cardstock using the Mini Slimline Scallop Dies and adhered it over the scene with liquid glue. I love how the scalloped frame neatly finishes the card and draws the eye to the sweet little village scene.


Thank you so much for reading my blog post! Don’t forget to use my discount code T4TANNALISA10 when you shop at Time For Tea Designs to receive 10% off your order.

Friday, 29 April 2022

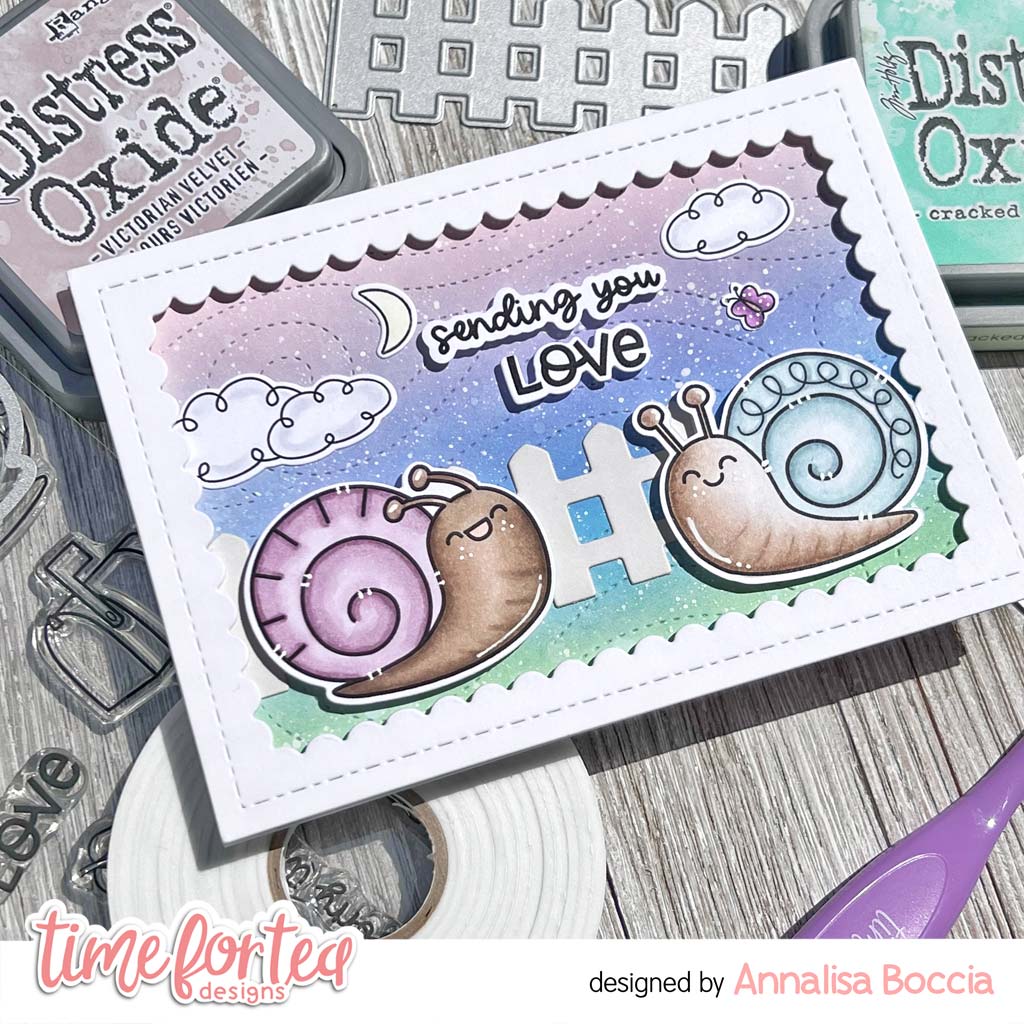
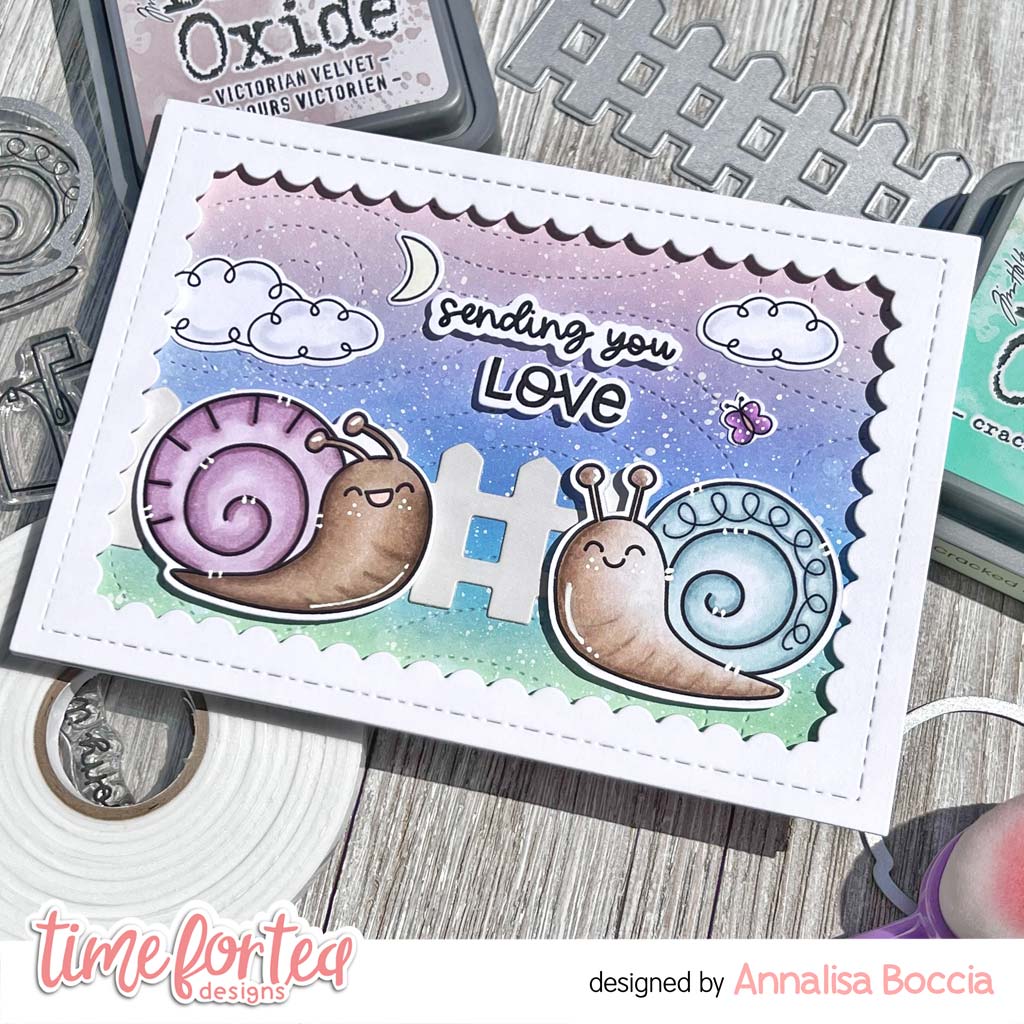
Sending You Love Snails


Happy Friday! DT Annalisa here sharing a card featuring the You’ve Got Mail clear stamp set and the coordinating dies. These snails are so fun to colour!

To start, I ink blended Distress Oxides (Victorian Velvet, Shaded Lilac, Salty Ocean and Cracked Pistachio) onto Distress White Heavy cardstock by Ranger with the Beautiful Rainbow Blender Brushes. I die-cut this panel with the Snow Flurry Cover Die and added white splatter to add inter


I die cut the fence from the Windmill Add On and lightly ink blended on some Weathered Wood Distress Oxide. I used liquid glue to stick this down to the ink-blended panel. I placed this onto a card base using liquid glue.

I stamped, coloured and die cut the snails from 'You've Got Mail.' I did the same with the clouds (Paper Plane Pals), butterfly (Be Slothy) and moon (Hillside Village). I used liquid glue to adhere the moon, clouds and butterfly to the panel. 


I used the larger frame in the Smile Inverted Scallop Frame Dies to die-cut some heavy white cardstock added foam tape to the back and stuck it to the panel. 

To complete the card, I added foam tape to the back of the snails and the sentiments and stuck them down.


Thank you so much for reading my blog post, you can use my discount code T4TANNALISA10 when you visit the Time For Tea Designs shop to get 10% off your order.

I hope you get some time to get inky and creative this weekend and that it makes you as happy as it does me!


Thursday, 17 February 2022

Treat Yourself

Hello, DT Kitty here. It's Thursday afternoon and time for my latest Time For Tea DT card. With Valentine's over that means Spring is on the way! I decided to create a slimline scene featuring some gorgeous bears...

For this card I used the Bears Picnic Stamp & Hillside Village Stamps (for the trees). I coloured them all with Copics and cut them out. I created the background by using the Scene It Stencil with some Mermaid Lagoon Distress Oxide Ink. I blended Twisted Citron & Mowed Lawn onto a strip of card and die cut it using the stitched border die from the Slimline Hillside Scene Dies. I used the Bold Sentiments Stamps for all the sentiments and used the coordinating Bold Sentiments Die to cut them out. I assembled everything onto the card with foam pads and added some heart embellishments to finish.


You can get 10% off your order on the website using the code T4TKITTY10


Kitty xx

Tuesday, 7 December 2021

You are so sweet

Hi friends, Claudia here to bring you some new inspiration with one of the sweetest stamps from the last release. This time I created a round card and a vellum overlay that allows you to see the scene below. I find it's a very simple structure to make and it creates a beautiful effect 


    I chose the set  Stinkin' Cut with these adorable and cute skunks  and I made the background of the scene with the set  Hillside Village


To complete my scene I used elements from other sets, and to finish I drilled a small hole to insert a Brads to open the circle. 


I love round cards and I really like this one, hope you do too!!!
I wish you all a wonderful week, maybe to dedicate to gift cards!!! And don't forget to use the code T4TCLAUDIA10 for shopping, you will get a 10% discount!!!

Friday, 12 November 2021

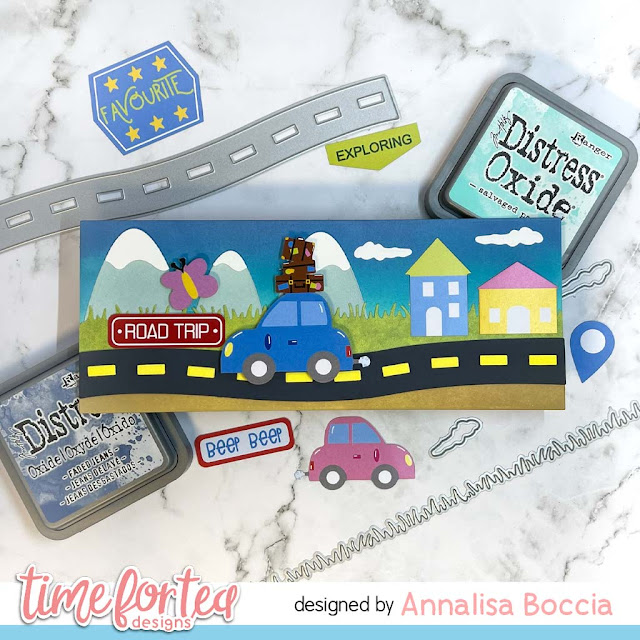
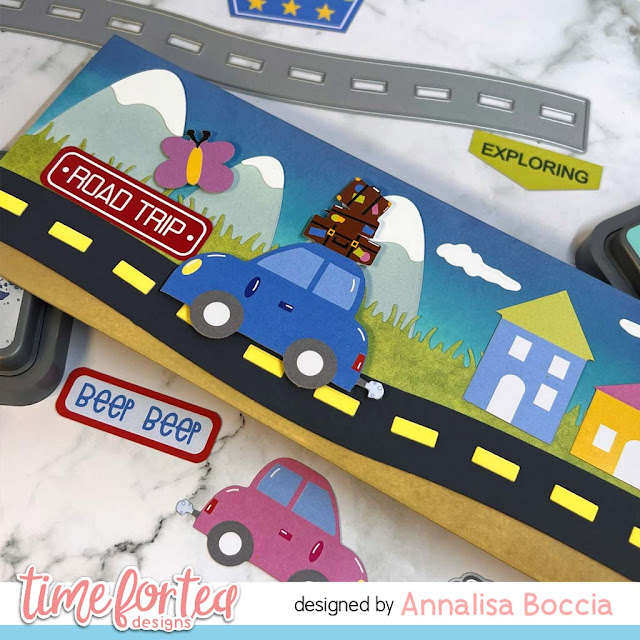
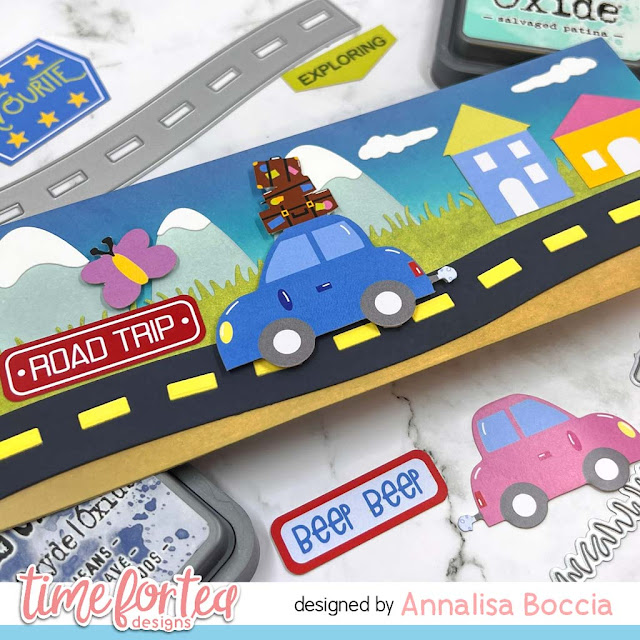
Road Tripping slimline card


Happy Friday! DT Annalisa here, my card today features elements from the new Sweet Summer Ephemera Pack from Time For Tea Designs. There are so many adorable pieces in this set that I knew that I had to create a cute card using some of them. The car, butterfly, houses and road trip sign are all from the ephemera pack which contains more than 50 pre-cut images, with a variety of images and sentiments.


To create the card, I cut down some Distress White Heavy cardstock by Ranger to 8 1/4 by 3 1/4 and used Distress Oxide Ink and my
Beautiful Rainbow Blender Brushes to colour the sky (Faded Jeans, Peacock Feathers and Salvaged Patina) and soil under the road (Antique Linen). For the hills, I used a die in my stash (you could use the  Mountain Scene Builder Dies from T4T) and Speckled Egg Distress Oxide.

I created the road using the Slimline Hillside Scene Dies and coloured the pieces with Black Soot and Squeezed Lemonade. For the grass, I used some green paper that I had on hand. To assemble the card, I started by adhering down the mountains with liquid glue onto my panel, near the top on the left-hand side. I then added the grass, clouds, road and little houses. The clouds were die cut from the Hillside Village coordinating dies.


I added foam tape to the back of the butterfly and car to add dimension to the card. I then added the 'road trip' bumper to complete the card.

Thank you so much for reading my blog post, you can use my discount code T4TANNALISA10 when you visit the Time For Tea Designs shop to get 10% off your order.


Friday, 15 October 2021

Thinking of You


Happy Friday! DT Annalisa here, for my project today I used the new Dog Gone Mutts stamp set, along with several other Time For Tea Designs sets to create this sympathy card for someone who has lost a furry friend. It is always such a devastating time, I have lost far too many over my lifetime.

I began by stamping down the rainbow from Unicorn In Training and the tennis ball from Dog Gone Mutts to some Neenah Solar White 80 lb card stock. I created masks for the rainbow and tennis ball and placed them on top of their images. Next, I stamped the dog and created a mask for him as well. With all of the masks in place, I set about stamping the rest of the scene.


The background scene is from Hillside Village and the sentiment is from Thinking of You Lily The two small hearts on each side of the sentiment are from Unicorn In Training. Once I removed the masks, I coloured the scene with my Copic markers. I added some accents with a white Gelly Roll Pen and then die cut the scene using a stitched A2 die in my stash.

For the back panel, I cut the black dots patterned paper from the Sweet Summer 6x6' Paper Pad and used double-sided tape to adhere it down to a card base. To make them look like paw prints, I added small circles and ovals with a black Faber Castell PITT artist pen.


To complete the card, I added some foam tape on the back of the scene and stuck it down on top of the card base.

Thank you so much for reading my blog post, you can use my discount code T4TANNALISA10 when you visit the Time For Tea Designs shop to get 10% off your order.


Friday, 17 September 2021

Have a Howling Good Day


Hello and happy Friday! Annalisa here, I am following in the footsteps of Kitty's blog post and Jo's Facebook live yesterday and sharing an adorable dog card using the new Dog Gone Mutts stamp set. I am more of a cat person, but these dogs are beyond cute and I just LOVE the doghouse!

I stamped the dogs down (using Ink on 3 Blackout detail ink) onto some white cardstock. I then created a mask by using the leftover ink to stamp onto some masking paper. I trimmed the dogs out right along the line on the masking paper, removed the backing and stuck it down to the cardstock.


I stamped down the dog bowl and bone and created masks for these and added them on before stamping down the dog house. After creating a mask for the dog house, I stamped the trees, moon, birds and clouds from the Hillside Village stamp set.

To finish up the scene, I stamped the tennis ball and the 'have a howling good day' sentiment. I then coloured the whole scene in with my Copic markers and added some white gel pen accents.

I die cut out the scene with an older T4T stitched rectangle die. I then used some paper from the Brighter Days 6x6' Paper Pad to frame the scene. I adhered the patterned paper to a card base and then glued down the doggie scene on top.


Thank you so much for my blog post, you can use code T4TANNALISA10 when you visit the shop to get a 10% discount on your entire order.

Thursday, 9 September 2021

With you anything is popsicle

Hello crafty friends and welcome back to the Time for Tea Designs blog. Silvia's here today with a yummy card.

I started die cutting a 5,5"x 4,25" rectangle from white cardstock and I used the "Simple Circle" die set to cut a windoow on it.

I created my own pattern on this panel stamping the tiny confetti stamp from the "Hello Cupcake" set in different colors.

I then stamped images from the "Cool Critters", "Hillside Village" and "Blooming Bunnies" stamp sets, I colored images with alcohol markers and I cut them with coordinating dies (here, here and here).

I also used the "Simple Circle" die set to create a yellow frame from the window.

I put everything together, I added a yummy sentiment  from the "Cool Critters" stamp set and here's my finished card.

I hope you like it and don't forget you can get a 10% off your Time 4 Tea order with the code T4TSILVIA10.

HAving an amazing day! Hugs, Silvia.


Tuesday, 27 July 2021

Copic colouring tutorial for a super cute birthday card!

Hey everyone, Lien here. Today I am sharing this card on the Time For Tea Designs Youtube Channel. I am featuring the Paper Plane PalsHogs & KissesHillside Village and Car Critters stamp sets from Time For Tea Designs. For the colors on this card, I used all copic markers! I hope you like it xxx 

You can click HERE to watch on the Time for Tea Designs Youtube channel.


I started by stamping out the scenery and images for this card using no-line coloring ink. I used the pig from Car Critters, the planes from Paper Plane Pals and the scenery from the Hillside Village stamp set. I colored everything in using my copic markers (combination listed below), also the complete background. Afterwards, I used the matching dies to cut everything out. 

  • Pig: E13, E11, E01, E00
  • Sky: B000, B00, B01, B02
  • Grass: YG03, YG23, YG17
  • Trees: E59, E57 / YG03, YG23, YG17 / YG00, YG03
  • Plane: W6, W4, W3, W2

The fit a slimline card base, I used the Slimline Scalloped Trio Circle Nesting Dies to cut the bottom (scenery from the Hillside Village) and another panel for the sky. I white heat embossed a sentiment from the Hogs & Kisses onto the grass. I also stamped out a speech bubble from the same set to add next to the critter. With all the elements ready, I assembled the card. I finished it of using a black glaze pen and some bubbles. I hope you like the card!


Thinking of buying some T4TD supplies? With T4TLIEN10 you will get 10% of your order at Time For Tea Designs! Happy shopping xxx 


Supplies:
  • Time For Tea Designs - Car Critters
  • Time For Tea Designs - Car Critters Dies
  • Time For Tea Designs - Paper Plane Pals
  • Time For Tea Designs - Paper Plane Pals Dies
  • Time For Tea Designs - Hogs & Kisses 
  • Time For Tea Designs - Hogs & Kisses Dies
  • Time For Tea Designs - Hillside Village
  • Time For Tea Designs - Hillside Village Dies
  • Time For Tea Designs - Slimline Scalloped Trio Circle Nesting Dies
  • Transotype: Perfect Colouring Paper
  • Gina K. Designs Amalgam Ink
  • InkOn3: Fadeout No-line Coloring/Detail Ink
  • Versamark Clear Embossing Ink
  • Copic Markers: see above
  • Black Glaze Pen
  • Copic Multiliner 0.3
  • Ranger Embossing Powder: White (super fine detail)
  • Little Things from Lucy's Cards: Bubbles
  • Thin Foam Squares from Scrapbook Adhesives 
  • NUVO Deluxe Adhesive
  • Pritt Adhesive Rollers

Tuesday, 20 July 2021

See You Soon

 Hello dear friends how are you? Claudia here to wish you a good week. 

Today I have a card a little different than usual, I created small windows that show the landscape and this cute bear taking a walk in the car. 


  For this scene, I imagined the panda leaving for summer vacation and greeting his friends with a "See you soon." 
To create it I combined two sets of stamps , Car Critters   and   Hillside Village 


To prepare the base of my card, I used two sets of die cuts from the latest collection, Slimline Postage  and      Slimline Hillside Diesand I did the coloring with alcohol markers.
I had fun creating this card, I hope you like it. 

  Don't forget to use the code T4TCLAUDIA10 to get a FANTASTIC 10% discount!


Friday, 16 July 2021

Flying By to say Hi


Hello and happy Friday! Annalisa here, flying by (I wish!) to say hi with this bright summer card featuring the Paper Plane Pals and Hillside Village stamp sets.

I stamped the trees from the Hillside Village down and then stamped the bunny from Paper Plane Pals and then masked him out to stamp the paper plane and the two clouds. I also stamped the birds, the sentiment, the dotted heart lines and the single cloud.


Once everything was stamped, I got to work colouring the scene with my Copic markers. I then die-cut the scene using the Rectangle Stitched Nesting Dies (an older T4T product). I then cut down some black card stock and some plaid patterned paper to add behind the scene.

I adhered the scene to the black panel and the patterned paper using liquid glue and then stuck the group of them to some white card stock.

Thank you so much for checking out my blog post, you can use code T4TANNALISA10 when you visit the shop to get a 10% discount on your entire order.


Tuesday, 6 July 2021

Life Would Suck Without You Video Tutorial

 Hello crafty friends Vic here today and I’m sharing a fun video tutorial.


I wanted to make a fun and colourful background and I also wanted to share a technique using emboss resist. I love using this technique especially with watercolour paints. 


For my background I used the A5 Woodgrain Clear Stamp. This is one of my favourite stamp sets I love the design and the texture it gives. I used a piece of A6 watercolour card and I stamped my ink with versamark ink. This will act like a glue to hold your embossing powder. I then sprinkled over some Opaque Bright White Embossing Powder onto my card and heat set the powder with my heat gun. I added some water and then added some distress inks onto my watercolour card. Using the heat gun I sped up the drying process. 


I stamped out my images using the Hillside Village Clear Stamp Set and I used the Coordinating Dies. I coloured the houses in with watercolour paint. I then stamped out my cute snails using the Snail Mail Stamp Set and Coordinating Dies. I coloured the snails and other accessories in with my copic markers. (Copic markers are listed on the screen of the video tutorial).


I also wanted to add a frame to my card and I used the Smile Inverted Scallop Frames Die. I used a pretty pink card to die cut my frame and I trimmed away the edges. I applied some foam tape to my frame and adhered this onto my card. I added all my images and then used a sentiment from the Brighter Days Sentiment Cards


I love how my card turned out I think it looks really bright and colourful. I hope you give the resist embossing technique a try it’s really fun to do and makes a watercolour background more fun. 

You can save 10% off your Time For Tea Designs purchases using the code: T4TVICKI10 at the checkout and this also includes new release products too. 

Thank you so much for stopping by today!

Hugs

Vic

Monday, 5 July 2021

CAS new home card

Hello tea timers! 

It is DT Natalia back with you today! I have a card that was inspired by the CAS queen - yes, Cathy Zielske

How do you feel about CAS cards? I love seeing them but I sometimes struggle to keep it minimal. I do however want to try and make more of them! 

I chose to feature the Hillside Village stamp and die set. I love house stamps, and this was perfect for this technique. 

I started off by making a rainbow coloured panel with some Izink Spray inks. I bought these long ago and haven’t used them much, but they really are lovely to make backgrounds. I sprayed a bit of each colour onto some watercolour cardstock and then sprayed Perfect Pearls water onto it so the colours move nicely. The Perfect Pearls water gives it a beautiful shimmery effect which is hard to capture on pictures! 

I then stamped the houses stamp from the Hillside Village set and used white WOW embossing powder with it and then cut out the houses silhouette with the coordinating die


To give the background some interest, I used the chic chevron stencil to do some dry embossing on a white panel which was cut to 3.75x4.75” - this is a great technique to give your cards some dimension! 


I put it all together and used a sentiment from the Brighter Days Sentiment Cards. I used a few sequins and gems from my little things from Lucy to finish it off. 

I am hoping this inspire you to try something simple today! I would love to see your creations if you do so please do let me know, either on Instagram or the Time for Tea Designs friends page!

If you head over to the Time for Tea shop, and fancy treating yourself, you can get a 10% discount by using the code T4TNEILA10

Sending hugs,

Natalia


Friday, 2 July 2021

Take the Scenic Route


Happy Friday, DT Annalisa here. The heat and humidity where I am have been brutal lately, so for this week's Time For Tea Designs card, I decided that these two critters should go for a drive with the top down to cool off.

To create this card I used the Hillside Village, Car Critters, Be Kind Be You and Treat Yourself stamp sets.


I stamped the houses onto some white card stock, which I cut to be 8 1/4 by 3 1/4. While the ink was still wet, I stamped the image onto some masking paper and then fussy cut it out. I masked the houses and then stamped the trees on top of them. I stamped the birds, sun and cloud onto the slimline background. Next, I stamped the sentiment from the Be Kind Be You sentiment stamp set. Once the background stamping was complete, I coloured the scene in with my Copic markers.


Next, I stamped the mouse, masked him out and stamped the car and bunny on top. I coloured the trio with my Copics and then fussy cut them out. To cut out my slider, I used the coordinating die set from the Hooray Hamsters stamp set.

I assembled the interactive element and then placed it down onto some blue card stock, cut to 8 1/2 by 3 1/2. There is a great video by Jo over on YouTube showing how to make the interactive element with a hamster. This car doesn't spin around (thankfully!), but the principle is the same.

I hope you like this card and would love it if you could use T4TANNALISA10 for 10% off your order the next time you purchase anything from Time For Tea Designs.


Thursday, 1 July 2021

Sending you hugs

 Hello crafty friends! Silvia's back today with a cute slimline card.

I started die cutting two white panel with the biggest scallop die from the "Slimline Scallop Nesting" die set and I ink blended the one of them with salvaged patina Distress Oxide ink.

I then die cut a hillside and two grassy borders with the "Slimline Hillside Scene"die set and I ink blended them with a combination of Distress Oxide inks in green tones.

I stamped images from the "Hillside Village",  "You Got Mail" and "Paper Plane Pals" stamp sets, I colored them with alcohol markers and I cut them with coordinating dies (here and here).

For the sentiment I die cut the word "hugs" three time with the "Hugs Sentiment" die and I glued one above the other to get a bit of dimension.

I put everything together and that's my card.


I hope you like it and don't forget you can get a 10% off your Time for Tea Designs order with my code, T4TSILVIA10.

Thank you for passing by and having an amazing day. Hugs, Silvia.

Other Posts You Might Like