Hello everyone & Happy Christmas Eve!!!
Jo here with a last, last, last minute set of cards & tags for you.
I know its super close but I am so not ready to stop making Christmas cards. I've enjoyed making them so much this year, even more so because of these fabulous stamp & die sets.
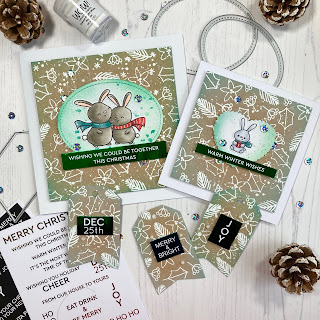
These cards were so easy the make as they just involved heat embossing onto Kraft card. The a bit of ink blending, our Cosy Winter bunnies & the fabulous Sentiment Strips which are so convenient for last minute projects like this and you're good to go.
I cut my Kraft cardstock to 5"x 5" as I am using a 6" x 6" card base. I used almost all the open line stamps from the Winter Wishes Wreath Stamp Set to stamp my images randomly in Embossing Ink.
You do have to work quickly here as the Kraft card is very absorbent & the ink does dry quickly.
Once stamped I covered with WOW Bright White Embossing Powder & heat set.
You know I love a good splatter effect & this project was no exception. I splattered white Gouache paint all over the background. This effect helps cover any issues with your heat embossing too as it creates a snowy layer.
I die cut an Oval from our Oval Scalloped Nesting Die set and then ink blended some Evergreen Bough & Pine Needles Distress Oxide Ink around the edges. I used these same shades to blend ink around the edges of my embossed Kraft panel.
I also splattered the background of my oval with the watered down Distress Oxide Inks.
I had a scalloped heart left over from another project which worked perfectly on the smaller version of the card. This is a 5" x 5" card base so the Kraft Panel is 4"x4".
I used the small bunny for the image & placed on the centre of the heart.
To finish off I used the Sentiment Strips which I had previously foiled with Green Foil in my Minc Hot Foiling Machine. I love these strips and they look extra awesome in foil!!
Some silver sequins add just the right amount of bling.
I loved this technique so much I thought it would be perfect for some simple gift tags too! I think they look so elegant and wintery.
All I needed here was to cut my tag using the largest Tag in the Zig Zag Frame & Tag Die Set. I used the same stamping, embossing and ink blending as I did with the cards. I then added my sentiment with some foam tape.
I thought is was really fun to use the sentiment that was typed down the page for the Tag as it was the perfect size. I also added some Nuvo Glitter Drops rather than sequins as I felt that a. they looked like snow, but b. they also are not about to drop off when being transported with the Gift.
I love how this set turned out. It really gives me winter, Christmassy feels and was pretty simple to reproduce.
I hope you enjoyed the cards today. An alternative to this would be to heat emboss onto white card stock and then ink blend rainbow colours over the top to give a totally different feel. I think that would look so much fun. Let me know what you think in the comments. How would you adapt this design for different occasions?
The details of the products I used are below.
Happy Christmas & stay safe
xoxo


No comments:
Post a Comment
Thank you for leaving a comment, it really does brighten my day!