
Hey Tea-Timers! I know we’re all tightening our purse strings at the moment, so I thought I’d look at a simple way of stretching your supplies! For today’s card, I’ve used just one stamp set and one die set, and also made use of my card scraps!
Here’s what you’ll need:
- · Ocean Waves dies (but you could also use the Landscape Edge Standalone dies)
- · Get Whale Soon stamp set
- · Scraps of coloured card in different shades of blue (or if you don’t have much coloured cardstock, use white cardstock and ink blend over it with blue shades to create your own)
- · Pale blue ink (I think I used tumbled glass distress oxide) and a blender brush or other ink blending tool
- · White embossing powder, embossing ink and a heat tool (if you don’t have these, you could just stamp your sentiment in white ink)
- · Copic markers (you can use whatever your preferred colouring medium is)
- · Shimmer spray (the Silver Sparkle colour that I used is currently sold out but you could use Aquatini or Winter Frost instead) (optional)
- · Slimline card base
- · White gel pen and silver pen (optional)

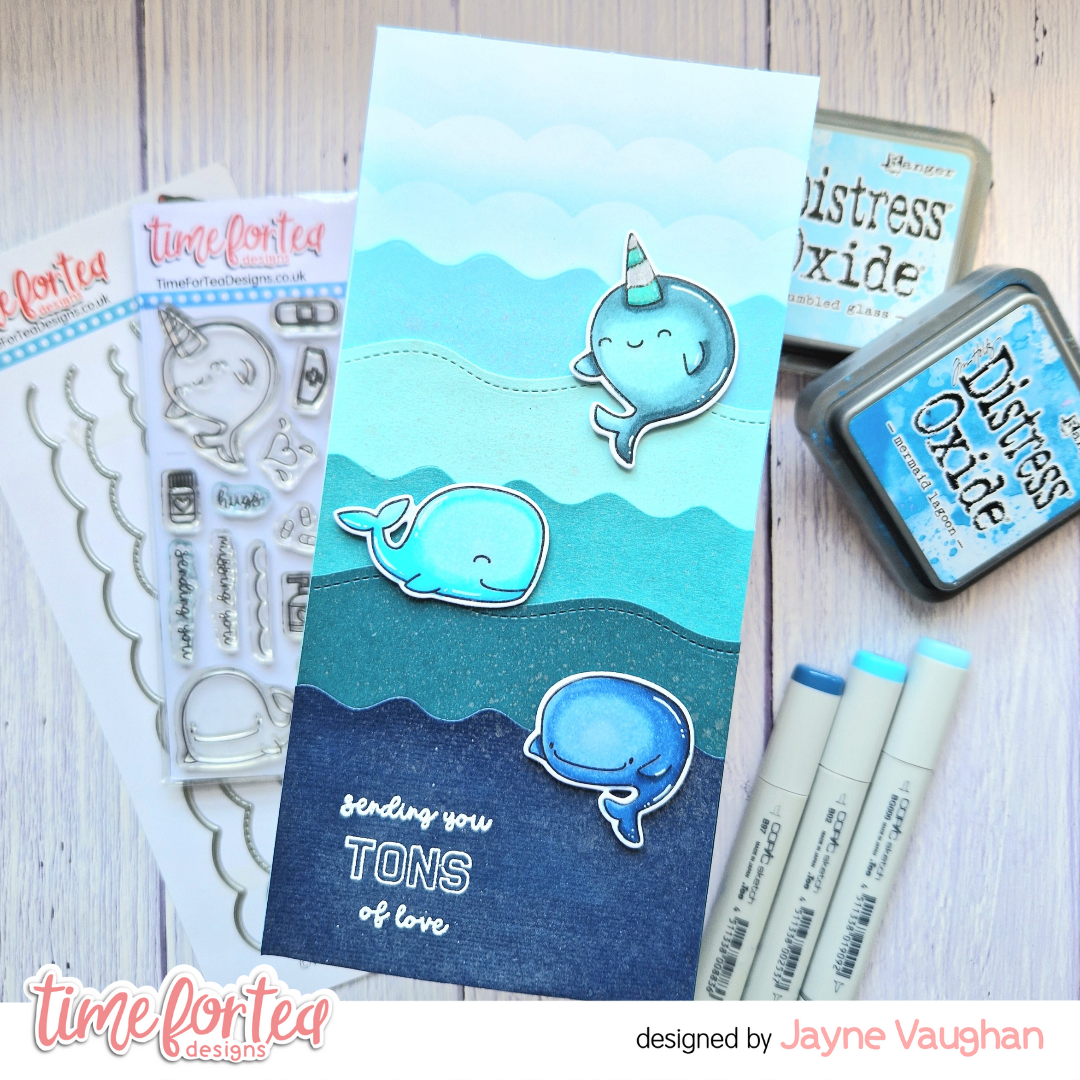
- 1. Stamp, colour and die-cut (or fussy cut) three of the whales from the Get Whale Soon stamp set. I used a white gel pen for highlights, and a silver pen for the horn on the narwhal, but you can skip this step if you want to!
- 2. The Copic colours I used for the whales were:
- a. Narwhal: BG57, BG13, BG10. Horn: BG13, BG18, silver pen
- b. Whale 1: B02, B01, B00, B000
- c. Whale 2: B28, B24, B21
- 3. Use the die that looks a bit like fluffy clouds from the Ocean Waves die set to die cut a piece of scrap card. Using the die cut as a stencil, place it along the top of your slimline card, and ink blend some light blue over the edge of the stencil on to the card. Shift the stencil down, and repeat, two or three times.
- 4. Using some of the other dies from the set, die cut various scraps of card that are the same width as your slimline card (this is usually around 3.5”). You want to die cut them along the top edge, creating lots of waves that we’ll layer up to make our sea.
- 5. Layer your wavey die-cuts together – use liquid glue or tape runner so we’re not adding too much bulk to the card. I started with my darkest colour at the bottom and trimmed it to be around 2 inches tall, then worked my way up to the lightest colour at the top. Each time, I would glue the next colour behind the previous one, so that around an inch of each colour showed. I used five colours in total, so my waves were around 6 inches tall – leaving enough space for our stencilled sky to show above the top.
- 6. Prep your card for embossing by dusting over some embossing powder. I laid out my sentiments in the bottom left corner, then stamped them in embossing ink, added Super Bright White embossing powder (from Wow! Embossing) and heat set.
- 7. Glue the waves on to the card base, and spray with shimmer spray.
- 8. Add the whales with foam tape.
I love how fun and sparkly this card is (and it’s also
perfect for male recipients, too!).
Hope you have a wonderful, crafty day!
Jayne


No comments:
Post a Comment
Thank you for leaving a comment, it really does brighten my day!