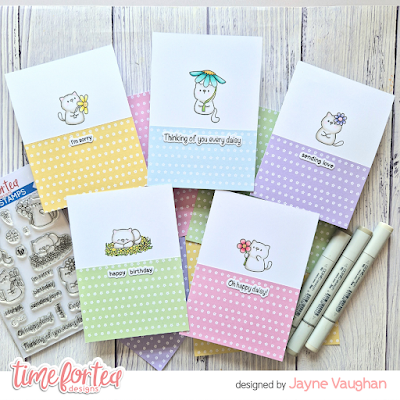
Hey Tea-Timers! It's the first of the month, which means it's time for another Step by Step tutorial. This month, I have a really easy project for you, which is precisely the beauty of it!
This month. we're going to make some notecard sets! Perfect for when you need a handmade gift, or maybe you want to donate a prize to a charity auction... the key is to keep it simple, and co-ordinated.
Supplies:
- Oops a Daisy stamp & die set
- Colouring medium of your choice (I used Copics)
- White card blanks
- Tape runner or liquid glue
- Black ink
Instructions
1. Prepare five card fronts. I made A2 cards, so I cut 5 panels of white card down to 5.5 x 4.25".
2. On each card front, stamp out one of the cats from the Oops a Daisy stamp set using blank ink (Copic-friendly ink, if you'll be colouring with alcohol markers).
3. Choose five co-ordinating patterned papers from the Pretty Pastels paper pad. I chose each of the colours in the floral pattern.
4. Adhere the patterned paper below where your cat is stamped, and trim to fit the panel. I used tape runner rather than liquid glue, to avoid any warping.
5. Colour your cat in shades that match the patterned paper on that card. The colours I used are listed below:
Cats - W5/W3/W1/W0, RV000
Blue card: BG49/BG23/BG10, Y38/Y15/Y11/E17, YG07/YG03/YG21
Pink card: RV14/RV13/RV11, Y11/Y23/E17, YG07/YG03/YG21
Yellow card: YG21/YG23, Y02/E31, YG07/YG03
Purple card: BV04/BV02/BV01, RV10/RV11
Green card: YG23/YG21, Y15/Y02, YG03
6. Stamp and die cut five of the sentiments from the Oops a Daisy stamp set, and adhere one each to your card panels with tape runner or liquid glue.
7. Add your card panels to card blanks, and you're done - a set of co-ordinating cards that would make a lovely handmade gift for anyone!
There are plenty of patterned paper pads in the T4T shop to choose from, but I think the following would make particularly sweet co-ordinating sets:
And if you don't have / don't fancy patterned paper, how about masking off your card half way down, and stencilling the bottom half? You could use the same stencil for each one, but in different colours. I think these would work really well:
And as for stamps - well, the world is your oyster, there's so many to choose from! But the ones that spring to mind for me would be:
- Workout Pigs (these are in the sale)
- All Occasion Critters (also in the sale!)
I hope that gives you some inspiration, and I'd love to see what you make! Please do tag me / T4T in your projects!
And don't forget that discount code T4TJAYNE10 will get you 10% off your purchase!
Until next month - happy crafting!


No comments:
Post a Comment
Thank you for leaving a comment, it really does brighten my day!