

Hi crafty friends!! It's Amanda here sharing a really fun scene card with you today! Today, I'm going to share my tips and tricks on how I create an entire scene in one A2 card!
When I create a scene card, I like to leave a white 1/8" border around the entire edge of my card. This helps frame the scene in. So, I plan my scene on a piece of white cardstock that is 4" x 5.25".
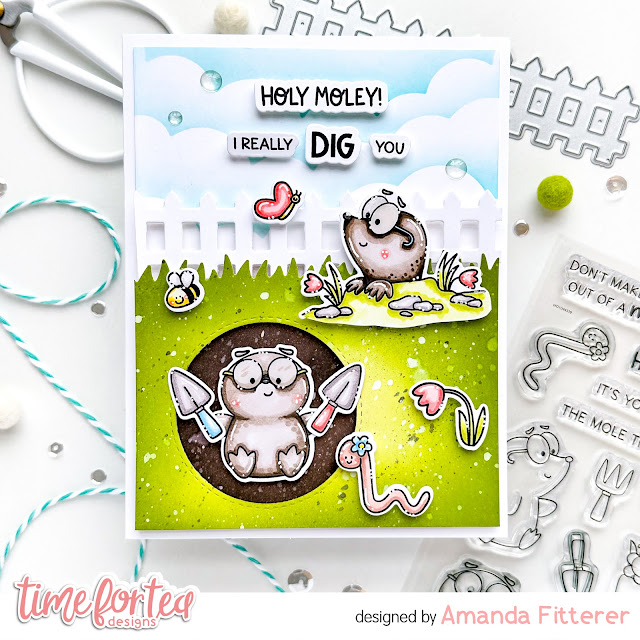
First, I am going to work on my foreground. My foreground will appear closer to the viewer. To do that, I'm going to prop it up with foam tape.
I am trimming a piece of white cardstock to 4"x 3". Then, I am ink blending it with Catherine Pooler's Melon Ice and Martini inks, concentrating the lighter color in the center and the darker color on the edges.
Next, I'm using a circle die to cut out my hole and the Landscape Edge Standalone Dies for the grass. I've also cut a fence using the Fenced In Dies.

Now, I'm planning my background! This will appear farthest away from the viewer.
I'm taking a piece of white cardstock trimmed to 4.25"x5.5. I'm creating some clouds using Cummerbund ink and a cloud stencil. The Scene Builder Stencil has some clouds you can use!
On the bottom of the card, I'm blending the "inside" of my hole with Sand Castle and S'mores. Once I'm done ink blending, I'm trimming the panel down to 4"x5.25".

Now, we're going to add our focal images! I've stamped my images from the I Really Dig You stamp set and then colored them with alcohol markers. I've die cut the little guys out and used scissors to trim the grass down. To make their glasses look more realistic, I'm adding Glossy Accents to them and then will allow them to dry!

Now, I can stamp my sentiments and die cut them out with the coordinating dies!

Now, that we have all the elements ready to go, we can assemble the scene!
First, I'm going to adhere my background panel onto the A2 card base by using liquid glue. This gives me some wiggle room in case I don't place it perfectly.
Next, I'm going to place foam tape all along the back of my grass and my fence. Then, I will adhere my grass first, then the fence (behind the grass).
Then, we'll put foam squares behind all our stamped images. This gives another layer of dimension!


Lastly, I've added a few Clear Bubbles Enamel Dots for just a bit more excitement!

That's it! Such a fun and dimensional scene card! I hope you enjoyed this post and I hope you find some time to get crafty today!!
Xx, Amanda


No comments:
Post a Comment
Thank you for leaving a comment, it really does brighten my day!